Painting Formica Cabinet Doors: A Simple Guide To Home Improvement
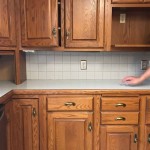
Formica cabinets, a common feature in many homes, particularly those built in the mid-20th century, offer durability and affordability. However, their appearance can often become outdated or simply fail to align with evolving aesthetic preferences. Rather than undertaking a complete kitchen or bathroom renovation, painting Formica cabinet doors presents a cost-effective and manageable solution for updating the overall look of a space. This guide provides a detailed explanation of the process involved in painting Formica cabinet doors, outlining the necessary steps and materials for achieving a professional-looking finish.
The key to successfully painting Formica lies in proper preparation. Formica, a laminate material, possesses a smooth, non-porous surface that paint struggles to adhere to. Without meticulous preparation, the paint is likely to chip, peel, or scratch easily, negating the time and effort invested in the project. The following sections will meticulously outline each step, from gathering the required materials to applying the final coat of paint, ensuring a durable and aesthetically pleasing result.
Gathering the Necessary Materials
Before commencing the painting process, it is crucial to assemble all the required materials. Having everything readily available streamlines the workflow and minimizes potential disruptions. The following is an enumerated list of essential supplies:
- Cleaning Supplies: This includes degreasing cleaner (such as TSP or a dedicated kitchen cleaner), clean cloths or sponges, and a bucket of warm water. Thorough cleaning removes grease, dirt, and grime that can impede paint adhesion.
- Sandpaper: Two grades of sandpaper are required: a coarse grit (around 120-grit) for initial scuff sanding and a fine grit (around 220-grit) for smoothing between coats of primer and paint. Sanding roughens the Formica surface, creating "tooth" for the primer and paint to grip onto.
- Tack Cloth: Tack cloths are sticky cloths designed to remove dust and debris after sanding. This ensures a clean surface for optimal paint adhesion.
- Primer: An adhesion-promoting primer specifically designed for laminate surfaces is essential. These primers contain chemicals that bond effectively to the Formica and provide a stable base for the paint. Epoxy primers are often recommended for their superior adhesion properties.
- Paint: Choose a high-quality paint formulated for cabinets and interior use. Acrylic latex or alkyd (oil-based) paints are common choices. Acrylic latex paints are water-based, low in VOCs, and easy to clean up, while alkyd paints offer a harder, more durable finish but require mineral spirits for cleanup.
- Paintbrushes and Rollers: High-quality paintbrushes and rollers are crucial for achieving a smooth, even finish. Opt for brushes with synthetic bristles for latex paints and natural bristles for alkyd paints. Use a low-nap roller for a smooth, professional look.
- Paint Tray and Liners: A paint tray with disposable liners simplifies paint application and makes cleanup easier.
- Painter's Tape: Painter's tape is used to protect adjacent surfaces, such as walls, countertops, and drawer interiors, from paint splatters and drips.
- Drop Cloths: Drop cloths protect flooring and other surfaces from paint spills.
- Screwdriver or Drill: These tools are necessary for removing cabinet doors from their hinges and removing hardware (knobs, pulls, hinges).
- Protective Gear: Safety glasses, gloves, and a respirator or dust mask are essential for protecting eyes, skin, and lungs from dust and fumes.
- Work Table: A stable work table provides a convenient surface for painting the cabinet doors.
Preparing the Formica Cabinet Doors
Proper preparation is paramount to achieving a successful and long-lasting paint job. This stage involves several crucial steps, each contributing to the overall adhesion and appearance of the finished product.
1. Removal of Cabinet Doors and Hardware: Begin by carefully removing the cabinet doors from their hinges using a screwdriver or drill. Label each door and its corresponding hinge location to ensure proper reinstallation. Remove all hardware, including knobs, pulls, and hinges. Store the hardware in a safe place to prevent loss or damage. If desired, this presents an excellent opportunity to replace outdated hardware with new options, further enhancing the updated aesthetic.
2. Thorough Cleaning: Clean the cabinet doors thoroughly with a degreasing cleaner, such as TSP (trisodium phosphate) or a dedicated kitchen cleaner. Follow the manufacturer's instructions for dilution and application. Use a clean cloth or sponge to scrub the surfaces, removing all traces of grease, dirt, and grime. Rinse thoroughly with clean water and allow the doors to dry completely. This step is crucial, as any remaining contaminants can interfere with paint adhesion.
3. Sanding the Surface: Use a coarse-grit sandpaper (around 120-grit) to lightly sand the Formica surface. The goal is not to remove the Formica entirely but to create a slightly roughened surface that will allow the primer to adhere effectively. Apply even pressure and avoid sanding too aggressively, which can damage the laminate. Focus on scuff sanding the entire surface, paying particular attention to edges and corners. After sanding, thoroughly remove all sanding dust with a tack cloth. This is essential for a smooth and flawless finish.
4. Masking: Use painter's tape to carefully mask off any areas that should not be painted, such as the inside edges of the doors or adjacent surfaces. This ensures clean, crisp lines and prevents unwanted paint splatters. Press the tape firmly to ensure a good seal and prevent paint from bleeding underneath.
Applying Primer and Paint
With the cabinet doors properly prepared, the next step involves applying primer and paint. This stage requires patience and attention to detail to achieve a professional-looking finish.
1. Applying Primer: Apply a thin, even coat of adhesion-promoting primer to the Formica surface using a high-quality paintbrush or roller. Follow the manufacturer's instructions regarding application techniques and drying times. Ensure that the primer is specifically designed for laminate surfaces. Epoxy primers are often preferred for their superior adhesion and durability. Allow the primer to dry completely according to the manufacturer's recommendations. This may take several hours or even overnight. Once the primer is dry, lightly sand the surface with fine-grit sandpaper (around 220-grit) to smooth out any imperfections and create an even surface for the paint. Remove all sanding dust with a tack cloth.
2. Applying Paint: Once the primer is dry and sanded, apply the first coat of paint. Use a high-quality paintbrush or roller to apply a thin, even coat of paint to the Formica surface. Avoid applying too much paint at once, as this can lead to drips and runs. Work in long, smooth strokes, overlapping each stroke slightly to ensure complete coverage. Allow the first coat of paint to dry completely according to the manufacturer's instructions. This may take several hours or even overnight.
3. Applying Additional Coats of Paint: After the first coat of paint is dry, lightly sand the surface with fine-grit sandpaper (around 220-grit) to smooth out any imperfections and create an even surface for the subsequent coat. Remove all sanding dust with a tack cloth. Apply a second coat of paint, using the same techniques as before. Multiple thin coats are preferable to one thick coat, as they result in a more durable and professional-looking finish. Depending on the color and coverage of the paint, a third coat may be necessary. Allow each coat of paint to dry completely before sanding and applying the next coat.
4. Removing Painter's Tape: Once the final coat of paint is dry to the touch, carefully remove the painter's tape. Pull the tape away from the painted surface at a 45-degree angle to avoid chipping or peeling the paint. If any paint has bled underneath the tape, use a utility knife to carefully score the paint line before removing the tape. This will help prevent the paint from chipping.
5. Reinstalling Hardware and Cabinet Doors: After the paint has completely cured (typically 24-72 hours), reinstall the hardware (knobs, pulls, and hinges). Carefully reattach the cabinet doors to their corresponding hinges, ensuring that they are properly aligned and secured. Test the doors to ensure that they open and close smoothly. If necessary, adjust the hinges to achieve proper alignment.
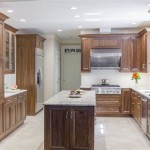
By following these detailed instructions, homeowners can successfully paint Formica cabinet doors and achieve a professional-looking finish. This cost-effective home improvement project can dramatically update the look of a kitchen or bathroom, enhancing its aesthetic appeal and increasing its overall value. Careful preparation, the use of high-quality materials, and attention to detail are essential for achieving durable and visually pleasing results.

How To Paint Laminate Cabinets Everything You Need Know

How To Paint Laminate Cabinets Without Sanding The Palette Muse

How To Paint Laminate Cabinets Without Sanding The Palette Muse

How To Add Trim And Paint Your Laminate Cabinets

How To Paint Laminate Kitchen Cabinets Perfect Finish Tips

How To Add Trim And Paint Your Laminate Cabinets

Painted Kitchen Cabinets One Year Later The Palette Muse

Painted Laminate Kitchen Cabinets

Budget Kitchen Renovation With Diy Shaker Painted Cabinets I

How To Paint Kitchen Cabinets Without Sanding Or Priming
Related Posts