```html
Optimizing Your Kitchen With Range Hood Under Cabinets Installation
A well-ventilated kitchen is crucial for maintaining a healthy and comfortable home environment. Cooking activities release grease, smoke, odors, and fumes, which, if left unchecked, can lead to respiratory problems, damage to kitchen surfaces, and lingering unpleasant smells. The installation of a range hood, particularly an under-cabinet model, is a practical solution to mitigate these issues. Under-cabinet range hoods offer a blend of functionality, space-saving design, and relative ease of installation, making them a popular choice for both new constructions and kitchen renovations. This article explores the benefits of under-cabinet range hoods, the factors to consider during the selection process, and the steps involved in ensuring a proper and efficient installation.
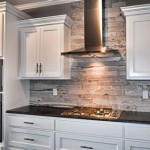
Under-cabinet range hoods are designed to be mounted directly beneath the kitchen cabinets above the cooking range or stovetop. This placement maximizes available space, especially in kitchens with limited square footage. Unlike chimney-style or downdraft range hoods, under-cabinet models don't require extensive ductwork modifications or floor space occupancy. They effectively capture airborne contaminants at the source, maintaining cleaner air quality and reducing the build-up of grease and grime on surrounding surfaces. Moreover, many under-cabinet range hoods come equipped with features such as adjustable fan speeds, integrated lighting, and dishwasher-safe filters, enhancing both usability and convenience.
Key Considerations Before Installation
Prior to installing an under-cabinet range hood, careful planning and assessment are essential to ensure optimal performance and safety. Several factors need to be considered, including the range hood's size, ventilation type, CFM rating, electrical requirements, and compatibility with existing kitchen cabinetry.
The size of the range hood should correspond to the width of the stovetop or range. Ideally, the range hood should be at least as wide as the cooking surface to effectively capture all rising fumes. Overhanging the stovetop by a few inches on each side can further improve its capture efficiency. Measuring the available space under the cabinets is also crucial to ensure that the chosen range hood will fit properly without any obstructions.
Ventilation type is another critical factor. Under-cabinet range hoods are available in ducted and ductless configurations. Ducted range hoods exhaust air outside the home through ductwork, providing the most effective removal of smoke, grease, and odors. Ductless range hoods, on the other hand, recirculate the air through filters, typically charcoal filters, to remove contaminants before releasing it back into the kitchen. While ductless models are easier to install, they are generally less effective at removing all pollutants and require more frequent filter replacements.
CFM, or cubic feet per minute, measures the volume of air a range hood can move. A higher CFM rating indicates a more powerful ventilation system. The appropriate CFM rating depends on the type of cooking and the size of the kitchen. For gas ranges, a general guideline is to have at least 100 CFM for every 10,000 BTUs (British Thermal Units) of burner output. For electric ranges, a CFM rating of 100 CFM per linear foot of range width is often recommended. Consult local building codes and manufacturer specifications for specific requirements.
Electrical requirements must also be considered. Most under-cabinet range hoods require a standard 120V electrical outlet. Ensure that there is a readily accessible outlet near the installation location, or plan to have one installed by a qualified electrician. Check the range hood's power consumption to ensure that the electrical circuit can handle the load without overloading.
Finally, assess the compatibility of the range hood with the existing kitchen cabinetry. Check for any obstructions, such as light fixtures or decorative trim, that may interfere with the installation. Some under-cabinet range hoods require specific mounting hardware or modifications to the cabinets. Consult the range hood's installation manual for detailed instructions and recommendations.
Step-by-Step Installation Guide
Installing an under-cabinet range hood is a manageable project for homeowners with basic handyman skills. However, for complex installations or if unsure about any aspect of the process, it is always recommended to consult a qualified professional. The following steps provide a general guideline for installing an under-cabinet range hood:
1. Preparation: Begin by gathering all necessary tools and materials. This typically includes a drill, screwdriver, level, measuring tape, pencil, safety glasses, gloves, duct tape (for ducted models), and the range hood installation kit. Turn off the power to the circuit breaker that supplies the electrical outlet near the installation location. This is a crucial safety precaution to prevent electrical shock.
2. Remove the Existing Range Hood (If Applicable): If replacing an existing range hood, carefully disconnect the electrical wiring and detach the old unit from the cabinet. Ensure that the gas supply to the range is also turned off if working near gas lines. Dispose of the old range hood according to local regulations.
3. Mark the Mounting Location: Using the range hood's installation template or the range hood itself, mark the mounting location on the underside of the cabinet. Ensure that the range hood is centered over the stovetop and that it is level. Use a level to verify accuracy. The installation template typically indicates the locations for mounting screws, electrical wiring, and ductwork (for ducted models).
4. Drill Pilot Holes: Drill pilot holes at the marked locations to facilitate the installation of mounting screws. The size of the pilot holes should be slightly smaller than the diameter of the screws to ensure a secure fit. Be careful not to drill through the cabinet completely.
5. Install the Range Hood: Carefully lift the range hood into position and align it with the pilot holes. Secure the range hood to the cabinet using the provided mounting screws. Tighten the screws gradually to ensure that the range hood remains level and flush against the cabinet. Avoid overtightening the screws, which can damage the cabinet or the range hood.
6. Connect the Electrical Wiring: Connect the range hood's electrical wiring to the existing electrical outlet. Typically, this involves connecting the black (hot) wire, the white (neutral) wire, and the green (ground) wire. Use wire connectors to ensure a secure and safe connection. Follow the manufacturer's instructions and local electrical codes carefully. If unsure about the electrical connections, consult a qualified electrician.
7. Install Ductwork (For Ducted Models): If installing a ducted range hood, connect the ductwork to the range hood's exhaust outlet and to the exterior vent. Use duct tape to seal all connections and prevent air leaks. Ensure that the ductwork is properly supported and that it does not create sharp bends that could restrict airflow. The ductwork should exhaust air to the outside of the house, away from windows, doors, and other openings.
8. Install Filters: Install the grease filters and charcoal filters (if applicable) according to the manufacturer's instructions. Grease filters are typically made of metal mesh and are designed to trap grease particles. Charcoal filters are used in ductless range hoods to remove odors and other contaminants.
9. Test the Range Hood: Restore power to the circuit breaker and test the range hood. Verify that the fan operates at all speed settings and that the lights are functioning properly. Check for any unusual noises or vibrations. If any issues are detected, consult the troubleshooting section of the installation manual or contact the manufacturer.
Maintaining Your Under-Cabinet Range Hood
Regular maintenance is essential to ensure the optimal performance and longevity of your under-cabinet range hood. Simple maintenance tasks, such as cleaning the filters and wiping down the exterior, can help to prevent the build-up of grease and grime and maintain its efficiency.
Grease filters should be cleaned regularly, typically every one to three months, depending on the frequency of cooking. Most grease filters are dishwasher-safe and can be easily cleaned in a dishwasher. Alternatively, they can be cleaned by hand using hot soapy water and a brush. Ensure that the filters are completely dry before reinstalling them.
Charcoal filters, used in ductless range hoods, should be replaced periodically, typically every three to six months, depending on usage. Charcoal filters cannot be cleaned and must be replaced when they become saturated with contaminants. Check the manufacturer's recommendations for the appropriate replacement schedule.
The exterior of the range hood should be cleaned regularly to remove grease, dust, and other debris. Use a mild detergent and a soft cloth to wipe down the surfaces. Avoid using abrasive cleaners or scouring pads, which can damage the finish. Stainless steel range hoods can be cleaned with a stainless steel cleaner to maintain their shine.
```
Kitchen Range Hood Ideas The Ultimate Guide

Range Hood Mn Plumbing Home Services

How To Find A Contractor Install Range Hood

Range Hood Insert Buyer S Guide

Range Hood Installation Logistics Planning And Execution My Old House Fix

Choosing The Perfect Range Hood Everything You Need To Know

Kitchen Range Hood Ideas The Ultimate Guide

Kitchen Range Hood Ideas The Ultimate Guide

Kitchen Range Hood Ideas The Ultimate Guide

How To Optimize Kitchen Work Triangle S Storage
Related Posts