Cabinet Installation Guide: 1300 Series A2
Welcome! This comprehensive guide will smoothly guide you through the installation process of your 1300 Series A2 cabinets. Whether you're a seasoned DIY enthusiast or tackling your first cabinetry project, we're here to help. Let's get started! ### Tools and Supplies: Gather the necessary tools and supplies to ensure a seamless installation: -Screwdriver:
A Phillips head screwdriver is essential for assembly. -Drill:
A power drill with a drill bit will be needed for certain steps. -Measuring Tape:
Ensure precise measurements for accurate cabinet placement. -Level:
A carpenter's level helps align cabinets horizontally and vertically. -Pencil:
Mark measurements and guidelines for drilling and assembly. -Safety Goggles:
Protect your eyes during drilling and assembly. -Clamps:
Secure cabinets during assembly and installation. -Wood Glue:
Bond cabinet parts and provide additional stability. -Mounting Brackets:
Attach cabinets securely to the wall. -Cabinet Knobs/Pulls:
Enhance the look and functionality of your cabinets. ### Preparing Your Cabinets: 1.Inspect Cabinets:
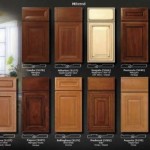
Examine your cabinets for any damage or defects before starting installation. 2.Sort Cabinets:
Group cabinets based on their size and purpose (upper cabinets, lower cabinets, corner units, etc.). 3.Label Cabinets:
If necessary, label each cabinet with its intended location to avoid confusion during assembly. ### Assembling Your Cabinets: 1.Lay Out Cabinets:
Arrange the cabinets in the desired layout on a flat surface. 2.Attach Cabinet Sides:
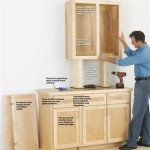
Begin by attaching cabinet sides using wood glue and screws. Ensure alignment and secure joints. 3.Install Back Panels:
Secure back panels to the cabinet frame using screws or nails. 4.Attach Shelves:
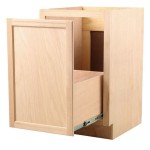
Position shelves at desired heights and secure them with shelf pins or supports. 5.Install Doors and Drawers:
Carefully align and attach doors and drawers to the cabinet frames. Ensure proper alignment and smooth operation. ### Installing Wall Cabinets: 1.Mark Wall Studs:
Locate and mark wall studs using a stud finder. 2.Attach Mounting Brackets:
Align mounting brackets with wall studs and secure them using screws. 3.Hang Cabinets:
Carefully lift cabinets and align them with the mounting brackets. Secure cabinets to the wall using screws. 4.Level Cabinets:
Use a level to ensure cabinets are perfectly horizontal and vertically aligned. ### Installing Base Cabinets: 1.Mark Cabinet Locations:
Measure and mark the desired location of base cabinets on the floor. 2.Level the Floor:
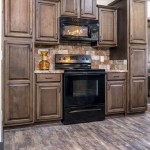
Ensure the floor is level, or use shims to level the cabinets. 3.Install Base Cabinets:
Position base cabinets in their designated locations. Secure them to the floor using screws. 4.Attach Cabinets:
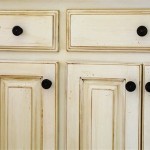
Join base cabinets by securing them with screws or cabinet connectors. ### Finishing Touches: 1.Install Cabinet Hardware:
Add cabinet knobs or pulls to complete the look and enhance functionality. 2.Caulk Seams:
Apply caulk to the joints between cabinets and countertops to prevent moisture damage. 3.Clean Cabinets:
Wipe down cabinets with a damp cloth to remove any residue or dust. ### Troubleshooting: 1.Cabinet Doors Not Closing Properly:
Adjust cabinet hinges to ensure proper alignment and smooth operation. 2.Drawers Not Opening or Closing Smoothly:
Check drawer glides for proper installation and lubrication. 3.Uneven Cabinet Alignment:
Use shims or levelers to adjust cabinet positions for a uniform appearance. ### Safety Precautions: - Always wear safety goggles when drilling or using power tools. - Ensure a stable and level work surface for assembly and installation. - Lift cabinets carefully to avoid injury. - If uncertain about electrical or plumbing connections, consult a qualified professional. Remember, patience, precision, and attention to detail are key! If you encounter any difficulties during installation, don't hesitate to consult the manufacturer's instructions or seek professional assistance. We hope this guide empowers you to create a stunning and functional cabinetry system in your home. Happy installing!
Cabinet Installation 1300 Series A2 Class Ii Type Biological Safety

Cabinet Installation 1300 Series A2 Class Ii Type Biological Safety

Thermo Scientific 1300 Series Class Ii Type A2 Biological Safety Cabinet Elokarsa

Biosafety Cabinets Biological Safety Cabinet Class Ii A2 Type Manufacturer From Navi Mumbai

Thermo Scientific 1300 Series A2 Community Manuals And Specifications Labwrench

1300 Series Class Ii Type A2 Biological Safety Cabinet Packages Kochin Inlab Equipments Pvt Ltd

Box To Bench Thermo Scientific 1300 Series Class Ii Type A2 Biological Safety Cabinet Installation

1300 Series A2 Bsc Operating Manual

Thermo Biosafety Cabinet 1300 Class Ii A2 2024 With Warranty Labx Com

Thermo 1300 Series A2 4 Feet Biological Safety Cabinet At Rs 500000 In Aurangabad
Related Posts