Cabinet Hardware Installation Guide: Essential Aspects for a Professional Finish
Cabinet hardware adds both functionality and aesthetic appeal to your cabinetry. Installing it correctly ensures seamless operation and enhances the overall look of your space. Here's a comprehensive guide to help you achieve a professional-looking installation:
1. Gather Your Supplies
Before you begin, assemble the necessary supplies:
- Cabinet hardware (knobs/pulls)
- Screwdriver (Phillips or flathead, depending on hardware)
- Measuring tape
- Level
- Drill (for hole drilling, if required)
- Screws or mounting bolts (should come with hardware)
- Pencil or marking tool
2. Determine Placement
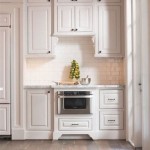
The placement of cabinet hardware affects both aesthetics and functionality. For drawer knobs, position them centered on the drawer front, about 2 to 3 inches from the top and bottom edges. For cabinet pulls, space them evenly apart, typically 6 to 8 inches between the centers of the pulls. Use a level to ensure they are aligned horizontally and vertically.
3. Mark and Drill Pilot Holes
Once you've determined the placement, use a pencil to mark the screw holes. For hardware that requires predrilled holes, use a drill bit slightly smaller than the screw size to create pilot holes. This helps prevent the wood from splitting and ensures a secure hold.
4. Install the Hardware
Align the hardware with the marked holes and insert the screws or mounting bolts. Tighten the screws securely using a screwdriver, but avoid overtightening. If the screws are too long, they can protrude through the back of the cabinet and damage the interior.
5. Adjust and Finalize
Once all the hardware is installed, make any necessary adjustments. Double-check the alignment and tighten any loose screws. If any hardware feels wobbly or loose, remove it and repeat the installation process with a slightly larger hole or a longer screw.
6. Clean Up
Wipe down the installed hardware with a damp cloth to remove any dust or debris. If desired, apply a small amount of lubricant to the moving parts of the hardware to ensure smooth operation.
Tips and Tricks
- Use a template to ensure precise and uniform placement of hardware.
- If drilling pilot holes, clamp a block of wood behind the drilling location to prevent tear-out.
- For heavy or oversized hardware, consider using lag bolts or molly bolts for extra support.
- Use washers or spacers to create additional space between the hardware and the cabinet door or drawer.
- If the provided screws are too long, trim them to the appropriate length before inserting them.
Conclusion
Installing cabinet hardware is a relatively straightforward process with the right tools and a bit of care. By following the steps outlined above and incorporating these tips and tricks, you can achieve a professional-looking installation that will enhance the functionality and beauty of your cabinetry for years to come.

Cabinet Hardware Installation Guide At Cabinetknob Com

The Ultimate Guide For Cabinet Hardware Placement And Sizing Kitchen Inspiration Design

Design 101 Cabinet Hardware Placement Lark Linen

Cabinet Hardware Installation Guide At Cabinetknob Com

Guide For Hardware Positioning Mockett Cabinet Placement Kitchen

Cabinet Hardware Placement Guide

How To Place Cabinet Knobs Pulls

A Designer S Guide To Hardware Placement Kitchen Cabinets Knobs And Pulls Trends

How To Install Cabinet Handles Straight Without Losing Your Mind

How To Install Handles And Knobs On Shaker Drawer Fronts True Position Tools
Related Posts