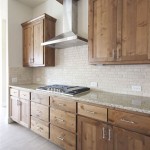
Staining Kitchen Cabinets Without Sanding: A Comprehensive Guide
Refinishing kitchen cabinets offers a cost-effective alternative to complete replacement, providing a refreshed aesthetic without the substantial expense of new cabinetry. While traditional staining methods often involve extensive sanding to prepare the surface, innovative techniques and specialized products now allow for staining kitchen cabinets with minimal or no sanding. This article details the process of staining kitchen cabinets without sanding, outlining the necessary steps, materials, and considerations for achieving a professional-looking result.
The primary advantage of avoiding sanding lies in its time-saving nature. Sanding is a labor-intensive process that generates dust and requires careful attention to detail to avoid damaging the cabinet surfaces. Removing this step significantly reduces the overall project time and minimizes disruption to the kitchen environment. Furthermore, some cabinets, particularly those with intricate detailing or thin veneer, are susceptible to damage from aggressive sanding. Staining without sanding mitigates this risk, preserving the integrity and original design of the cabinets.
Key Point 1: Surface Preparation is Paramount
Even without sanding, meticulous surface preparation remains the cornerstone of a successful staining project. The existing finish must be thoroughly cleaned and degreased to ensure proper adhesion of the new stain. Any residual grease, dirt, or wax will create a barrier, preventing the stain from penetrating the surface and resulting in an uneven or blotchy finish. A multi-step cleaning process is typically recommended to achieve optimal results.
The first step involves cleaning the cabinets with a degreasing cleaner. This is particularly important for cabinets located near the stove or sink, where grease and grime tend to accumulate. Several commercial degreasers are available, specifically formulated for kitchen applications. The cleaner should be applied according to the manufacturer's instructions, ensuring that all surfaces are thoroughly saturated. After allowing the cleaner to dwell for the recommended time, the cabinets should be wiped down with a clean, damp cloth.
Following degreasing, a more intensive cleaning solution, such as trisodium phosphate (TSP) or a TSP substitute, may be necessary to remove stubborn stains and residues. TSP is a powerful cleaner that effectively removes grease, dirt, and mildew. However, it is important to exercise caution when using TSP, as it can be harmful if ingested or comes into contact with skin or eyes. Appropriate safety precautions, including wearing gloves and eye protection, should be observed. TSP substitutes are generally considered safer and environmentally friendlier alternatives.
Regardless of the cleaning solution used, thorough rinsing is crucial. Any remaining cleaner residue can interfere with the adhesion of the stain and result in a poor finish. Rinse the cabinets multiple times with clean water, ensuring that all traces of the cleaning solution are removed. Allow the cabinets to dry completely before proceeding to the next step. Drying time can be accelerated by using a clean, dry cloth or a fan.
After cleaning and drying, a liquid deglosser or surface prep solution can be applied. These products chemically etch the existing finish, creating a slightly roughened surface that promotes adhesion of the new stain. Deglossers typically come in liquid form and are applied with a cloth or sponge. The manufacturer's instructions should be carefully followed regarding application technique and drying time.
Consideration should be given to any repairs needed. Examine the cabinets for any chips, dents, or scratches. Small imperfections can be filled with wood filler. Apply the wood filler according to the manufacturer's instructions, allowing it to dry completely before lightly sanding or scraping it flush with the surrounding surface. For larger repairs, more extensive wood repair techniques may be necessary.
Key Point 2: Selecting the Right Stain and Application Method
Choosing the appropriate stain and application method is crucial for achieving the desired aesthetic and ensuring a durable finish. Several types of stains are available, each with unique characteristics and application requirements. Gel stains and stain and sealant combinations are particularly well-suited for staining without sanding, as they are formulated to adhere to existing finishes without requiring extensive surface preparation.
Gel stains are known for their ease of application and excellent adhesion properties. Their thick, gel-like consistency allows them to cling to vertical surfaces without dripping or running, making them ideal for cabinets. Gel stains are available in a wide range of colors and can be applied with a brush, cloth, or sponge. The application method will influence the final appearance of the stain, with brushing generally resulting in a more textured finish and wiping producing a smoother, more uniform look.
Stain and sealant combinations offer the convenience of staining and sealing in a single step. These products contain both pigment and a protective topcoat, providing color and durability in one application. Stain and sealant combinations are typically applied with a brush or cloth, and multiple coats may be necessary to achieve the desired color intensity and level of protection. These products are often more expensive than traditional stains, the time savings may offset the cost.
When choosing a stain color, it is important to consider the existing color of the cabinets and the overall décor of the kitchen. If the goal is to achieve a darker finish, a darker stain color should be selected. If the goal is to lighten the cabinets, a lighter stain color may be considered, but achieving a significant color change without sanding can be challenging. In most cases, it is best to choose a stain color that is similar to or slightly darker than the existing finish.
Before applying the stain to the entire cabinet, it is recommended to test it on a small, inconspicuous area to ensure that the color and finish are satisfactory. This will also allow you to experiment with different application methods and determine the best technique for achieving the desired result. Allow the test area to dry completely before evaluating the final appearance.
The selected application method should be consistently applied across all cabinet surfaces. Whether using a brush, cloth, or sponge, maintain a uniform pressure and direction to avoid streaks or uneven color distribution. Apply the stain in thin, even coats, allowing each coat to dry completely before applying the next. Multiple thin coats are generally preferable to a single thick coat, as they result in a more even and durable finish.
Key Point 3: Protecting the Stained Surface
Once the stain has been applied and allowed to dry completely, it is essential to protect the surface with a clear topcoat. The topcoat provides a durable barrier against scratches, stains, and moisture, extending the life of the stained finish. Several types of clear topcoats are available, including polyurethane, varnish, and lacquer. The choice of topcoat will depend on the desired level of durability and aesthetic.
Polyurethane is a popular choice for kitchen cabinets due to its excellent durability and resistance to scratches, stains, and moisture. It is available in both oil-based and water-based formulations. Oil-based polyurethane provides a warmer, richer tone, but it tends to yellow over time and has a longer drying time. Water-based polyurethane is more environmentally friendly, dries faster, and does not yellow, but it may not be as durable as oil-based polyurethane.
Varnish is another durable topcoat option that offers good resistance to scratches and stains. It is available in a variety of sheens, from matte to gloss, allowing for customization of the final appearance. Varnish typically requires multiple coats for optimal protection. It tends to be less durable than polyurethane.
Lacquer is a fast-drying topcoat that provides a hard, durable finish. It is often used in professional cabinet finishing due to its ease of application and excellent leveling properties. However, lacquer is more prone to chipping and cracking than polyurethane or varnish, and it requires specialized equipment for application.
Before applying the topcoat, ensure that the stained surface is clean and free of dust or debris. Lightly sand the stained surface with fine-grit sandpaper (e.g., 320-grit) to create a smooth, even surface for the topcoat to adhere to. Remove any sanding dust with a tack cloth before proceeding.
Apply the topcoat in thin, even coats, following the manufacturer's instructions. Allow each coat to dry completely before applying the next. Multiple thin coats are generally preferable to a single thick coat, as they result in a smoother, more durable finish. Lightly sand between coats with fine-grit sandpaper to remove any imperfections and improve adhesion.
After the final coat of topcoat has been applied and allowed to dry completely, inspect the cabinets for any imperfections. Touch up any areas as needed and allow the finish to cure for the recommended time before using the cabinets. Avoid harsh cleaning agents or abrasive materials when cleaning the finished cabinets, and use a soft cloth and mild soap to maintain their appearance.

Gel Stain Kitchen Cabinets Without Sanding Fast Easy Diy

Staining Your Wood Cabinets Darker Young House Love

How To Paint Kitchen Cabinets Without Sanding Sustain My Craft Habit

Refurbish Old Cabinets Without Sanding Using Gelstain

How To Paint Kitchen Cabinets Without Sanding Or Priming

Gel Stain Kitchen Cabinets Without Sanding Fast Easy Diy

How To Paint Kitchen Cabinets Without Sanding Or Priming

Pickled Oak Bathroom Vanity Before And After Gel Stain Staining Cabinets Kitchen Makeover Wood

How To Refinish Kitchen Cabinets Without Stripping Ron Hazelton

How To Paint Kitchen Cabinets Without Sanding Sustain My Craft Habit
Related Posts