Painting Formica Cabinet Doors: A Simple Guide To Home Design
Formica cabinets, once a staple in kitchens and bathrooms, often fall out of favor as interior design trends evolve. Replacing these cabinets can be a significant undertaking, both financially and logistically. However, painting Formica cabinet doors offers a cost-effective and less disruptive alternative to achieve a refreshed aesthetic. This guide provides a comprehensive overview of the process, ensuring a smooth and successful transformation of your Formica cabinets.
Before embarking on the painting project, it's crucial to understand the properties of Formica. Formica is a brand name for laminate, a durable, heat-resistant plastic bonded to a substrate, often particleboard or plywood. Its smooth, non-porous surface presents a challenge for paint adhesion. Proper preparation and the use of appropriate primers and paints are essential to achieve a long-lasting and professional-looking finish.
Key Point 1: Thorough Preparation is Paramount
The success of painting Formica cabinet doors hinges on meticulous preparation. Skipping steps or cutting corners will likely result in paint chipping, peeling, or an uneven finish. This section details the essential preparation steps for achieving optimal paint adhesion.
1. Remove Hardware and Doors: Begin by removing all cabinet door hardware, including knobs, pulls, hinges, and any other decorative elements. This prevents paint from getting on these fixtures and allows for easier access to the entire door surface. Carefully label each piece of hardware and door to ensure proper reinstallation later. Store hardware in a safe place to prevent loss or damage.
2. Clean the Surfaces: Thoroughly clean the Formica cabinet doors to remove any grease, dirt, dust, or grime. Use a degreasing cleaner specifically formulated for kitchen surfaces. Avoid abrasive cleaners that could scratch the Formica. Wipe down the doors with a clean, damp cloth to remove any cleaner residue. Allow the doors to dry completely before proceeding to the next step.
3. Sanding (Lightly): Lightly sanding the Formica surface is critical for creating a "key" for the primer to adhere to. Use a fine-grit sandpaper (220-grit or higher) and gently scuff the entire surface. The goal is not to remove the Formica, but rather to create microscopic scratches that will improve adhesion. Avoid excessive sanding, as it can damage the Formica. After sanding, wipe the doors down again with a tack cloth to remove all sanding dust.
4. Repairing Damage (If Necessary): Inspect the cabinet doors for any chips, cracks, or dents. If present, repair these imperfections with wood filler or epoxy filler specifically designed for laminate surfaces. Apply the filler according to the manufacturer's instructions, allowing it to dry completely. Once dry, sand the filled areas smooth with fine-grit sandpaper, blending them seamlessly with the surrounding Formica. Wipe away any sanding dust.
5. Masking: Use painter's tape to mask off any areas you don't want to paint, such as the inside edges of the cabinet doors or any decorative trim. Ensure the tape is applied firmly to prevent paint bleeding. Consider using a high-quality painter's tape designed for delicate surfaces to avoid damaging the Formica.
Key Point 2: Selecting the Right Primer and Paint
Choosing the correct primer and paint is crucial for achieving a durable and attractive finish on Formica cabinet doors. Not all primers and paints are created equal, and selecting products specifically designed for laminate surfaces is essential.
1. Primer Selection: A high-quality bonding primer is essential for ensuring proper paint adhesion to the smooth, non-porous Formica surface. Look for a primer specifically labeled for use on laminate, melamine, or other glossy surfaces. These primers often contain additives that promote adhesion and prevent peeling. Epoxy-based primers are also excellent choices for Formica, as they offer superior bonding properties. Apply the primer in thin, even coats, following the manufacturer's instructions. Allow the primer to dry completely before proceeding to the painting step. Depending on the specific primer, multiple coats might be required.
2. Paint Selection: For painting Formica cabinet doors, acrylic latex paint is generally recommended due to its durability, ease of application, and wide range of colors and finishes. Consider using a paint with a satin or semi-gloss finish, as these finishes are easier to clean and more resistant to stains and scratches. Avoid using flat or matte paints, as they tend to show fingerprints and dirt more easily. Another option is to use an enamel paint, which provides a hard, durable finish that is resistant to chipping and scratching. However, enamel paints typically require a longer drying time and may require specialized application techniques. Choose a high-quality paint from a reputable brand to ensure optimal performance and longevity.
3. Application Tools: Invest in high-quality painting tools for a professional-looking finish. Use a fine-bristled brush, a foam roller, or a paint sprayer. A fine-bristled brush is ideal for painting edges and corners, while a foam roller is excellent for achieving a smooth, even finish on the larger surfaces. A paint sprayer can provide the most uniform finish, but it requires practice and careful masking to prevent overspray. If using a paint sprayer, be sure to thin the paint according to the manufacturer's instructions. Clean your brushes and rollers thoroughly after each coat to prevent paint buildup and ensure they are ready for the next application.
4. Color Selection: Choose a paint color that complements your existing kitchen or bathroom décor. Consider the lighting in the room and the overall style you are trying to achieve. Lighter colors can make a small room feel larger and brighter, while darker colors can add drama and sophistication. Test paint samples in the room before committing to a final color to ensure you are happy with the result.
Key Point 3: Painting Techniques and Finishing Touches
Applying the paint correctly and incorporating the right finishing touches are vital for achieving a professional-looking and durable result. This section details the best painting techniques and finishing steps to elevate the painted Formica cabinets.
1. Applying Paint: Apply the paint in thin, even coats, avoiding drips and runs. Multiple thin coats are always better than one thick coat, as they will result in a smoother, more durable finish. Allow each coat of paint to dry completely before applying the next, following the manufacturer's instructions. Use a brush to paint the edges and corners, and then use a roller to paint the larger surfaces. If using a paint sprayer, maintain a consistent distance from the surface and use overlapping strokes to ensure even coverage.
2. Sanding Between Coats (Optional): Lightly sanding between coats of paint can help to remove any imperfections and create an even smoother finish. Use a very fine-grit sandpaper (400-grit or higher) and gently sand the painted surface. Wipe away any sanding dust before applying the next coat of paint.
3. Curing Time: Allow the painted cabinet doors to cure completely before reinstalling the hardware or reattaching them to the cabinets. Curing time varies depending on the type of paint used and the environmental conditions, but it typically takes several days. During the curing process, avoid touching or handling the painted surfaces to prevent damage.
4. Reinstallation: Once the paint has fully cured, carefully reinstall the hardware and reattach the cabinet doors to the cabinets. Use the labels you made during the removal process to ensure that each piece of hardware and door is reinstalled in its correct location. Tighten the screws securely, but avoid over-tightening, as this could damage the Formica or the cabinet frame.
5. Protective Coating (Optional): For added protection and durability, consider applying a clear topcoat over the painted cabinet doors. A clear topcoat can help to protect the paint from scratches, stains, and fading. Choose a water-based polyurethane topcoat for best results, as it is durable and easy to apply. Apply the topcoat in thin, even coats, following the manufacturer's instructions. Allow the topcoat to dry completely before using the cabinets.
6. Maintenance: To keep your painted Formica cabinet doors looking their best, clean them regularly with a mild soap and water solution. Avoid using abrasive cleaners or scouring pads, as these could damage the paint. Wipe up spills and splatters promptly to prevent staining. With proper care and maintenance, your painted Formica cabinet doors will provide years of beauty and functionality.
7. Disposal: Dispose of used paint, primer, and cleaning supplies properly according to local regulations. Many communities offer paint recycling programs or hazardous waste disposal facilities. Never pour paint down the drain or into the ground.
By following these steps, transforming outdated Formica cabinet doors into a stylish and updated feature of the home is possible. The careful preparation, selection of appropriate materials, and meticulous application techniques will result in a professional-looking finish that enhances the overall aesthetic of the space.

How To Paint Laminate Kitchen Cabinets Perfect Finish Tips

How To Paint Laminate Cabinets Everything You Need Know

Painting Laminate Cabinets Everything You Need To Know

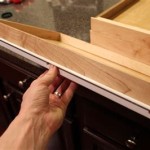
How To Add Trim And Paint Your Laminate Cabinets

How To Add Trim And Paint Your Laminate Cabinets

How To Paint Laminate Cabinets

Budget Kitchen Renovation With Diy Shaker Painted Cabinets I

How To Paint Kitchen Cabinets Without Sanding Or Priming

How To Paint Laminate Cabinets Everything You Need Know

Budget Kitchen Renovation With Diy Shaker Painted Cabinets I
Related Posts