Painting Formica Cabinet Doors: A Simple Guide Using Home Depot Resources
Updating kitchen or bathroom cabinets is a cost-effective way to refresh the look of a home without undergoing a full-scale renovation. Formica cabinets, known for their durability and ease of cleaning, can become dated over time. Painting them provides a budget-friendly alternative to replacement. This guide provides a detailed process for painting Formica cabinet doors, utilizing products and resources readily available at Home Depot.
Formica, technically a brand name for laminate surfaces, refers broadly to a plastic laminate material commonly used on cabinet doors, countertops, and furniture. Unlike solid wood, Formica's smooth, non-porous surface requires specific preparation and painting techniques to ensure proper adhesion and a lasting finish. Failure to adequately prepare the surface will likely result in peeling, chipping, or an uneven appearance.
The following steps outline the process for painting Formica cabinet doors, emphasizing the importance of preparation, appropriate product selection, and careful application. The information provided assumes a basic level of DIY proficiency. For complex projects or if uncertainty exists, consulting with a professional painter is recommended.
Key Point 1: Preparation is Paramount
The success of any painting project, particularly when dealing with non-porous surfaces like Formica, hinges on thorough preparation. This involves cleaning, sanding, and priming the cabinet doors to create a receptive surface for the paint to adhere to.
Step 1: Removal and Hardware Detachment
Begin by carefully removing all cabinet doors and drawers from their frames. Label each door and drawer with its corresponding cabinet location to ensure proper reinstallation. Remove all hardware, including knobs, pulls, hinges, and any other attached components. Store these components in a labeled container to prevent loss or confusion. Consider replacing old or dated hardware with new options available at Home Depot to further enhance the updated look.
Step 2: Thorough Cleaning
Clean the Formica surfaces thoroughly to remove any grease, grime, dirt, or residues. A degreasing cleaner purchased from Home Depot, such as TSP (trisodium phosphate) substitute, is highly recommended. Follow the manufacturer's instructions for dilution and application. Use a soft cloth or sponge to scrub the surfaces, paying particular attention to areas around handles and edges where grease and dirt tend to accumulate. Rinse the surfaces thoroughly with clean water and allow them to dry completely. This step is crucial to remove any contaminants that could interfere with the adhesion of the primer and paint.
Step 3: Sanding for Adhesion
Formica's smooth surface requires sanding to create a "tooth" for the primer to grip. Use a fine-grit sandpaper, typically 220-grit, available at Home Depot. Lightly sand the entire surface of each cabinet door, focusing on creating a slightly roughened texture. Avoid applying excessive pressure, as this can damage the Formica. The goal is to dull the surface, not to remove the laminate. After sanding, wipe down the doors with a tack cloth to remove all sanding dust. This step is essential for achieving a smooth and durable finish.
Step 4: Masking and Protection
Protect surrounding areas from paint splatter by using painter's tape and drop cloths. Carefully mask off any areas that you don't want to paint, such as the inside edges of the cabinet doors, glass panels, or decorative trim. Drop cloths will protect your work surface from drips and spills. Home Depot offers a wide variety of painter's tape and drop cloths to suit different needs and budgets.
Key Point 2: Priming for a Strong Foundation
Priming is a critical step in painting Formica cabinet doors. A high-quality primer designed for slick surfaces will create a strong bond between the Formica and the paint, preventing peeling and chipping. Selecting the correct primer available at Home Depot is just as important as the selection of the paint.
Primer Selection
Choose a primer specifically formulated for use on laminate or slick surfaces. These primers typically contain bonding agents that promote adhesion. Look for primers labeled as "adhesion primers" or "bonding primers." Popular options available at Home Depot include bonding primers like those from brands such as Kilz or Zinsser. Read the product labels carefully to ensure compatibility with Formica and the chosen paint.
Primer Application
Apply the primer in thin, even coats using a high-quality brush, roller, or sprayer. A foam roller is often recommended for achieving a smooth, non-textured finish. Follow the manufacturer's instructions for application techniques and drying times. Typically, two coats of primer are recommended, allowing each coat to dry completely before applying the next. Proper drying time is crucial for the primer to cure and bond effectively.
Sanding Between Coats (Optional)
After the primer has dried completely, inspect the surface for any imperfections, such as drips, runs, or rough spots. If necessary, lightly sand the primed surface with fine-grit sandpaper (320-grit) to create a smooth base for the paint. Wipe down the doors with a tack cloth to remove any sanding dust before proceeding to the painting stage.
Key Point 3: Painting for a Durable and Appealing Finish
The final stage involves applying the paint color of choice to the primed Formica cabinet doors. Selecting a durable paint and applying it with care will result in a beautiful and long-lasting finish. Home Depot offers a vast array of paint colors and finishes to match any design aesthetic.
Paint Selection
Choose a high-quality paint formulated for cabinets or furniture. Acrylic latex paints and enamel paints are both suitable options. Acrylic latex paints are water-based, durable, and easy to clean. Enamel paints offer a harder, more durable finish and are often preferred for high-traffic areas. Consider using a paint with a satin or semi-gloss finish, as these finishes are durable and easy to clean. Avoid using flat paints, as they are more prone to staining and damage. Consult with a paint specialist at Home Depot to determine the best paint type for your specific needs and preferences.
Paint Application
Apply the paint in thin, even coats using a high-quality brush, roller, or sprayer. As with the primer, a foam roller is often preferred for achieving a smooth, non-textured finish. Apply two to three coats of paint, allowing each coat to dry completely before applying the next. Follow the manufacturer's instructions for application techniques and drying times. Avoid applying thick coats of paint, as this can lead to drips, runs, and uneven drying. Maintain a wet edge while painting to prevent lap marks.
Sanding Between Coats (Optional)
After each coat of paint has dried completely, inspect the surface for any imperfections. If necessary, lightly sand the painted surface with fine-grit sandpaper (320-grit or higher) to create a smooth and flawless finish. Wipe down the doors with a tack cloth to remove any sanding dust before applying the next coat of paint.
Curing Time
Allow the painted cabinet doors to cure completely before reinstalling them. Curing time varies depending on the type of paint used and the ambient temperature and humidity. Refer to the paint manufacturer's instructions for recommended curing times. Avoid handling the doors excessively during the curing process to prevent damage to the finish.
Reinstallation and Hardware Attachment
Once the paint has cured completely, carefully reinstall the cabinet doors and drawers to their respective frames. Reattach all hardware, using the original screws or replacing them with new ones if necessary. Adjust the hinges as needed to ensure that the doors hang properly and close smoothly. Clean the painted surfaces with a soft cloth and mild detergent to remove any fingerprints or dust.
By following these steps and utilizing the products and resources available at Home Depot, homeowners can successfully paint Formica cabinet doors and achieve a professional-looking finish. Patience and attention to detail are key to creating a lasting and aesthetically pleasing result. Remember to always prioritize safety by wearing appropriate protective gear, such as gloves and a respirator, when working with paints, primers, and solvents.
The transformative power of paint can revitalize a kitchen or bathroom without the significant investment associated with full cabinet replacement. By meticulously preparing the surfaces, selecting appropriate primers and paints, and applying them with care, Formica cabinet doors can be updated to reflect a contemporary style and personal taste.

How To Paint Laminate Cabinets Everything You Need Know

How To Paint Laminate Cabinets Without Sanding The Palette Muse

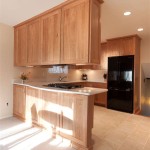
Budget Kitchen Renovation With Diy Shaker Painted Cabinets I

Budget Kitchen Renovation With Diy Shaker Painted Cabinets I

How To Paint Laminate Cabinets Without Sanding The Palette Muse

How To Add Trim And Paint Your Laminate Cabinets

Budget Kitchen Renovation With Diy Shaker Painted Cabinets I

How To Paint Kitchen Cabinets Without Sanding Or Priming

Budget Kitchen Renovation With Diy Shaker Painted Cabinets I

How To Paint Laminate Cabinets Love Renovations
Related Posts