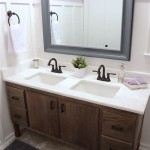
Make a Bathroom Sink Cabinet Out of Wood Floors: A Step-by-Step Guide
Transforming wood floors into a functional bathroom sink cabinet is an excellent way to repurpose materials and add a unique touch to your bathroom. With careful planning and execution, you can create a stunning and durable storage solution that complements your bathroom decor.
Materials and Tools:
* Wood floor planks (1/2 inch to 3/4 inch thick) * Plywood (1/2 inch to 3/4 inch thick) * Waterproof wood glue * Wood screws * Brad nailer * Table saw * Miter saw * Drill * Countersink bit * Sandpaper and orbital sander * Paint or stain * Polyurethane finish * Sink * Faucet * P-trap and drainpipeStep 1: Design and Cut the Frame
* Determine the size and shape of your desired sink cabinet. * Cut two pieces of plywood for the sides, two for the top and bottom, and one for the back. * Using wood glue and wood screws, assemble the frame by attaching the side pieces to the top and bottom pieces. * Reinforce the corners with additional screws or metal corner brackets.Step 2: Install the Wood Floor Planks
* Cut the wood floor planks to the desired length and angle using a miter saw. * Apply wood glue to the inside of the frame and press the planks into place. * Use a brad nailer to secure the planks to the frame. * Stagger the joints between the planks to create a stronger and more visually appealing design.Step 3: Reinforce the Structure
* Cut plywood pieces to fit inside the cabinet as shelves and supports. * Attach the shelves to the sides of the cabinet using wood glue and wood screws. * Add additional supports under the sink area to ensure stability.Step 4: Prepare the Sink Cutout
* Mark the location and size of the sink on the countertop. * Use a jigsaw or hole saw to cut out the opening for the sink. * Sand the edges of the cutout to ensure a smooth and level surface.Step 5: Install the Sink and Faucet
* Set the sink into the cutout and tighten the mounting screws. * Install the faucet onto the sink and connect the water supply lines. * Connect the P-trap and drainpipe to the sink drain.Step 6: Finish the Cabinet
* Sand the entire cabinet to smooth out any rough edges or imperfections. * Apply paint or stain to the cabinet to match your bathroom decor. * Apply a polyurethane finish to protect the cabinet from moisture and wear.Step 7: Customize with Doors or Drawers
* If desired, you can add doors or drawers to the cabinet for additional storage and functionality. * Cut and assemble the doors or drawers using plywood and wood glue. * Install the hardware and hinges or drawer slides to complete the cabinet. By following these steps, you can create a stylish and functional bathroom sink cabinet out of wood floors, adding both aesthetic value and practical storage to your bathroom.
8 Ways A Great Vanity Can Transform Small Bathroom

Custom Made Bathroom Wood Floating Vanity Shelf Sink Live Natural Edge Rustic Solid Wall Mounted New Home Gift

8 Ways A Great Vanity Can Transform Small Bathroom

Bathroom Rustic Vanity Reclaimed Wood Solid Live Edge Farmhouse Decor Counter Top Table

Bathroom Vanity Idea An Open Shelf Below The Countertop 17 Pictures

Pepping Up Bathroom Under Sink Cabinet Wood Paint Paper Ideas Pls Houzz

What Is The Best Material For Bathroom Cabinets Riluxa Com

White Oak Bathroom Vanity Single Sink

Vanity Units Standing Or Wall Mounted Duravit

Modern Floating Wood Vanity Single Sink
Related Posts


