Kitchen Cabinet Drawer Slides Replacement: A Comprehensive Guide
Kitchen cabinet drawer slides, though often overlooked, are essential components for the smooth and efficient operation of kitchen storage. Over time, these slides can wear out, become damaged, or simply fail to meet the demands of a busy household. Replacing them is a common home improvement task that can significantly improve the functionality and convenience of a kitchen. This article provides a detailed guide to understanding the process of kitchen cabinet drawer slide replacement, covering everything from identifying the need for replacement to selecting the appropriate slides and executing the installation.
Identifying the Need for Drawer Slide Replacement
Recognizing the signs of failing drawer slides is the first step in addressing the problem. Several indicators suggest that replacement is necessary, impacting both the functionality and the user experience of the kitchen. Early detection can prevent further damage to the cabinet or drawer itself.
One of the most common signs is difficulty in opening and closing the drawer. If the drawer sticks, requires excessive force to move, or makes grinding noises during operation, the slides are likely experiencing wear or damage. This friction can be due to several factors, including accumulated dirt and debris, corrosion, or the breakdown of internal mechanisms within the slide.
Another indication is visible damage to the slides themselves. Inspect the slides for signs of rust, bending, cracking, or broken components. Even minor damage can compromise the slide's ability to support the drawer's weight and maintain smooth movement. Look closely at the rollers or ball bearings, as these are often the first parts to fail.
Misalignment of the drawer within the cabinet is also a telltale sign. If the drawer sits crookedly or rubs against the cabinet frame, it may indicate that the slides are no longer providing proper support. This misalignment can place undue stress on the drawer box and the cabinet frame, potentially leading to further damage.
Finally, excessive wobbling or sagging of the drawer when it is extended is a clear sign of slide failure. This instability can make it difficult to access items stored in the drawer and can even pose a safety hazard if the drawer threatens to detach completely.
Selecting the Right Replacement Drawer Slides
Choosing the correct replacement drawer slides is critical for ensuring a successful installation and long-term performance. There are several factors to consider when making this selection, including the type of slide, the required length, and the load capacity.
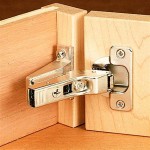
Drawer slides are broadly classified into several types: side-mount, center-mount, and under-mount. Side-mount slides are the most common and are installed on the sides of the drawer box and the cabinet frame. Center-mount slides are mounted underneath the center of the drawer and are typically used for smaller drawers. Under-mount slides are also mounted beneath the drawer but offer a more concealed appearance and often feature soft-close mechanisms.
Determining the correct length of the drawer slides is essential for ensuring that the drawer can fully extend without compromising stability. Measure the depth of the cabinet from the front edge to the back wall. The slide length should be slightly shorter than this measurement to allow for clearance. Standard lengths range from 10 inches to 28 inches, typically in 2-inch increments.
The load capacity of the drawer slides must be sufficient to support the weight of the drawer and its contents. Consider the types of items that will be stored in the drawer when determining the required load capacity. Lighter-duty slides are suitable for drawers containing utensils or lightweight items, while heavy-duty slides are necessary for drawers holding pots, pans, or other heavy objects. Load capacities can range from 25 pounds to over 100 pounds per pair of slides.
Beyond functionality, consider the desired features. Soft-close drawer slides provide a smooth and quiet closing action, preventing the drawer from slamming shut. Full-extension slides allow the drawer to extend completely out of the cabinet, providing full access to the contents. These additional features can enhance the user experience and add value to the kitchen.
Material also plays a role in durability. Many drawer slides are made of steel, often with a zinc or powder-coated finish for corrosion resistance. Consider stainless steel for areas with high humidity or potential for exposure to moisture.
Step-by-Step Guide to Drawer Slide Replacement
Replacing kitchen cabinet drawer slides is a manageable DIY project that can be accomplished with basic tools and a systematic approach. The following steps outline the process.
Step 1: Preparation and Removal of Old Slides. Begin by emptying the drawer completely. This will make it lighter and easier to handle. Using a screwdriver or drill, remove the screws that secure the old drawer slides to the drawer box and the cabinet frame. Be sure to collect all the screws and keep them organized, as they may be needed for reinstallation or to match with new screws. Once the screws are removed, carefully detach the old slides from both the drawer and the cabinet. If the slides are stuck, try gently prying them loose with a flathead screwdriver.
Step 2: Preparing the Surfaces. After removing the old slides, inspect the surfaces of the drawer box and the cabinet frame for any damage or debris. Clean the surfaces thoroughly with a damp cloth to remove any dirt, dust, or old adhesive residue. If there are any damaged areas, such as stripped screw holes, repair them before installing the new slides. Wood filler can be used to repair stripped screw holes, allowing for a secure attachment of the new slides. Allow the wood filler to dry completely before proceeding.
Step 3: Installing the New Slides on the Drawer Box. Take the new drawer slides and separate the drawer member (the part that attaches to the drawer box) from the cabinet member (the part that attaches to the cabinet frame). Align the drawer member with the marked location on the drawer box, ensuring that it is properly positioned. Use a level to ensure the slide is aligned correctly. Secure the drawer member to the drawer box using screws. Make sure the screws are the correct length to avoid protruding through the other side of the drawer. Repeat this process for the other side of the drawer.
Step 4: Installing the New Slides on the Cabinet Frame. Align the cabinet member with the marked location inside the cabinet frame, ensuring that it is properly positioned. Use a level to ensure the slide is aligned correctly. Secure the cabinet member to the cabinet frame using screws. Again, ensure the screws are the correct length to avoid damaging the cabinet. Repeat this process for the other side of the cabinet.
Step 5: Testing and Adjusting the Installation. Carefully slide the drawer back into the cabinet, aligning the drawer members with the cabinet members. Check to see if the drawer slides smoothly and closes properly. If there is any binding or misalignment, carefully remove the drawer and adjust the position of the slides as necessary. This may involve loosening the screws and slightly repositioning the slides. Once the drawer slides smoothly and closes properly, tighten all the screws securely.
Essential Tools and Materials
Successful drawer slide replacement relies on having the right tools and materials readily available. Gathering these items before starting the project will streamline the process and minimize interruptions.
A screwdriver is essential for removing the old slides and installing the new ones. Both Phillips-head and flathead screwdrivers may be needed, depending on the type of screws used. A power drill with a screwdriver bit can speed up the process, especially when installing a large number of slides. Ensure the drill has adjustable torque settings to prevent over-tightening the screws.
A measuring tape is crucial for accurately determining the length of the existing slides and selecting the correct replacement size. Precise measurements are essential for ensuring that the drawer fits properly within the cabinet.
A level is necessary for ensuring that the slides are installed straight and even. This is particularly important for side-mount slides, as any misalignment can cause the drawer to bind or wobble. A small bubble level is sufficient for this task.
A pencil is needed for marking the locations of the new slides on the drawer box and the cabinet frame. Clear and accurate markings are essential for ensuring that the slides are properly aligned. A utility knife can be helpful for scoring the wood to prevent splintering when driving in screws.
Safety glasses are important for protecting the eyes from dust and debris, especially when working with power tools. Gloves can also be helpful for protecting the hands and providing a better grip.
Wood filler can be used to repair damaged screw holes or other imperfections in the drawer box or cabinet frame. Choose a wood filler that is compatible with the type of wood being used. Replacement screws matching the size and type of the original screws are also important.
A damp cloth or solvent cleaner will help prepare the surfaces by removing any dirt or debris that could interfere with the proper adhesion of the slides. This ensures a clean and secure installation.
Common Problems and Solutions
While drawer slide replacement is generally straightforward, certain problems can arise during the process. Understanding these potential issues and their solutions can help to avoid frustration and ensure a successful outcome.
One common problem is stripped screw holes. If the screws do not grip properly, the slides will not be securely attached. This can be resolved by using wood filler to repair the stripped holes. Fill the holes with wood filler and allow it to dry completely. Then, pre-drill new pilot holes and install the screws. Alternatively, use longer or wider screws to find a better grip in the surrounding wood.
Another issue is drawer misalignment. If the drawer does not slide smoothly or binds when opening or closing, it may indicate that the slides are not properly aligned. Loosen the screws and adjust the position of the slides until the drawer slides smoothly. Use a level to ensure that the slides are aligned correctly. Make sure the drawer is square as well.
Sometimes, the new drawer slides may not be an exact match to the old ones. This can require some creativity and adaptation. If the screw holes do not line up, you may need to drill new pilot holes. Be careful not to drill too deeply and damage the surrounding wood. Consider using shims to adjust the position of the slides if necessary.
If the drawer is too tight or too loose, it may indicate that the drawer slides are not the correct size. Double-check the measurements and ensure that the slides are compatible with the drawer and the cabinet. You may need to purchase different-sized slides if the original selection was incorrect.
Finally, if the drawer slides are making noise, it may indicate that they are not properly lubricated. Apply a small amount of lubricant, such as silicone spray or grease, to the moving parts of the slides. This can help to reduce friction and noise.

Replacing Drawer Slides Extreme How To

How To Replace Kitchen Drawers Shelfgenie

How To Replace Old Drawer Slides Only 5 Easy Steps Vadania Home Upgrader

How To Fit Or Replace A Drawer Slide Runner

How To Replace Old Drawer Slides Only 5 Easy Steps Vadania Home Upgrader

The Complete Guide To Choosing Drawer Slides Cdnm Cabinet Doors N More

How To Install Drawer Slides The Easy Way

Budget Kitchen Renovation Replacing Drawer Slides

How To Fix Drawer Slides Repair Guide Connection

Drawer Runners High Quality Systems Häfele
Related Posts