Installing LED Cabinet Lights: A Step-by-Step Guide
Installing LED cabinet lights is a simple yet transformative project that can instantly elevate the look and functionality of your kitchen or any room with cabinets. These energy-efficient, bright, and long-lasting lights offer a range of benefits, from enhancing visibility and creating a welcoming ambiance to adding a sleek contemporary touch to your space. This comprehensive guide will walk you through the process of installing LED cabinet lights, ensuring a successful and rewarding outcome.
1. Planning and Preparation
Before embarking on the installation, careful planning is crucial. This involves determining the specific locations for the lights, the type and number of lights required, and the necessary tools and materials.
1.1. Determine Light Placement
Consider the size and arrangement of your cabinets, the purpose of the lighting, and the desired aesthetic. Common placement options include:
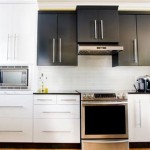
- Under-cabinet lighting: This is the most popular option for illuminating countertops and workspaces.
- Inside cabinet lighting: Ideal for illuminating the interior of cabinets, making it easier to find items.
- Overhead cabinet lighting: This provides general illumination above cabinets, adding a decorative touch.
1.2. Choose the Right Lights
LED cabinet lights come in various forms, each tailored to specific needs:
- Puck lights: Small, round lights with a high-output LED chip, offering a compact and versatile solution.
- Strip lights: Flexible strips of LEDs offering a continuous line of light, perfect for under-cabinet applications.
- Recessed lights: Mounted directly into the cabinet, these lights provide a clean and integrated look.
1.3. Gather Essential Tools and Materials
To ensure a smooth installation process, make sure you have the following:
- Screwdriver: Suitable for attaching the lights to the cabinet.
- Wire cutters: For stripping the wire insulation.
- Wire strippers: For removing the insulation from the wire ends.
- Voltage tester: To ensure the power supply is disconnected before working with wires.
- Electrical tape: For securing wire connections.
- Drill with appropriate drill bits: For drilling pilot holes for mounting screws, if necessary.
- Level: To ensure the lights are installed straight and even.
2. Installing the Lights
Once you have chosen your lights and gathered the necessary tools, you can begin the installation:
2.1. Disconnect Power
The most important safety precaution is to disconnect power to the circuit that will be powering the lights. Turn off the breaker for the corresponding outlet and use a voltage tester to confirm the absence of power.
2.2. Mount the Lights
Carefully follow the manufacturer's instructions provided with the lights.
- Under-cabinet lights: Most under-cabinet lights are secured using adhesive strips, screws, or a combination of both. Ensure a secure grip for optimal stability.
- Inside cabinet lights: Inside cabinet lights are often attached to the back wall of the cabinet or mounted to the shelf using adhesive strips or screws. Position the lights strategically to maximize illumination.
- Overhead cabinet lights: Overhead cabinet lights may require drilling pilot holes and using mounting screws for secure attachment.
2.3. Connect the Wiring
Connect the lights to the power source, ensuring all connections are secure and properly insulated.
- Use wire connectors: Wire connectors, often called wire nuts, provide a secure and safe connection. Choose connectors compatible with the wire gauge and ensure all wires are securely connected within the connector.
- Use electrical tape: Wrap electrical tape around the wire connections for extra insulation and protection against short circuits.
- Connect to a power source: Typically, you will connect the lights to a standard electrical outlet using a plug adapter or hardwire them directly to the electrical junction box.
2.4. Test the Lights
Once the wiring is complete, carefully restore power to the circuit and test the lights to ensure they are functioning correctly and providing the desired illumination.
3. Enhancing Lighting Functionality
To expand the functionality of your LED cabinet lights, you can consider these additional features:
3.1. Dimmable Switches
Dimmable switches allow you to adjust the brightness of the lights, creating different ambiances for various tasks or occasions.
3.2. Motion Sensors
Motion sensors automatically turn on the lights when motion is detected, providing convenient hands-free operation, particularly in areas like the kitchen or pantry.
3.3. Remote Controls
Remote controls offer the ability to turn the lights on and off, adjust their brightness, and even change their color temperature from a distance.
By following these steps and incorporating additional features, you can successfully install LED cabinet lights that significantly enhance the functionality, aesthetics, and overall ambiance of your home.

How To Install Under Cabinet Lighting In Your Kitchen Diy

How To Install Under Cabinet Lighting The Home Depot

How To Install Led Under Cabinet Lighting

How To Install Under Cabinet Lighting The Home Depot

Led Strip Light Installation Tips Armacost Lighting

How To Install Under Cabinet Lighting

Led Cabinet Lighting Wiring Diagrams

Ultimate Guide To Diy Cabinet Led Lights Full Install

How To Install Under Cabinet Lighting In The Kitchen Using Led Light Strips

How To Install Under Cabinet Lighting 1000bulbs Blog
Related Posts