How to Stain Cabinets Without Stripping: A Step-by-Step Guide
Staining cabinets without stripping can seem daunting, but it's a project that can be completed with patience and attention to detail. By following these steps, you can achieve a professional-looking finish without the hassle of stripping and refinishing your cabinets.
Materials You'll Need:
* Sandpaper (120-grit and 220-grit) * Tack cloth * Gel stain in your desired color * Foam brush or sponge * Clean rags * Polyurethane (optional) * Gloves * Safety glassesStep 1: Prepare the Cabinets
* Remove all hardware from the cabinets. * Clean the cabinets thoroughly with a degreaser to remove any dirt or grime. * Scuff-sand the cabinet surfaces with 120-grit sandpaper to create a smooth base for the stain. * Wipe away any dust with a tack cloth.Step 2: Apply the Stain
* Wear gloves and safety glasses. * Apply a thin, even coat of gel stain to a small area using a foam brush or sponge. * Work the stain into the grain of the wood, following the natural lines. * Wipe off any excess stain immediately with a clean rag.Step 3: Wipe Back the Stain
* After applying the first coat of stain, wait the recommended time specified on the stain's label. * Using a clean rag, gently wipe the stain back in the direction of the wood grain. * This process will remove excess stain and create a more even finish.Step 4: Sand and Smooth
* Allow the first coat of stain to dry completely according to the manufacturer's instructions. * Lightly sand the surface with 220-grit sandpaper to smooth out any imperfections. * Wipe away any dust with a tack cloth.Step 5: Apply a Second Coat (Optional)
* If desired, you can apply a second coat of stain following the same steps as the first coat. * This will deepen the color and enhance the richness of the stain.Step 6: Protect the Finish (Optional)
* Once the stain has completely dried, you can protect the finish by applying polyurethane. * Use a light, even coat and allow the polyurethane to dry according to the manufacturer's instructions.Step 7: Reinstall Hardware
* Once the polyurethane is dry, reinstall the cabinet hardware. * Enjoy your beautifully stained cabinets!Tips:
* Test the stain on an inconspicuous area before applying it to the entire cabinet. * Use a light touch when sanding and wiping back the stain. Over-sanding can remove the stain and damage the wood. * If the stain is too dark, you can lighten it by mixing in some white paint. * If the stain is too light, you can darken it by applying multiple coats. * Allow ample drying time between coats to ensure proper adhesion. * If you're unsure about any step, consult a professional or reach out to the stain manufacturer for guidance.
Staining Your Wood Cabinets Darker Young House Love

Diy Gel Stain Cabinets No Heavy Sanding Or Stripping Maison De Pax

Gel Stain Kitchen Cabinets Without Sanding Fast Easy Diy

Gel Stain Kitchen Cabinets Without Sanding Fast Easy Diy

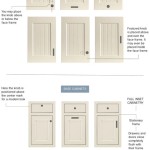
Darken Cabinets Without Stripping The Existing Finish Pneumatic Addict

How To Refinish Kitchen Cabinets Without Stripping Ron Hazelton

Refinish Kitchen Cabinets Without Stripping

How To Stain With Gel Over An Existing Finish Without Stripping The Weathered Door

How To Use Gel Stain Update Cabinets Without Sanding

How To Paint Kitchen Cabinets Without Sanding Or Priming
Related Posts