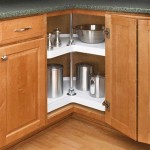
How to Replace a Lazy Susan in a Corner Cabinet
Corner cabinets, often the deepest and most inaccessible spaces in a kitchen, are frequently equipped with a Lazy Susan to improve accessibility. These rotating shelves allow for easier retrieval of stored items. However, Lazy Susans, like any mechanical component, are subject to wear and tear, potentially requiring replacement. Recognizing the signs of a failing Lazy Susan and understanding the replacement process are crucial for maintaining an organized and functional kitchen.
This article provides a comprehensive guide to replacing a Lazy Susan in a corner cabinet, covering the identification of problems, selection of a suitable replacement, and a step-by-step walkthrough of the installation process. It is essential to prioritize safety and accuracy throughout the procedure to ensure a successful and long-lasting repair.
Identifying Problems with Your Lazy Susan
Before embarking on a replacement, it is important to accurately diagnose the issues plaguing the existing Lazy Susan. Common problems can range from superficial annoyances to functional impairments. A thorough assessment will help determine if a replacement is necessary or if a simple repair will suffice.
Examine the rotation mechanism. A Lazy Susan that is difficult to turn, squeaks loudly, or binds in certain spots likely has issues with its bearings or mounting hardware. Dirt and debris accumulation can also impede smooth rotation. If cleaning and lubrication do not resolve the problem, the mechanism may be damaged.
Assess the shelves themselves. Cracks, warping, or broken edges can compromise the structural integrity of the Lazy Susan. Overloading the shelves beyond their weight capacity is a common cause of damage. If the shelves are significantly damaged, replacing the entire unit is often the most practical solution.
Inspect the mounting hardware. Screws can loosen over time, causing the Lazy Susan to wobble or become unstable. Check the hardware that secures the shelves to the rotating mechanism and the mechanism to the cabinet. Loose or damaged hardware should be tightened or replaced as needed. If the cabinet itself is damaged where the Lazy Susan mounts, reinforcing the cabinet may be necessary.
Rusting or corrosion can also affect the functionality of a Lazy Susan. This is particularly common in humid environments. Rust can seize the rotation mechanism and weaken the structural components. If rust is extensive, replacement is generally recommended.
Selecting a Replacement Lazy Susan
Choosing the right replacement Lazy Susan is crucial for ensuring a proper fit and optimal performance. Several factors must be considered, including the cabinet dimensions, shelf type, and load capacity. A careful selection process will prevent frustration and ensure a durable and functional upgrade.
Measure the interior dimensions of the corner cabinet. Specifically, measure the height, width, and depth. The diameter of the new Lazy Susan's shelves must be smaller than the cabinet's interior width to allow for free rotation. The height of the cabinet will determine the number and spacing of the shelves. Pay close attention to any obstructions inside the cabinet, such as pipes or electrical wiring, that may affect the available space.
Determine the shelf type. Lazy Susans are available in various materials, including plastic, wood, and metal. Plastic shelves are typically the most affordable and are suitable for light-duty use. Wood shelves offer a more aesthetically pleasing appearance and can handle moderate loads. Metal shelves are the most durable and are ideal for heavy-duty applications. Consider the types of items that will be stored on the Lazy Susan and choose a shelf material that can support the weight without bending or breaking.
Assess the load capacity. Each Lazy Susan has a maximum weight capacity, which is typically specified by the manufacturer. Exceeding the load capacity can damage the shelves, the rotation mechanism, or both. Estimate the weight of the items that will be stored on each shelf and choose a Lazy Susan with a sufficient load capacity. It is better to err on the side of caution and select a unit with a higher load capacity than is strictly necessary.
Consider the rotation mechanism. Some Lazy Susans feature a simple turntable design, while others incorporate more sophisticated bearing systems. A bearing system generally provides smoother and quieter rotation. Look for a mechanism that is made of durable materials and is designed for long-term use. Also, consider whether the Lazy Susan requires any specific mounting hardware or adjustments.
Evaluate the overall quality and reputation of the manufacturer. Consider factors such as warranty, customer reviews, and availability of replacement parts. A reputable manufacturer is more likely to produce a high-quality product that will provide years of reliable service. Reading online reviews and comparing different brands can help to narrow down the choices.
Step-by-Step Installation Guide
Replacing a Lazy Susan is a relatively straightforward project that can be accomplished with basic tools and a methodical approach. The following step-by-step guide outlines the installation process, emphasizing safety and precision at each stage.
Step 1: Preparation and Safety
Gather the necessary tools and materials. This typically includes a screwdriver (both Phillips and flathead), a measuring tape, a drill (optional), a level, and the replacement Lazy Susan. Protect the work area by laying down a drop cloth or cardboard to prevent scratches and spills. Wear safety glasses to protect your eyes from debris.
Step 2: Removing the Old Lazy Susan
Empty the cabinet completely. Remove all items from the shelves of the old Lazy Susan. This will make it easier to access the mounting hardware and prevent items from falling during removal. Carefully inspect the existing mounting system before attempting to remove anything. Some Lazy Susans are secured with screws, while others may use clips or other fasteners.
Carefully unscrew the mounting hardware. Starting with the top shelf, unscrew the hardware that secures the shelves to the rotating mechanism. Use the appropriate screwdriver to avoid stripping the screw heads. If the screws are difficult to remove, try applying a penetrating oil to loosen them. Once the shelves are detached from the mechanism, carefully remove the rotating mechanism from the cabinet. If the mechanism is also secured with screws, unscrew them. Take note of the orientation and placement of the old hardware for reference during the installation of the new Lazy Susan.
Thoroughly clean the inside of the corner cabinet. Use a vacuum cleaner to remove any dust, dirt, or debris that may have accumulated inside the cabinet. Wipe down the interior surfaces with a damp cloth and a mild cleaning solution. Allow the cabinet to dry completely before proceeding.
Step 3: Installing the New Lazy Susan
Follow the manufacturer's instructions. The installation process may vary slightly depending on the specific model of Lazy Susan. Refer to the manufacturer's instructions for detailed guidance and diagrams. Familiarize yourself with the components and the recommended installation procedure before beginning.
Position the rotating mechanism. Place the rotating mechanism inside the cabinet, aligning it with the mounting holes or markings. Use a level to ensure that the mechanism is properly aligned. Secure the mechanism to the cabinet using the provided screws or fasteners. If the existing mounting holes do not align with the new mechanism, you may need to drill new holes. Use a drill bit that is slightly smaller than the diameter of the screws to prevent the screws from stripping. Be careful not to drill through the cabinet wall.
Attach the shelves to the rotating mechanism. Starting with the bottom shelf, attach the shelves to the rotating mechanism using the provided hardware. Ensure that the shelves are properly aligned and evenly spaced. Tighten the screws securely, but avoid overtightening, which can damage the shelves or the mechanism. If the shelves are adjustable, experiment with different positions to find the optimal configuration for your needs.
Test the rotation. Once all the shelves are installed, test the rotation of the Lazy Susan. The shelves should rotate smoothly and freely without binding or wobbling. If there are any issues, check the alignment of the shelves and the tightness of the screws. Make any necessary adjustments until the Lazy Susan rotates properly.
Step 4: Final Adjustments and Cleanup
Make any final adjustments. Inspect the Lazy Susan for any remaining issues or imperfections. Adjust the shelf spacing or tighten any loose screws as needed. Ensure that the Lazy Susan is stable and secure before loading it with items.
Clean up the work area. Remove any tools, materials, or debris from the work area. Sweep or vacuum the floor to remove any dust or dirt. Properly dispose of any waste materials.
Load the Lazy Susan with items. Carefully load the Lazy Susan with the items that were previously stored in the cabinet. Distribute the weight evenly across the shelves to prevent tipping or overloading. Avoid placing heavy items on the top shelf, which can make the Lazy Susan unstable.

How To Remove A Lazy Susan Cabinet Crystel Montengro Home

Let S Remove The Lazy Susans And Build Shelves My Perpetual Project

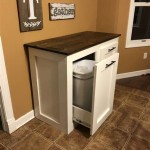
5 Lazy Susan Alternatives Grandior Kitchens Baths Closets

Frameless Lazy Susan Cabinet Install Kitchen Remodel

5 Lazy Susan Alternatives Superior Cabinets

Repair Lazy Susan Gave Up

Let S Remove The Lazy Susans And Build Shelves My Perpetual Project

Building A Lazy Susan Cabinet Fine Homebuilding

5 Lazy Susan Alternatives Grandior Kitchens Baths Closets

Kitchens Corner Sink Installation In Lazy Susan Cabinets Home Improvement Stack Exchange
Related Posts