How To Put New Hinges On Kitchen Cabinets
Replacing worn-out or damaged hinges on kitchen cabinets is a common DIY project that can significantly enhance the functionality and appearance of your kitchen. With the right tools and a bit of patience, you can successfully install new hinges and give your cabinets a fresh, updated look. This article will guide you through the process of replacing cabinet hinges, providing step-by-step instructions and helpful tips for a smooth and successful installation.
Step 1: Gather Your Tools and Materials
Before you begin, make sure you have all the necessary tools and materials readily available. This will ensure a seamless and efficient installation process. Here's a list of what you'll need:
- New cabinet hinges (ensure they are compatible with your existing cabinet doors)
- Screwdriver (Phillips head and flat head)
- Drill with a drill bit size appropriate for the hinge screws
- Level
- Pencil
- Measuring tape
- Optional: Wood filler (for filling any holes from previous hinges)
Step 2: Remove the Old Hinges
Begin by carefully removing the old hinges from the cabinet door and the cabinet frame. Use a screwdriver to loosen and remove the screws holding the hinges in place. Be cautious not to damage the surrounding wood or the cabinet door while removing the screws. If the screws are stuck, apply a little penetrating oil to help loosen them.
Once the screws are removed, gently pry the hinges off the door and the cabinet frame. If any hinges are particularly stubborn, you can use a small pry bar or a flat-head screwdriver to assist in their removal. Take note of the position and orientation of the old hinges, as this will help you install the new ones correctly.
Step 3: Prepare the Cabinet Door and Frame
Before installing the new hinges, you may need to make some preparations. If the old hinges left behind any holes or damage, use wood filler to repair them. Allow the filler to dry completely before proceeding.
If the cabinet door is misaligned or warped, you may need to adjust it before installing the new hinges. Use a level to check the alignment of the door and adjust it accordingly. You can use shims or thin pieces of wood to create a level surface for the door.
Step 4: Installing the New Hinges
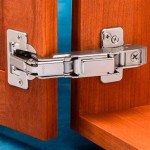
Now it's time to install the new hinges. Start by placing the new hinge into its corresponding position on the cabinet door. Align the hinge with the existing screw holes (if any) or mark the new location for the screws using a pencil. Use a drill to create pilot holes for the screws, ensuring they are the correct depth. This will prevent the wood from splitting when you drive in the screws. If you are installing self-closing hinges, make sure to follow the manufacturer's instructions for proper alignment and installation.
Next, carefully attach the hinge to the door using the provided screws. Ensure that the screws are driven in straight and evenly. Repeat this process for the other hinge on the cabinet door.
Step 5: Attach the Hinges to the Cabinet Frame
With the hinges securely attached to the cabinet door, now place the door onto the cabinet frame. Ensure it aligns properly with the cabinet opening. Mark the location of the hinge plates on the cabinet frame using a pencil. Use a drill to create pilot holes for the screws, taking care not to drill too deep. Install the hinge plates to the cabinet frame using the provided screws.
Step 6: Test and Adjust
Once you have installed all the new hinges, carefully test the movement of the cabinet door. Ensure that it opens and closes smoothly without any resistance. If the door is not aligned properly, you can adjust the hinges by loosening the screws and repositioning the hinge plates slightly. Make sure to test the door after each adjustment and repeat until the alignment is satisfactory.
Step 7: Finishing Touches
After you've finished installing the new hinges, you may need to add some finishing touches. If any screws or hinge plates are visible, consider painting them to match the cabinet color. You can also install decorative hinge covers for a more polished look. Ensure that all the screws are tight and the hinges are functioning properly. Finally, clean any leftover dust or debris from the installation process.

How To Install Concealed Hinges The Easy Way Love Renovations

Replacing Cabinet Hinges With Overlay Self Closing The Palette Muse

Installing Concealed Cabinet Door Hinges Handles The Easy Way

Hinges Installation Trick For Cabinets Young House Love

How To Install Overlay Kitchen Cabinet Hinges Roots Wings Furniture Llc

How To Install Overlay Kitchen Cabinet Hinges Roots Wings Furniture Llc

How To Fit Or Replace A Kitchen Hinge

How To Install Cabinet Hinges Hymns And Verses

Hinges Installation Trick For Cabinets Young House Love

How To Install Cabinet Hinges A Step By Guide
Related Posts


