How to Make Your Own Shaker Cabinet Doors for Kitchen Cabinets
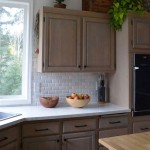
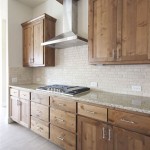
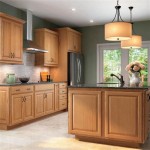
Shaker cabinets are known for their simple yet elegant design, featuring a recessed center panel framed by a raised outer frame. These cabinets are a popular choice for contemporary and traditional kitchens alike, offering a timeless appeal that complements various design styles. With the right tools and a bit of patience, crafting your own shaker cabinet doors can be a rewarding DIY project. This guide provides a step-by-step process for constructing custom doors that match your vision and complement your existing cabinetry.
Planning and Design
The first step in creating shaker cabinet doors is to carefully plan and design the project. Begin by measuring the existing cabinet openings to determine the exact dimensions for your new doors. Consider the overall style of your kitchen and select materials that complement the existing cabinetry. Measure the thickness of your existing cabinet doors, as this will determine the thickness of the wood you will use for your new doors. You will also need to select the desired style of shaker door. For example, some common shaker door styles include a full overlay, where the door sits flush with the cabinet frame, and a half overlay, where the door overlaps the frame slightly.
Once you have determined the dimensions and style of your doors, you can create a template for your shaker door design. This template is like a blueprint that will be used to cut the different pieces of wood for your doors. You can use a cardboard template or, for greater accuracy, use a CAD program to create a digital template that can then be printed out. The template should include the dimensions of the center panel, the frame pieces, and any decorative cuts, such as raised edges or grooves. For intricate designs, a CNC router can be used to precisely cut the template. This ensures that your doors are perfectly symmetrical and match your desired dimensions.
Gathering Materials and Tools
After planning and designing your shaker cabinet doors, gather the necessary materials and tools. The materials you will need include:
- Wood: Select a type of wood that is durable, aesthetically pleasing, and easy to work with. Popular choices for cabinet doors include maple, cherry, oak, and birch.
- Wood glue: Choose a high-quality wood glue that will provide a strong bond between the different pieces of wood.
- Screws: Select screws that are appropriate for the thickness of your wood and the desired level of holding power.
- Finishing nails: Use finishing nails to secure the decorative details, such as raised edges or grooves.
- Wood filler: Wood filler can be used to fill in any gaps or imperfections in the wood.
- Primer and paint or stain: Choose a primer that is specifically designed for the type of paint or stain you plan to use. If you are painting your doors, select a high-quality paint that is durable and easy to clean. If you are staining your doors, choose a stain that will enhance the natural beauty of the wood.
- Cabinet door hinges: Select cabinet door hinges that are appropriate for the weight of your doors and the style of your cabinetry.
- Door knobs or handles: Choose door knobs or handles that complement the style of your kitchen and add a finishing touch to your custom doors.
The tools you will need include:
- Table saw: A table saw is necessary for cutting the wood to the exact dimensions specified in your template. It also allows for precise cuts in the wood.
- Miter saw: A miter saw is used to make clean, accurate cuts at precise angles, which is necessary for the frame pieces of the shaker cabinet door.
- Router: Use a router for creating intricate designs and details, such as raised edges or grooves. It allows for precise and complex cuts.
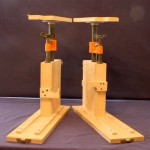
- Clamps: Clamps are essential for holding the different pieces of wood together while the glue dries.
- Sanding block or sander: Use a sanding block or sander to smooth out the surface of the wood and remove any imperfections.
- Measuring tape: A measuring tape is essential for ensuring that all the pieces of wood are cut to the correct dimensions.
- Level: A level is used to ensure that the cabinet doors are hung evenly and that the frame is straight.
- Drill: A drill is used to pre-drill holes for screws and to attach the hinges and handles.
Construction Process
Once you have gathered your materials and tools, you can begin the construction process. Here are the steps involved in creating your shaker cabinet doors:
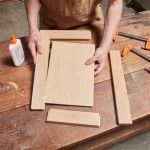
- Cut the wood pieces: Use the table saw and miter saw to cut the wood pieces according to the dimensions on your template. Make sure all cuts are clean and precise.
- Assemble the frame: Glue and screw the frame pieces together. Use clamps to hold the frame pieces secure while the glue dries.
-
Add decorative details:
If your design calls for raised edges or grooves, use a router to create these details. - Install the center panel: Glue the center panel into the frame. Use clamps to secure the panel while the glue dries.
- Sand and finish the doors: Use a sanding block or sander to smooth out the surfaces of the doors. You can then apply primer, paint, or stain, to create the desired finish.
-
Install the hinges and handles:
Attach the cabinet door hinges to the doors and the cabinet frames. Then, attach the door knobs or handles. - Install the doors:** Install the doors on the cabinets.
Finishing Touches
Once the doors are installed, you can add finishing touches to enhance their appearance and functionality. These touches might include:
- Adding decorative trim: You can add a decorative trim around the edges of the doors or center panel for a more elaborate look.
- Installing soft-close hinges: Soft-close hinges provide a smooth and quiet closing mechanism.
- Applying a protective sealant: A protective sealant can help to protect the wood from moisture and scratches.
Remember, creating your own shaker cabinet doors provides the opportunity to personalize your kitchen and create a space that reflects your unique style. With careful planning, attention to detail, and a commitment to quality, you can achieve stunning results.

Kitchen Diy Shaker Style Cabinets Cherished Bliss

Diy Shaker Cabinet Doors How To Make Your Own For Less Farmhouseish

Diy Shaker Cabinet Doors How To Make Your Own For Less Farmhouseish

Diy Shaker Cabinet Doors

Diy Shaker Cabinet Doors The Easy Way Mimzy Company

Diy Shaker Cabinet Doors The Easy Way Mimzy Company

Diy Shaker Cabinet Doors How To Make Your Own For Less Farmhouseish

How To Make Shaker Style Kitchen Cabinet Doors On A Budget My Design Rules

How To Make Diy Cabinet Doors Without Fancy Router Bits

And Easy Shaker Cabinet Doors Drawers Diy How To
Related Posts