How To Make Your Own Kitchen Cabinet Doors And Drawers
Creating custom kitchen cabinet doors and drawers offers an opportunity to personalize a kitchen's aesthetic and functionality. Whether aiming to upgrade existing cabinets, renovate an entire kitchen, or embark on a woodworking project, understanding the process of crafting these essential components is fundamental. This article provides a comprehensive guide to constructing kitchen cabinet doors and drawers, detailing the necessary tools, materials, and techniques.
Planning and Design
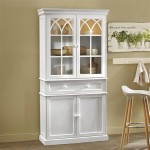
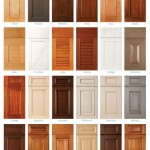
Before initiating any physical construction, meticulous planning is crucial. Accurate measurements are paramount, requiring a detailed assessment of the existing cabinet frames or the planned dimensions of the new cabinets. Consider the desired style of the doors and drawers, as this will influence material selection and construction methods. Common styles include shaker, raised panel, slab, and glass-front doors. Each style necessitates specific joinery techniques and levels of woodworking skill.
Accurate documentation of measurements is essential. Create a detailed cut list specifying the dimensions of each component, including door stiles, rails, panels, and drawer boxes. Digital design software, such as SketchUp or AutoCAD, can be valuable for visualizing the final product and ensuring dimensional accuracy. These tools allow for adjustments to be made before committing to material purchases and cutting.
Choosing the right materials is a critical aspect of the design phase. Solid wood, plywood, and medium-density fiberboard (MDF) are common choices for cabinet doors and drawers. Solid wood offers durability and aesthetic appeal, but is susceptible to warping and expansion due to changes in humidity. Plywood offers stability and strength, while MDF provides a smooth, paintable surface and is less prone to warping. The selection should reflect the desired aesthetic and the functional requirements of the kitchen environment. Consider the wood species and grain pattern for solid wood, and the veneer quality for plywood.
Tools and Materials
Successfully constructing cabinet doors and drawers requires a specific set of tools. A table saw is essential for accurately cutting large panels and creating consistent dimensions. A router, equipped with various bits, is necessary for shaping edges, creating joinery, and routing recesses for panels. A miter saw facilitates precise angled cuts for door frames, ensuring tight-fitting joints. Clamps are vital for assembling components and maintaining squareness during glue-up. A drill and driver are necessary for installing hardware and securing screws.
Other essential hand tools include a measuring tape, a square, a marking gauge, and sandpaper. Safety equipment, such as safety glasses, hearing protection, and a dust mask, is non-negotiable. Proper ventilation is also crucial when working with wood and finishing products.
Material requirements vary depending on the chosen door and drawer style. For shaker-style doors, wood for the stiles and rails, and a panel (typically plywood or MDF) are necessary. For raised panel doors, specialized router bits are required to create the raised profile on the panel. For slab doors, a single panel of plywood or MDF is sufficient. Drawer boxes typically consist of plywood or solid wood sides, a bottom panel, and a front panel. Drawer slides, screws, wood glue, and finishing materials are also indispensable.
Construction Techniques for Cabinet Doors
Shaker-style doors are a popular choice due to their simplicity and versatility. The construction involves creating a frame consisting of two stiles (vertical pieces) and two rails (horizontal pieces) that surround a center panel. The stiles and rails are typically joined using mortise and tenon joints, although simpler methods like dowel joints or pocket hole screws can be employed for less demanding applications. The center panel is often set into a groove routed into the inside edge of the stiles and rails. This allows the panel to float freely within the frame, accommodating expansion and contraction.
To construct shaker-style doors, first cut the stiles and rails to the required dimensions. Rout a groove along the inside edge of each piece, ensuring the groove is wide enough to accommodate the center panel. Create the mortise and tenon joints (or alternative joinery method) and dry-fit the frame to ensure proper alignment. Apply glue to the joints and clamp the frame together, ensuring the assembly is square. Once the glue has dried, sand the frame smooth and insert the center panel.
Raised panel doors involve creating a decorative raised profile on the center panel. This is typically achieved using a specialized router bit designed for raised panel doors. The process involves routing the edges of the panel to create the desired profile. The panel is then assembled into a frame similar to that of a shaker-style door. Careful attention must be paid to the depth and alignment of the router cuts to achieve a consistent and aesthetically pleasing result.
Slab doors, the simplest to construct, consist of a single panel of plywood or MDF. The edges can be left square or shaped using a router. Slab doors are often used in modern kitchens due to their clean lines and minimalist aesthetic. To construct slab doors, simply cut the panel to the required dimensions and sand the edges smooth. Edge banding can be applied to the edges of plywood or MDF slab doors to create a more finished look.
Construction Techniques for Drawer Boxes
Drawer boxes are typically constructed from plywood or solid wood. The sides, front, and back of the drawer box are joined together to form a rectangular enclosure. The bottom panel is then attached to the bottom edges of the sides, front, and back. Common joinery methods for drawer boxes include dovetail joints, rabbet joints, and butt joints. Dovetail joints offer superior strength and aesthetic appeal, but require specialized tools and skills. Rabbet joints are simpler to create and provide adequate strength for most applications. Butt joints are the easiest to construct, but are the weakest and require reinforcement with screws or other fasteners.
To construct drawer boxes, first cut the sides, front, back, and bottom panel to the required dimensions. Create the chosen joint on the edges of the sides, front, and back. Dry-fit the components to ensure proper alignment. Apply glue to the joints and clamp the drawer box together, ensuring the assembly is square. Once the glue has dried, sand the drawer box smooth and attach the bottom panel. The bottom panel can be attached using glue and screws, or by inserting it into a groove routed into the inside faces of the sides, front, and back.
Drawer slides are essential for smooth and reliable drawer operation. There are various types of drawer slides available, including side-mount, under-mount, and center-mount slides. Side-mount slides are the most common and are relatively easy to install. Under-mount slides offer a cleaner look and often incorporate soft-close mechanisms. Center-mount slides are typically used for smaller drawers and are less robust than side-mount or under-mount slides. Follow the manufacturer's instructions for installing the chosen drawer slides, ensuring they are properly aligned and securely attached.
Finishing and Installation
Once the cabinet doors and drawer boxes have been constructed, finishing is the next crucial step. This involves sanding, staining (optional), and applying a protective topcoat. Sanding removes imperfections and prepares the wood surface for finishing. Start with a coarse grit sandpaper (e.g., 120 grit) and gradually progress to finer grits (e.g., 220 grit) to achieve a smooth surface. If staining, apply the stain evenly and allow it to dry completely before applying the topcoat.
A variety of topcoat options are available, including polyurethane, lacquer, and varnish. Polyurethane is a durable and water-resistant option that is suitable for high-use areas like kitchens. Lacquer provides a smooth, professional-looking finish but requires specialized equipment and ventilation. Varnish offers good durability and water resistance and can be applied with a brush or sprayer. Apply the topcoat in thin, even layers, allowing each layer to dry completely before applying the next. Sand lightly between coats to remove any imperfections.
Installation involves attaching the cabinet doors and drawer boxes to the cabinet frames. For cabinet doors, hinges are used to attach the door to the frame. Various types of hinges are available, including concealed hinges and traditional hinges. Concealed hinges offer a clean, modern look and allow for adjustable door alignment. Follow the manufacturer's instructions for installing the chosen hinges, ensuring they are properly aligned and securely attached. For drawer boxes, align the drawer box with the opening in the cabinet frame and attach the drawer slides to the cabinet frame and the drawer box. Ensure the drawer box slides smoothly and is properly aligned.

Life Turn Any Cabinet Door Into A Drawer

And Easy Shaker Cabinet Doors Drawers Diy How To

Diy Rustic Industrial Cabinet Doors Tutorial Cherished Bliss

How To Make Diy Cabinet Doors Without Fancy Router Bits

How To Make Inset Kitchen Cabinets Diy

21 Diy Affordable Ways To Redo Kitchen Cabinets Extra Space Storage
.jpg?strip=all "How To Make Inset Kitchen Cabinets Diy")
How To Make Inset Kitchen Cabinets Diy

30 Kitchen Cabinet Add Ons You Can Diy Family Handyman

How We Organized Our Kitchen Drawers And Cabinets Jenna Sue Design
.jpg?strip=all "How To Make Inset Kitchen Cabinets Diy")
How To Make Inset Kitchen Cabinets Diy
Related Posts