How to Make Your Own Kitchen Cabinet Doors
Replacing or upgrading kitchen cabinet doors can significantly alter the look and feel of a kitchen without requiring a full-scale remodel. Constructing your own cabinet doors offers a cost-effective and customizable solution, allowing for the selection of specific materials, styles, and finishes to perfectly match your aesthetic preferences and existing cabinetry. This article provides a detailed guide on crafting your own kitchen cabinet doors, covering essential steps from planning and materials to construction and finishing.
Planning and Design Considerations
The first step in creating custom cabinet doors involves careful planning and design. This stage is crucial for ensuring that the finished doors meet both functional and aesthetic requirements. Begin by precisely measuring the existing cabinet openings. Accurate measurements are paramount, as even slight discrepancies can lead to improperly fitting doors.
Measure the height and width of each cabinet opening. Measure twice and record the smaller measurement of the two. This will be the "finished opening size." The "door size" will be slightly larger than the "finished opening size", depending on the overlay type. Consider whether you want full overlay, partial overlay, or inset doors. Each overlay type requires a specific calculation to determine the correct door size.
For full overlay doors, the door completely covers the cabinet frame and typically requires an overlay of approximately 1 inch on all sides, meaning the door will be 2 inches wider and 2 inches taller than the finished opening size, distributed equally. For partial overlay doors, the door covers a portion of the cabinet frame, leaving some of the frame visible. The overlay for partial overlay doors is usually less than 1 inch per side. For inset doors, the door fits inside the cabinet frame, flush with the face. Determining the exact dimensions for inset doors is the most crucial, allowing for a small amount of clearance (around 1/16 to 1/8 inch) on all sides to prevent binding during operation.
Once you have precise measurements, determine the desired style for your cabinet doors. Common styles include shaker, raised panel, flat panel, and slab doors. Each style offers a distinct visual appeal and construction method. Shaker doors, characterized by a recessed center panel and simple frame, are a popular choice for their clean lines and versatility. Raised panel doors feature a center panel that is raised above the surrounding frame, adding depth and dimension. Flat panel doors, also known as slab doors, are the simplest design, consisting of a single, flat piece of material. The chosen style will dictate the specific materials and joinery techniques required for construction.
Selecting the appropriate wood species is also crucial for both aesthetics and durability. Hardwoods like maple, oak, cherry, and walnut are commonly used for cabinet doors due to their strength and resistance to wear and tear. Softwoods, such as pine, can be used but may require more careful handling during construction and finishing. Consider the grain pattern and color of the wood to ensure it complements your kitchen's overall design scheme. In addition to solid wood, engineered wood products like MDF (Medium-Density Fiberboard) can be used for flat panel doors or for the center panels of shaker-style doors. MDF provides a smooth, stable surface that is ideal for painting.
Materials and Tools Required
After finalizing the door design, gather the necessary materials and tools. The specific materials will depend on the chosen style and wood species, but typically include:
*Wood:
Select the appropriate wood species and purchase lumber in the required dimensions. *Wood Glue:
High-quality wood glue is essential for creating strong and durable joints. *Fasteners:
Screws or nails may be used to supplement glue joints, especially during assembly. *Sandpaper:
Various grits of sandpaper will be needed for smoothing surfaces and preparing for finishing. *Primer and Paint or Stain and Sealer:
Choose a finish that complements your kitchen's décor and provides protection against moisture and wear. *Hardware:
Hinges, knobs, and pulls are essential for functionality and aesthetics.Essential tools for constructing cabinet doors include:
*Measuring Tape and Square:
For accurate measurements and ensuring squareness. *Table Saw or Circular Saw:
For cutting lumber to the required dimensions. A table saw offers greater precision and control. *Miter Saw:
For making precise angled cuts, particularly for frame components. *Router and Router Table:
For creating decorative edges, grooves for panel inserts, or joinery details. *Drill and Driver:
For drilling pilot holes and driving screws. *Clamps:
Various types of clamps are essential for holding components together during glue-up. *Sanding Block or Random Orbital Sander:
For smoothing surfaces and preparing for finishing. *Safety Glasses and Hearing Protection:
Essential for protecting yourself from dust and noise.For more advanced joinery techniques, consider the following tools:
*Mortise and Tenon Jig:
For creating precise mortise and tenon joints. *Biscuit Joiner:
For creating strong, aligned joints using biscuits.Construction Process
The construction process will vary depending on the chosen door style, but generally involves the following steps:
1.
Cutting the Components:
Begin by cutting all components to the precise dimensions specified in the design plan. Use a table saw or circular saw for straight cuts and a miter saw for angled cuts. Ensure all cuts are clean and accurate to prevent gaps or misalignments during assembly.2.
Preparing the Joinery:
The type of joinery used will depend on the door style. For shaker doors, a simple rabbet or tongue-and-groove joint can be used to connect the frame components. A router table is ideal for creating these joints. For raised panel doors, the center panel will typically fit into a groove routed into the frame components. Create the necessary grooves using a router and appropriate bit.3.
Assembling the Frame:
Apply wood glue to the mating surfaces of the frame components. Clamp the frame together, ensuring that it is square. Use a square to check for squareness and adjust as needed. Allow the glue to dry completely according to the manufacturer's instructions. Fasteners, such as screws or nails, can be used to reinforce the joints, but be sure to countersink the fasteners and fill the holes with wood filler.4.
Installing the Center Panel:
For shaker and raised panel doors, the center panel is installed after the frame has been assembled. For shaker doors, the panel typically floats within the frame, allowing for expansion and contraction. For raised panel doors, the panel may be glued into the frame or allowed to float. Ensure the panel is properly centered and secured.5.
Sanding and Preparation for Finishing:
Once the door is assembled, sand all surfaces smooth using progressively finer grits of sandpaper. Start with a coarser grit (e.g., 120-grit) to remove any imperfections, and gradually move to finer grits (e.g., 220-grit) to create a smooth, even surface. Pay particular attention to the edges and corners, ensuring they are smooth and rounded.6.
Finishing:
Apply a primer to the door to seal the wood and provide a uniform base for the paint or stain. Allow the primer to dry completely, and then lightly sand it to remove any imperfections. Apply the desired finish (paint or stain) according to the manufacturer's instructions. Multiple coats may be necessary to achieve the desired color and coverage. If staining, apply a sealer or clear coat to protect the stain and provide a durable finish. Lightly sand between coats for a smoother finish.7.
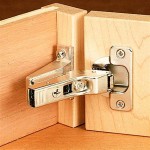
Installing Hardware:
After the finish has dried completely, install the hinges, knobs, and pulls. Use a drill to create pilot holes for the screws, ensuring they are properly aligned. Install the hinges on both the door and the cabinet frame, and adjust them as needed to ensure the door opens and closes smoothly. Install the knobs or pulls in the desired location on the door.Throughout the construction process, prioritize safety by wearing safety glasses and hearing protection. Use caution when operating power tools and follow all manufacturer's instructions. Work in a well-ventilated area to avoid inhaling dust or fumes.

How To Build Cabinet Doors Update Your Cabinets Or Built Ins

How To Make Diy Cabinet Doors Without Fancy Router Bits

How To Make Diy Cabinet Doors

How To Make Diy Cabinet Doors Without Fancy Router Bits

How To Make Your Own Cabinet Doors Beneath My Heart

How To Build Cabinets The Complete Guide Houseful Of Handmade

How To Add Glass Cabinet Doors Confessions Of A Serial Do It Yourselfer

How To Make Your Own Cabinet Doors Beneath My Heart

How To Make Diy Cabinet Doors Without Fancy Router Bits

Diy Cabinet Doors How To Update Your Kitchen With Plywood Real Homes
Related Posts