How To Make Homemade Kitchen Cabinets
Creating kitchen cabinets from scratch offers a considerable opportunity to customize a kitchen's design, optimize storage space, and potentially reduce costs compared to purchasing pre-manufactured options. This article provides a detailed guide on the process of building kitchen cabinets, covering essential steps from planning and material selection to assembly and installation. While this is a project requiring careful planning, patience, and intermediate woodworking skills, the satisfaction of building a custom kitchen is often well worth the effort.
Before embarking on the construction of homemade kitchen cabinets, it is crucial to accurately assess the existing kitchen space. Precise measurements, including wall dimensions, appliance placements, and existing plumbing and electrical locations, are necessary. Consideration should be given to the desired cabinet configuration, including base cabinets, wall cabinets, and any specialty units like pantry cabinets or islands. This detailed planning phase serves as the foundation for all subsequent steps.
Key Point 1: Planning and Design
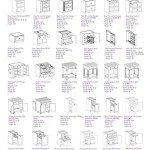
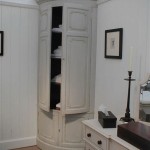
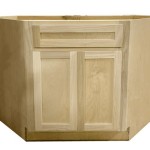
The initial stage involves creating a detailed plan. This plan should include a comprehensive floor plan of the kitchen, highlighting the exact location and dimensions of each cabinet. Utilizing graph paper or CAD software can significantly aid in creating accurate and scaled drawings. The plan should specify the type of cabinets to be constructed: base cabinets, which sit on the floor and typically support countertops; wall cabinets, which are mounted to the wall; and potentially tall cabinets or specialty units.
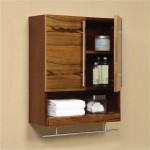
Cabinet dimensions are paramount. Standard base cabinet height is typically 34.5 inches, allowing for a countertop thickness of 1.5 inches to reach the standard countertop height of 36 inches. Standard base cabinet depth is 24 inches. Wall cabinet depth typically varies from 12 to 14 inches, and height is typically between 30 and 42 inches. These are standard dimensions, but can be adjusted to suit individual needs and preferences. Consider accessibility; lower cabinets may benefit from pull-out shelves for ease of access.
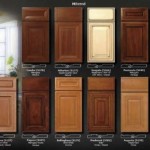
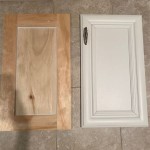
Door and drawer styles should also be decided at this stage. Options range from traditional raised panel doors to modern slab doors. Drawer construction methods, such as dovetail joints or simpler butt joints, should be determined based on skill level and aesthetic preferences. The hardware, including hinges, drawer slides, and knobs or pulls, should be selected early to ensure proper fit and functionality.
The internal organization of the cabinets is equally important. Consider the types of items to be stored and design the cabinets accordingly. Adjustable shelves provide flexibility, while specialized storage solutions like drawer dividers, spice racks, and pull-out organizers can significantly enhance functionality. The design should also account for any existing plumbing or electrical lines that need to be accommodated within the cabinet structure.
Finally, a cutting list should be generated based on the design plans. This list details the exact dimensions and quantity of each piece of wood required for the project. A well-organized cutting list minimizes material waste and ensures that all components are accurately sized before construction begins.
Key Point 2: Material Selection and Preparation
The choice of materials significantly impacts the appearance, durability, and cost of the kitchen cabinets. Common materials include plywood, medium-density fiberboard (MDF), and solid wood. Plywood is a popular choice for cabinet boxes due to its strength, stability, and resistance to warping. MDF provides a smooth surface for painting and is often used for door panels and cabinet faces. Solid wood offers a classic aesthetic and can be used for doors, frames, and decorative elements.
Plywood is graded based on its appearance, with A-grade being the highest quality and D-grade being the lowest. For cabinet boxes, a B-grade or C-grade plywood is typically sufficient. MDF is available in various thicknesses and densities; a higher density MDF is more resistant to denting and chipping. Solid wood species, such as maple, oak, and cherry, offer different grain patterns and color variations. The choice of wood species should be based on personal preference and the desired aesthetic of the kitchen.
Once the materials have been selected, they need to be prepared for construction. This involves cutting the wood to the dimensions specified in the cutting list. A table saw is the most accurate and efficient tool for cutting large sheets of plywood and MDF. A miter saw can be used for cutting smaller pieces and angles. It is crucial to use sharp blades to ensure clean cuts and minimize splintering. Safety precautions, such as wearing safety glasses and using push sticks, should always be observed when operating power tools.
After cutting, the edges of the plywood and MDF should be finished to prevent chipping and improve appearance. Edge banding, which is a thin strip of wood veneer or PVC, can be applied to the edges using a hot iron or an edge banding machine. Alternatively, the edges can be filled with wood filler and sanded smooth. Solid wood components should be planed and sanded to achieve a smooth, even surface. Any imperfections, such as knots or blemishes, should be filled with wood filler and sanded flush.
Before assembly, the materials should be primed and painted or stained and sealed. Priming helps the paint adhere better and provides a uniform base color. Multiple coats of paint or stain may be necessary to achieve the desired finish. Sealing the wood protects it from moisture and wear and tear. A clear coat of polyurethane or varnish is a durable and long-lasting option. Allow the paint, stain, or sealant to dry completely before proceeding with assembly.
Key Point 3: Assembly and Installation
The assembly process involves joining the various components of the cabinet box. This typically involves using screws, nails, or dowels, in conjunction with wood glue. Wood glue provides a strong and durable bond. Clamps are essential for holding the pieces together while the glue dries. It is important to ensure that the corners are square and the joints are flush. A square can be used to verify that the corners are at a 90-degree angle.
The cabinet box is typically assembled in stages. First, the sides, top, and bottom are joined to form the basic box. Then, the back panel is attached. The back panel provides structural support and helps to keep the cabinet square. The face frame, which is the decorative frame that surrounds the cabinet opening, is then attached to the front of the box. The face frame can be made from solid wood or MDF. It is typically attached with screws and glue.
Drawer construction involves similar techniques. The drawer box is assembled from the drawer sides, front, and back. The drawer bottom is typically made from plywood or MDF and is attached to the drawer box with screws or staples. Drawer slides, which allow the drawer to open and close smoothly, are attached to the drawer box and the inside of the cabinet box. There are many different types of drawer slides available, including side-mount, under-mount, and center-mount slides.
Door installation involves attaching the doors to the cabinet box using hinges. There are many different types of hinges available, including European-style hinges, which are concealed, and traditional hinges, which are visible. The hinges should be installed according to the manufacturer's instructions. The doors should be aligned properly to ensure that they open and close smoothly and that there are no gaps between the doors and the cabinet box.
The final step is installing the finished cabinets in the kitchen. This involves attaching the cabinets to the wall or floor using screws. Wall cabinets should be attached to wall studs for maximum support. Base cabinets should be leveled before being attached to the floor. Shims can be used to level the cabinets if the floor is uneven. Once the cabinets are installed, the countertops can be installed. The countertops should be attached to the base cabinets using screws and adhesive. Finally, the hardware, such as knobs and pulls, can be installed on the doors and drawers.
Building kitchen cabinets from scratch is a demanding project, but the resulting custom-built storage solutions can dramatically improve the functionality and aesthetics of a kitchen. Careful planning, meticulous execution, and a commitment to quality craftsmanship are essential for success. By following the steps outlined in this article, individuals can create durable, beautiful, and personalized kitchen cabinets that meet their specific needs and preferences.

How To Make Diy Kitchen Cabinets

How To Build Your Own Kitchen Cabinets Building New Diy

Diy Kitchen Cabinets Made From Only Plywood

Homemade Modern Ep86 Kitchen Cabinets

22 Easy Diy Kitchen Cabinets With Free Step By Plans Building Makeover

Diy Kitchen Cabinets 25 And Easy Ideas For An Update Joyful Derivatives

Diy Kitchen Cabinets Projects With Pete

Diy Budget Open Kitchen Cabinets Build Your Own In A Weekend

21 Diy Kitchen Cabinet Ideas For Your Remodel

Diy Budget Open Kitchen Cabinets Build Your Own In A Weekend
Related Posts