How To Make Built-In TV Cabinets Out Of Wood Furniture in Saudi Arabia
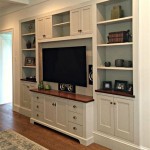
Creating a built-in entertainment center from repurposed wood furniture offers a unique way to personalize a living space while potentially saving money. This process involves careful planning, accurate measurements, and appropriate woodworking techniques. This guide provides a step-by-step approach to crafting built-in TV cabinets from existing wood furniture in Saudi Arabia, considering the availability of materials and the specific climate.
1. Selecting and Preparing the Furniture
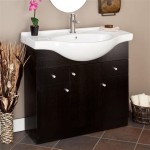
The first step involves choosing suitable wood furniture. Sturdy pieces like wardrobes, dressers, or bookshelves provide a good foundation. Consider the overall dimensions required for the entertainment center, including the TV size and any additional components like speakers or gaming consoles. The furniture's wood type should be assessed for its workability and suitability for the Saudi Arabian climate. Hardwoods like teak or acacia are ideal due to their durability and resistance to temperature fluctuations. Ensure the chosen furniture is structurally sound and free from extensive damage or insect infestation. Cleaning the furniture thoroughly and removing any existing finishes like varnish or paint is crucial before proceeding.
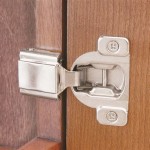
Disassemble the furniture carefully, labeling each piece to facilitate reassembly. This also offers an opportunity to inspect individual components for damage and make any necessary repairs. Existing hardware like hinges and handles can be repurposed or replaced with new ones to match the desired aesthetic.
2. Planning and Measurements
Accurate measurements are paramount to a successful outcome. Measure the television and other components that will be housed within the cabinet. Add extra space for ventilation to prevent overheating, especially crucial in the Saudi Arabian climate. Consider the location of electrical outlets and cable connections, planning for appropriate access points. Sketch a detailed design of the built-in unit, including the arrangement of the furniture components and their intended modifications.
The chosen location's dimensions are equally important. Measure the wall space where the unit will be installed, noting any architectural features like windows or doorways. Ensure the planned cabinet fits comfortably within the space while allowing for easy movement around the room. This careful planning will prevent issues during installation and ensure a professional-looking finished product.
3. Construction and Assembly
Begin by creating a base structure if the chosen furniture doesn't already offer a suitable one. A sturdy base made of plywood or solid wood provides stability and ensures even weight distribution. Assemble the disassembled furniture pieces according to the pre-planned design, securely joining them using wood glue and screws. Utilize clamps to hold pieces together while the glue dries, ensuring strong and stable joints. Reinforcement brackets can be added for extra support, especially for larger or heavier units.
Cut and shape the furniture components as needed to create the desired cabinet structure. This may involve shortening shelves, creating openings for ventilation, or adding decorative elements. Use appropriate woodworking tools like circular saws, jigsaws, and sanders to ensure clean and precise cuts. Pay close attention to safety precautions when using power tools.
Create shelving to accommodate electronic components and other items. Adjustable shelves offer flexibility for future needs. Consider incorporating cable management solutions to organize wires and prevent clutter. This can include built-in channels or openings for cables to run through, maintaining a clean and organized appearance.
4. Finishing and Installation
Once the cabinet is assembled, sand all surfaces smooth to prepare for finishing. Fill any gaps or imperfections with wood filler and allow it to dry completely before sanding again. Apply a primer to ensure even adhesion of the final finish. Choose a paint or stain that complements the existing décor and offers protection against the harsh Saudi Arabian climate. Multiple coats may be required for optimal coverage and durability. Allow sufficient drying time between coats.
Carefully move the finished cabinet into its designated location. Securely attach the cabinet to the wall using appropriate anchors and screws to ensure stability and prevent tipping. Consider the weight of the cabinet and its contents when selecting anchors. Connect electronic components and organize cables using the planned cable management system. Test the functionality of all components to ensure proper installation.
Adding decorative molding, trim, or hardware can enhance the aesthetic appeal of the finished cabinet. Consider incorporating lighting elements to highlight displayed items and create a focal point in the room. This final touch adds a personalized and professional finish to the project.
.jpg?strip=all "10 Best Tv Stand Ideas You Should Know")
10 Best Tv Stand Ideas You Should Know

10 Best Tv Stand Ideas You Should Know

8 Stylish Furniture Alternatives For Tv Stands Sunnydaze Decor

Tv Stand Guide Size Material And Style Oppein

Wood Solid Tv Cabinet Modern Minimalist Hanging Living Room With Light Wall Storage

10 Best Tv Stand Ideas You Should Know

Built In Fireplace Tv Stand Cabinet Around Oppein

Solid Wood Wall Mounted Tv Cabinet Living Room Black Walnut Combinable Floor Suspended Storage Locker

Solid Wood Tv Stand Walnut Handmade Unit Modern Console Cabinet Wall

Custom Tv Unit Design For Every Space Suntew
Related Posts