How to Make a Cabinet Door with Glass
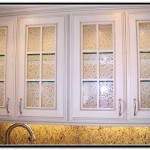
Cabinet doors with glass inserts can dramatically enhance the aesthetic appeal of kitchens, bathrooms, and other spaces. They allow a glimpse of what’s stored inside, making them suitable for displaying decorative items or easily identifying frequently used items. Constructing a cabinet door with a glass insert involves precise measurements, careful routing, and secure glass installation. This article outlines the detailed process of creating a cabinet door with glass, ensuring a professional and visually appealing result.
The process begins with selecting the appropriate materials. Hardwoods like maple, cherry, or oak are commonly used for cabinet doors due to their durability and aesthetic qualities. The thickness of the wood should be considered, with ¾ inch being a standard choice for cabinet doors. The glass selection is also important. Clear glass provides maximum visibility, while frosted or textured glass offers a degree of privacy. The thickness of the glass should be appropriate for the depth of the rabbet created within the door frame, typically ¼ inch. Safety considerations also dictate the use of tempered glass, which is shatter-resistant and safer than standard glass if broken.
Planning and Design Considerations
Before commencing any physical work, a detailed plan is crucial. This involves determining the desired size of the cabinet door and the dimensions of the glass insert. The proportions should be aesthetically pleasing and functional for the intended purpose. Consider the style of the cabinet door, whether it will be a simple flat frame or a more decorative raised panel design. When designing the frame, the width of the stiles (vertical pieces) and rails (horizontal pieces) needs to be considered. A common width is 2-3 inches, but this can be adjusted based on personal preference and the overall design. For the glass insert, calculate the required rabbet depth, ensuring that the glass sits flush with the back of the door frame or slightly recessed.
Sketching a detailed diagram of the cabinet door is highly recommended. This diagram should include all critical dimensions, including the overall door size, the size of the glass insert opening, the width of the stiles and rails, and the depth of the rabbet that will hold the glass. This visual representation will serve as a blueprint throughout the project, minimizing the risk of errors and ensuring a consistent and accurate outcome.
Selecting the appropriate router bit is also a vital part of the planning process. A rabbeting bit is essential for creating the recess that will hold the glass. The size of the rabbeting bit should correspond to the thickness of the glass. A variety of decorative edge router bits can be used to add a decorative touch to the door frame. These bits can create a rounded edge, a beveled edge, or a more intricate profile. Carefully research and select the bits that will best achieve the desired aesthetic.
Constructing the Door Frame
The construction of the door frame begins with cutting the stiles and rails to the appropriate lengths. Use a miter saw or table saw to ensure precise and accurate cuts. Accuracy is critical at this stage, as any discrepancies in length will affect the overall squareness and alignment of the door frame. After cutting the pieces, they should be sanded to smooth any rough edges and prepare the surfaces for joining. Start with a lower grit sandpaper (e.g., 120 grit) and gradually move to a finer grit (e.g., 220 grit) for a smooth finish.
The next step involves joining the stiles and rails to create the frame. Mortise and tenon joints are a traditional and robust method for joining cabinet door frames. However, simpler methods such as pocket hole joinery or dowel joints can also be used, particularly for smaller or less demanding applications. For pocket hole joinery, drill pocket holes on the back of the rails, where they will be hidden from view. Apply wood glue to the joints and clamp the frame together securely. Ensure that the frame is square during clamping by using a square to check the corners. Allow the glue to dry completely according to the manufacturer's instructions, typically 24 hours.
Once the frame is assembled and the glue has dried, use a router with a rabbeting bit to create the recess for the glass. The depth of the rabbet should be slightly less than the thickness of the glass, allowing the glass to sit flush with the back of the frame or slightly recessed. Carefully guide the router along the inside edge of the frame, ensuring a consistent and even rabbet depth. Make multiple passes with the router if necessary, gradually increasing the depth of the cut to avoid excessive strain on the tool. If using a decorative edge router bit, apply it now to the outside edges of the frame to achieve the desired aesthetic profile.
Preparing and Installing the Glass
Before installing the glass, carefully clean the rabbeted area and the glass itself. Remove any dust, debris, or fingerprints that could interfere with the adhesion of the glass or detract from the appearance of the finished door. Use a glass cleaner or mild detergent and a lint-free cloth to thoroughly clean both surfaces. Handle the glass with care to avoid scratches or breakage. Wearing gloves during this process can help to prevent fingerprints.
With the glass and frame prepared, the glass can be installed into the rabbet. Apply a small bead of clear silicone caulk or glazing compound into the rabbet. This will help to secure the glass in place and prevent rattling. Carefully position the glass into the rabbet, ensuring that it is centered and aligned correctly. Press the glass firmly into the caulk or glazing compound to ensure a good seal. Remove any excess caulk or glazing compound with a damp cloth or putty knife. Consider using glass retainer clips or points to further secure the glass in place. These clips or points are small metal or plastic pieces that are inserted into the rabbet around the perimeter of the glass, providing additional support and preventing movement.
Once the glass is installed and secured, allow the caulk or glazing compound to cure completely according to the manufacturer's instructions. This will typically take 24-48 hours. During this time, avoid handling the door excessively to prevent disturbing the glass or compromising the seal. After the caulk or glazing compound has cured, inspect the door for any imperfections or areas that need further attention. Touch up any nicks or scratches with sandpaper and finish as needed. Clean the glass one final time to remove any remaining residue.
Finishing and Hardware
After the glass is installed, the cabinet door needs to be finished to protect the wood and enhance its appearance. Sand the entire door frame using fine-grit sandpaper (e.g., 220 grit) to create a smooth and consistent surface. Remove any dust with a tack cloth before applying the finish. Select a finish that is appropriate for the type of wood and the desired aesthetic. Options include paint, stain, varnish, or lacquer. Apply the finish in thin, even coats, following the manufacturer's instructions. Allow each coat to dry completely before applying the next. Multiple coats may be necessary to achieve the desired level of protection and color saturation.
After the finish has dried completely, install the necessary hardware, such as hinges and pulls or knobs. Select hinges that are appropriate for the weight and size of the cabinet door. Common types of hinges include surface-mounted hinges, concealed hinges, and European-style hinges. Install the hinges according to the manufacturer's instructions, ensuring that they are properly aligned and securely attached. Choose pulls or knobs that complement the style of the cabinet door and are comfortable to use. Drill pilot holes for the screws to prevent splitting the wood. Attach the pulls or knobs securely, ensuring that they are aligned properly.
Finally, install the completed cabinet door onto the cabinet frame. Ensure that the door is properly aligned and that it opens and closes smoothly. Adjust the hinges as needed to achieve a perfect fit. Once the door is installed, inspect it one final time to ensure that all hardware is secure and that the door functions properly. Making a cabinet door with glass requires patience, precision, and attention to detail. Following these steps will help to create a beautiful and functional cabinet door that will enhance the aesthetic appeal of any space.

How To Make Divided Glass Cabinet Doors Stumpy Nubs Woodworking Journal

How To Add Glass Cabinet Doors Confessions Of A Serial Do It Yourselfer

How To Add Glass Cabinet Doors Genius

How To Make Glass Cabinet Doors With Router Bits Home Bar Pt 3 Crafted Work

How To Make Wood Doors With Glass Cabinet Diy

How To Put Glass In Cabinet Doors

Cabinet Doors Diy

How To Add Glass Cabinet Doors Confessions Of A Serial Do It Yourselfer

Diy Changing Solid Cabinet Doors To Glass Inserts Wood

How To Add Glass Cabinet Doors Confessions Of A Serial Do It Yourselfer Kitchen Home Remodeling
Related Posts