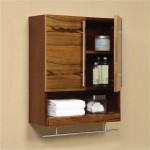
How To Make A Cabinet Door Frame
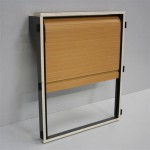
Constructing a cabinet door frame is a fundamental skill in woodworking, allowing for customization of kitchen cabinets, built-in storage, and furniture pieces. The process involves accurately measuring, cutting, and joining wood to create a durable and aesthetically pleasing frame that can then be fitted with a panel, glass, or other decorative element. The construction outlined herein focuses on creating a traditional stile-and-rail frame using common woodworking tools and techniques.
The success of a cabinet door frame hinges on precision and attention to detail. Inaccurate measurements or sloppy joinery will result in a frame that is not square, structurally weak, and visually unappealing. Therefore, careful planning and execution are paramount throughout the entire process.
Materials and Tools Required
The materials needed for constructing a cabinet door frame include:
*Lumber:
The selection of lumber is critical to the final appearance and durability of the cabinet door. Hardwoods like maple, oak, cherry, or poplar are commonly used for painted or stained cabinets, offering strength and resistance to wear. Softwoods, such as pine, can be used for rustic or painted projects but are generally less durable. The dimensions of the lumber will depend on the desired size and style of the door. Common sizes for stiles and rails range from 2 inches to 3 inches wide and ¾ inch to 1 inch thick. *Wood Glue:
A high-quality wood glue is essential for creating strong and lasting joints. Polyurethane or PVA (polyvinyl acetate) glues are suitable options. *Fasteners (Optional):
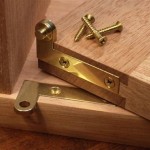
While traditional stile-and-rail construction relies primarily on glue, fasteners like screws or dowels can provide additional reinforcement, especially for larger doors. *Panel (Optional):
If the frame is intended to hold a panel, the panel material (e.g., plywood, MDF, glass) should be chosen and sized accordingly.The tools required for constructing a cabinet door frame include:
*Measuring Tools:
A tape measure, combination square, and marking gauge are necessary for accurate measurements and marking. A digital angle finder can be beneficial for ensuring squareness. *Cutting Tools:
A table saw is the most efficient tool for ripping the lumber to the desired width of the stiles and rails. A miter saw is used for making precise crosscuts to length. Alternatives include a circular saw with a guide or a hand saw, although these require more skill to achieve accurate cuts. *Joinery Tools:
A router is essential for creating the mortises and tenons needed for a strong stile-and-rail joint. A router table is recommended for safety and precision. Alternatives include using a mortise machine, a drill press with a mortising attachment, or hand tools like chisels and a mallet. *Clamping Tools:
Clamps are necessary for holding the frame together while the glue dries. Bar clamps, pipe clamps, or face frame clamps are suitable options depending on the size and shape of the door. *Sanding Tools:
Sandpaper in various grits (e.g., 80, 120, 220) and a sanding block or power sander are needed for smoothing the frame after assembly. *Safety Equipment:
Safety glasses, hearing protection, and a dust mask or respirator are essential for personal protection when working with power tools.Step-by-Step Construction Process
The construction of a cabinet door frame typically involves the following steps:
Planning and Design:
Before commencing construction, it's essential to determine the exact dimensions of the cabinet door. This involves measuring the cabinet opening and accounting for any desired reveals or overlaps. A detailed drawing or sketch of the door, including the overall dimensions, stile and rail widths, and panel size (if applicable), is highly recommended. The style and dimensions of the frame will influence the amount of material needed.Lumber Preparation:
Select the lumber and inspect it for defects, such as knots, warps, or cracks. Mill the lumber to the desired thickness and width using a jointer and planer if necessary. This ensures that the stiles and rails are uniform in size and have smooth, flat surfaces.Cutting the Stiles and Rails:
Cut the stiles (the vertical members of the frame) and rails (the horizontal members) to the correct length using a miter saw or table saw. The length of the stiles will determine the overall height of the door, while the length of the rails will determine the width of the door minus the width of the two stiles. Accuracy in cutting is critical to ensuring a square and properly sized door.Creating the Joinery:
The strength and durability of the cabinet door frame depend on the quality of the joinery used to connect the stiles and rails. The most common method is the mortise-and-tenon joint. This involves cutting a mortise (a rectangular hole) into the stiles and a tenon (a projecting tongue) on the ends of the rails that fits snugly into the mortise. The mortises can be cut using a router, mortise machine, or hand tools. The tenons can be cut using a table saw or router. A precise fit between the mortise and tenon is essential for a strong and durable joint. Another option is to use cope-and-stick cutters on a router table to create a decorative profile on the inside edge of the stiles and rails and interlocking joinery.Dry Fit Assembly:
Before applying glue, dry-fit the stiles and rails together to ensure that all the parts fit properly. This allows for any necessary adjustments to be made before the glue is applied. Check for squareness using a combination square or by measuring the diagonals of the frame. The diagonals should be equal if the frame is square.Gluing and Clamping:
Apply glue to all mating surfaces of the mortise-and-tenon joints. Insert the tenons into the mortises and clamp the frame together using bar clamps or pipe clamps. Apply even pressure to the clamps to ensure that the joints are tight and flush. Check for squareness again while the frame is clamped. Wipe away any excess glue with a damp cloth.Drying and Curing:
Allow the glue to dry and cure completely according to the manufacturer's instructions. This typically takes at least 24 hours. Removing the clamps prematurely can weaken the joints.Sanding and Finishing:
Once the glue has dried, remove the clamps and sand the frame smooth using progressively finer grits of sandpaper. Start with a coarser grit (e.g., 80 or 120) to remove any imperfections and then move to a finer grit (e.g., 220) to create a smooth surface. Pay particular attention to the joints, ensuring that they are flush and seamless. The frame is now ready for finishing, which may include staining, painting, or applying a clear coat.
Addressing Common Challenges
Several challenges can arise during the construction of a cabinet door frame. Addressing these issues promptly and effectively is crucial for achieving a professional-looking result.
*Out-of-Square Frame:
An out-of-square frame is a common problem that can be caused by inaccurate measurements, misaligned joinery, or uneven clamping pressure. To correct an out-of-square frame, carefully inspect the joints to identify any gaps or misalignments. If the frame is only slightly out of square, it may be possible to gently persuade it into square using clamps and shims. For more severe cases, it may be necessary to disassemble the frame and rework the joinery. *Gaps in Joints:
Gaps in the mortise-and-tenon joints can be caused by inaccurate cutting or insufficient glue. To fill small gaps, a mixture of wood glue and sawdust can be used. For larger gaps, it may be necessary to insert a wood shim or repair the tenon. Ensuring the tenon fits snugly into the mortise before gluing is crucial to prevent gaps. *Uneven Surfaces:
Uneven surfaces or misaligned joints can be addressed by sanding. Use a sanding block or power sander to smooth the frame and level the joints. Pay attention to the edges and corners, ensuring that they are smooth and consistent. *Wood Movement:
Wood is a natural material that expands and contracts with changes in humidity. This movement can cause problems in cabinet door frames, particularly if the frame is not properly constructed. To minimize the effects of wood movement, choose stable lumber that has been properly dried and acclimated to the environment. Allow adequate expansion gaps around any panels within the frame.Considerations for Panel Installation
If the cabinet door frame is intended to hold a panel, the method of panel installation must be considered during the design and construction process. There are several options for installing a panel, each with its own advantages and disadvantages.
*Floating Panel:
A floating panel is the most common method of panel installation. In this method, the panel is slightly smaller than the opening in the frame, allowing it to expand and contract freely without putting stress on the frame. The panel is held in place by a groove routed into the inside edge of the stiles and rails. This groove should be slightly wider and deeper than the panel to allow for movement. *Fixed Panel:
A fixed panel is glued directly into the frame. This method is typically used for smaller panels or when the panel is made of a stable material like MDF. Gluing the panel in place provides additional strength and rigidity to the frame but does not allow for wood movement. *Glass Panel:
Glass panels are typically held in place by retaining clips or silicone caulk. The frame must be rabbeted or grooved to accommodate the thickness of the glass. Safety glass or tempered glass is recommended for cabinet doors.When installing a panel, it is essential to ensure that it is centered in the frame and that the sides are parallel to the stiles and rails. Use shims or spacers to position the panel correctly before securing it in place.

And Easy Frame Panel Doors

Build Shaker Cabinet Doors With Table Saw New To Woodworking

How To Build A Custom Diy Built In Cabinet Angela Marie Made

Diy Cabinet Doors With Cane Webbing The On Trend Look You Can Create Yourself Farmhouseish

How To Build Diy Inset Cabinet Doors Christine Nickerson Design

How To Make Simple Frame And Panel Cabinet Doors No Router Or Pocket S Needed

How To Build A Frame And Panel Door Furniture Making For Beginners

How To Make Diy Cabinet Doors Without Fancy Router Bits

Diy Inset Cabinet Doors A Beginner S Way

How To Make Your Own Cabinet Doors Beneath My Heart
Related Posts