How to Make a Built-in Refrigerator Cabinet Out of Wood Pallets
Transforming reclaimed wood pallets into a functional and visually appealing built-in refrigerator cabinet is an exciting DIY project that combines practicality and sustainability. This guide provides a comprehensive overview of the process, from design considerations to construction steps, enabling you to create a custom storage solution that seamlessly integrates with your kitchen space.
1. Design and Planning
Before embarking on the construction, meticulous planning is essential to ensure the cabinet aligns with your needs and aesthetics. The following steps outline the key considerations:
a) Determine the Dimensions: Measure the dimensions of your refrigerator to ensure the cabinet fits snugly. Allow for adequate ventilation around the appliance. Sketch out the desired cabinet design, considering the height, width, and depth.
b) Choose the Pallet Material: Select pallets in good condition with minimal damage or warping. Look for sturdy hardwood pallets, preferably free of chemical treatments.
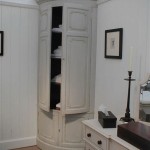
c) Design the Cabinet Structure: Consider the desired style for your cabinet. You can opt for a simple, minimalist design or incorporate ornate elements like molding or trim. Decide on the cabinet's door style – sliding, hinged, or French doors.
d) Plan for Ventilation: Adequate ventilation is crucial for preventing moisture buildup and ensuring proper airflow around the refrigerator. Incorporate ventilation openings at the top and bottom of the cabinet.
2. Preparation and Disassembly
Once you have a clear design in mind, prepare the pallets for disassembly and construction. Follow these steps:
a) Clean and Sand: Remove any debris or dirt from the pallets using a brush and soapy water. Sand the pallet surfaces with sandpaper to create a smooth finish.
b) Disassemble the Pallets: Carefully remove the nails or screws holding the pallet boards together. If necessary, use a hammer and nail puller to detach the boards.
c) Sort and Select Boards: Inspect the boards for defects, such as cracks or warping. Select suitable boards for the cabinet construction, sorting them based on size and condition.
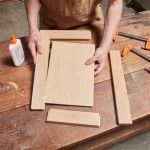
d) Cut and Prepare Boards: Using a saw, cut the selected boards to the desired lengths and widths according to your design plans.
3. Cabinet Construction
The construction process requires meticulous attention to detail and alignment. Follow these steps to assemble the cabinet frame:
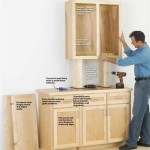
a) Assemble the Frame: Join the cabinet frame pieces using wood glue and screws. Use a level to ensure the frame is square and plumb.
b) Install the Base and Top: Position and secure the bottom and top panels using wood glue and screws.
c) Add Shelves and Interior Divisions: Install shelves and dividers within the cabinet as per your design. Use wood glue and screws for robust connections.
d) Integrate Ventilation: Create ventilation openings at the top and bottom of the cabinet using a jigsaw or router. Ensure sufficient airflow around the refrigerator.
4. Finishing Touches
After assembling the cabinet, apply finishing touches to enhance its appearance and durability:
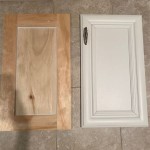
a) Stain and Seal: Apply wood stain to the cabinet to achieve the desired color and finish. Use a sealant to protect the wood from moisture and stains.
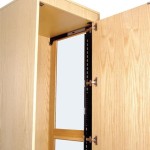
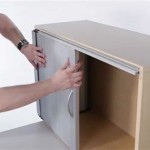
b) Install Doors: Attach the cabinet doors using hinges. If using sliding doors, install the necessary tracks.
c) Attach Handles and Hardware: Install door handles, hardware, and any other desired decorative elements.
d) Final Touches: Incorporate additional design details, such as trim, moldings, or decorative accents.
5. Installation and Setup
The final stage involves installing the cabinet in your kitchen and setting up the refrigerator:
a) Position the Cabinet: Carefully move the assembled cabinet to its desired location in your kitchen.
b) Secure the Cabinet: Secure the cabinet to the wall or floor using appropriate fasteners.
c) Install the Refrigerator: Place the refrigerator inside the cabinet, ensuring it sits level and has ample ventilation.
d) Final Adjustments: Make any necessary adjustments to the cabinet or appliance to ensure a perfect fit and proper operation.

Pallet Kitchen Remodel A Piece Of Rainbow

Kitchen Cabinets Using Old Pallets

Diy Pallet Wood Kitchen Makeover

How Do I Build A Storage Table For My Mini Refrigerator Out Of Barn W Hometalk

Pallet Kitchen Remodel A Piece Of Rainbow

Rustic Kitchen Cabinets Made From Old Pallets

How To Use 1 Sheet Of Plywood Make A Mini Bar Woodworking Project

Rustic Barnwood Mini Fridge Stand Cabinet

Pallet Kitchen Remodel A Piece Of Rainbow

Diy Cabinet Refacing With Pallet Board
Related Posts