How To Install Pull-Out Shelves In Cabinets
Installing pull-out shelves, also known as sliding shelves or roll-out trays, in existing cabinets can significantly improve accessibility and organization within a kitchen, pantry, or bathroom. These shelves eliminate the need to reach deep into dark cabinets, making it easier to locate items and maximize storage space. The installation process involves careful measurement, selection of appropriate hardware, and precise execution. This article details the steps required to successfully install pull-out shelves in cabinets.
Before beginning any installation, it is essential to determine the specific needs and requirements for the cabinets. This preliminary assessment will inform the type of shelves to purchase, the necessary hardware, and the optimal placement within the cabinet. Consider the weight capacity required for the shelves based on the items anticipated to be stored. Heavier items such as cookware or large appliances will necessitate heavier-duty shelf construction and supporting hardware.
Once the requirements are clearly defined, the procurement of the necessary materials and tools can commence. This includes the pull-out shelves themselves, appropriate drawer slides, measuring tools, a drill, screws, and potentially shims, depending on the cabinet's construction. The quality of these materials will directly impact the longevity and functionality of the installed shelves.
Key Point 1: Precise Measurement and Planning
Accurate measurement is paramount to a successful pull-out shelf installation. The interior dimensions of the cabinet must be measured precisely to ensure the shelf units will fit comfortably and operate smoothly. The first step involves measuring the interior width, depth, and height of the cabinet opening. Measure at the top, middle, and bottom, as cabinet interiors are often not perfectly square.
The narrowest width measurement should be used to determine the maximum width of the pull-out shelf. Subtract approximately 1 to 1.5 inches from this measurement to account for the thickness of the drawer slides and allow for clearance. This clearance ensures the shelf can slide in and out without binding or rubbing against the cabinet walls. For example, if the cabinet interior width is 15 inches, the shelf width should be no more than 13.5 to 14 inches.
Depth measurements are equally critical. Measure the depth of the cabinet from the front opening to the back wall. The chosen drawer slides will dictate the maximum usable depth of the pull-out shelf. Drawer slides are commonly available in standard lengths, such as 12, 14, 16, 18, 20, and 22 inches. Select a drawer slide length that is as close as possible to the cabinet depth while remaining shorter. This prevents the shelf from protruding beyond the cabinet opening when fully extended.
The height available within the cabinet dictates the number of shelves that can be installed and the spacing between them. Measure the total usable height and consider the height of items that will be stored on each shelf. Allow sufficient vertical clearance above each shelf to easily access and remove items. If adjustable shelves are desired, consider installing vertical supports with pre-drilled holes or slots to accommodate adjustable shelf placement.
After measuring, create a detailed plan or diagram outlining the shelf dimensions, placement, and hardware requirements. This plan serves as a roadmap during the installation process and helps to avoid errors. Use a pencil and paper or a computer-aided design (CAD) program to create a visual representation of the project. Note the type of drawer slides selected, the screw sizes needed, and any other relevant details.
Before cutting any materials or installing any hardware, perform a dry fit. This involves temporarily placing the shelf units inside the cabinet to verify the fit and ensure adequate clearance. This step helps identify any discrepancies between the measurements and the actual cabinet dimensions, allowing for adjustments before permanent installation.
Key Point 2: Installation of Drawer Slides
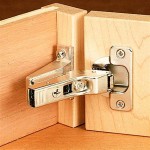
The proper installation of drawer slides is crucial for the smooth and reliable operation of pull-out shelves. Drawer slides come in various types, including side-mount, bottom-mount, and center-mount. Side-mount slides are the most common for pull-out shelves due to their strength and stability. Bottom-mount slides are typically used for drawers, while center-mount slides are less common due to their limited weight capacity.
Begin by separating the drawer slides into their two components: the cabinet member and the drawer member. The cabinet member is attached to the inside of the cabinet, while the drawer member is attached to the sides of the pull-out shelf. Identify the location where the slides will be mounted. This is determined by the desired height of the shelf. Use a level to ensure the slides are mounted horizontally. Inaccurate mounting can cause the shelves to bind or operate unevenly.
Mark the screw hole locations on the cabinet interior using a pencil. Pre-drilling pilot holes is recommended, especially in hardwood cabinets. This prevents the wood from splitting when the screws are inserted. Select drill bits that are slightly smaller in diameter than the screws to ensure a secure hold. Attach the cabinet members of the drawer slides to the cabinet interior using appropriate screws. Ensure the slides are aligned properly and securely fastened.
Next, attach the drawer members of the drawer slides to the sides of the pull-out shelf. Again, ensure accurate alignment and pre-drill pilot holes. The drawer slides should be positioned so that the shelf will be flush with the front of the cabinet when fully retracted. Use a square to ensure the slides are mounted perpendicularly to the front edge of the shelf. This is crucial for smooth and even operation.
Once both the cabinet members and drawer members are installed, carefully slide the pull-out shelf into the cabinet. The drawer members should engage with the cabinet members. If necessary, adjust the position of the slides slightly to ensure smooth and effortless movement. If the shelves are difficult to slide in or out, check for obstructions or misalignment. Tighten all screws to ensure a secure connection.
For cabinets with face frames, the drawer slides may need to be mounted flush with the face frame. This can be accomplished by using spacers or shims between the cabinet walls and the drawer slides. Shims provide a level mounting surface and prevent the slides from binding against the face frame. Alternatively, specialized face frame mounting brackets can be used.
Key Point 3: Addressing Cabinet Irregularities and Fine-Tuning
Cabinets, particularly older ones, are often not perfectly square or level. These irregularities can pose challenges during the pull-out shelf installation process. Identifying and addressing these issues early on is crucial for achieving a professional-looking and functional result.
Use a level and a square to check the cabinet's interior for any deviations from square. If the cabinet walls are not perfectly vertical, shims can be used to create a level mounting surface for the drawer slides. Place shims between the cabinet wall and the drawer slide bracket to compensate for the unevenness. Secure the shims in place with glue or screws to prevent them from shifting over time.
Similarly, if the cabinet floor is not level, shims can be used to raise or lower the pull-out shelf. Place shims under the shelf unit to level it and prevent it from rocking or wobbling. Ensure the shims are evenly distributed to provide uniform support. In extreme cases, it may be necessary to plane or sand down uneven areas of the cabinet floor to create a level surface.
Another common issue is the presence of obstructions within the cabinet interior, such as pipes, wires, or support structures. These obstructions may interfere with the installation of the pull-out shelves. In some cases, it may be possible to relocate the obstructions. If relocation is not feasible, the shelves may need to be modified to accommodate the obstructions. This may involve cutting notches or recesses in the shelf to clear the obstructions.
After the pull-out shelves are installed, test their operation thoroughly. Slide the shelves in and out multiple times to ensure smooth and consistent movement. Check for any binding, rubbing, or sticking. If any issues are detected, carefully inspect the installation for misaligned slides, loose screws, or obstructions. Adjust the slides as needed to eliminate the problem.
Add any desired finishing touches, such as edge banding to the pull-out shelves or drawer pulls to the front. Edge banding protects the edges of the shelves from damage and provides a more finished appearance. Drawer pulls make it easier to grip and slide the shelves in and out. Choose drawer pulls that complement the style of the cabinets and the overall kitchen or bathroom decor.
Finally, load the pull-out shelves with the intended items. Distribute the weight evenly across the shelf to prevent it from sagging or tipping. Avoid overloading the shelves, as this can damage the drawer slides and reduce their lifespan. Regularly inspect the shelves and slides for any signs of wear or damage. Tighten any loose screws and lubricate the slides as needed to maintain smooth operation.
By meticulously following these steps and paying close attention to detail, even individuals with limited carpentry experience can successfully install pull-out shelves in their cabinets. The result is improved accessibility, increased storage capacity, and a more organized and efficient living space.

How To Make Simple Easy Sliding Shelves

How To Install Pull Out Shelves In Kitchen Cabinets

How To Convert Cabinet Shelves Into Pull Out Drawers Tutorial

Easy Convert Cabinet Shelves To Roll Outs For 10

Installing Sliding Shelves In A Pantry Southern Hospitality

Installing Sliding Shelves In A Pantry Southern Hospitality

Custom Pull Out Shelving Soultions Diy Do It Yourself Shelves That Slide

Pull Out Shelves Kitchen Organization Bigger Than The Three Of Us

How To Install Pull Out Shelves In Kitchen Cabinets Deep Dive

How To Make Simple Easy Sliding Shelves
Related Posts