How To Install Pull Out Drawers In Kitchen Cabinets
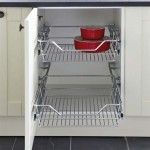
Maximizing space and improving accessibility in the kitchen are common goals for homeowners. One effective solution is the installation of pull-out drawers in existing kitchen cabinets. These drawers offer a significant upgrade from fixed shelves, allowing for easier access to items stored at the back of the cabinet and preventing the need to rummage through contents. This article outlines a comprehensive guide for installing pull-out drawers in kitchen cabinets, covering preparation, installation steps, and potential challenges.
Before embarking on the installation process, a thorough assessment of the existing cabinets is essential. This includes measuring the interior dimensions of the cabinets, particularly the width, depth, and height. Accurate measurements are crucial for selecting the correct size of pull-out drawers and ensuring a proper fit. Consideration should also be given to the cabinet door opening, as some doors may require adjustment or modification to accommodate the drawer slides. Furthermore, the type of cabinet construction should be examined to determine the best method for attaching the drawer slides.
The selection of appropriate pull-out drawer kits is a critical step. Various kits are available, offering different features such as soft-close mechanisms, adjustable dividers, and different weight capacities. The choice should be based on the intended use of the drawers and the specific needs of the user. Higher-quality kits often feature durable materials and smooth-gliding slides, offering long-term reliability. It is advisable to read reviews and compare different options before making a purchase. Consider the desired drawer height and depth to maximize usable space within the cabinet.
Safety is paramount throughout the installation process. Eye protection and gloves should be worn to protect against debris and potential injuries. A dust mask is also recommended, especially when working with older cabinets that may contain dust or allergens. Ensure the work area is well-lit and adequately ventilated. If power tools are used, follow the manufacturer's instructions carefully and use appropriate safety precautions. Disconnect any electrical appliances or circuits that may be in close proximity to the work area to prevent electrical shock.
Preparing the Existing Cabinet
The first step in preparing the cabinet is to remove all existing contents. This includes any items stored on the shelves, as well as any removable shelves themselves. Thoroughly clean the interior of the cabinet using a vacuum cleaner and a damp cloth. This will remove any dust, debris, or food particles that may have accumulated over time. Inspect the cabinet walls and floor for any damage or weaknesses. If any issues are found, such as loose joints or damaged surfaces, they should be addressed before proceeding with the installation.
If the cabinet has fixed shelves, they will need to be removed. Depending on the construction of the cabinet, the shelves may be attached with screws, nails, or glue. Use appropriate tools, such as a screwdriver, pry bar, or putty knife, to carefully remove the shelves without causing damage to the cabinet walls. If the shelves are glued in place, a heat gun or adhesive remover may be necessary to loosen the glue. Once the shelves are removed, fill any holes or imperfections with wood filler and sand smooth to create a flush surface for attaching the drawer slides.
Determine the desired placement of the pull-out drawers within the cabinet. Consider the height of the items that will be stored in each drawer and the overall configuration that will best utilize the available space. Use a measuring tape and a level to mark the locations of the drawer slides on the cabinet walls. It is important to ensure that the marks are accurate and consistent to ensure that the drawers will slide smoothly and evenly. Double-check the measurements and make any necessary adjustments before proceeding.
In some cases, the cabinet walls may not be perfectly square or plumb. This can cause problems with the installation of the drawer slides. If necessary, use shims to create a level and square surface for attaching the slides. Insert the shims between the cabinet walls and the drawer slides, and secure them with screws or adhesive. Check the level of the shims before proceeding to ensure that the drawer slides will be properly aligned.
Installing the Drawer Slides
The installation of the drawer slides is a crucial step in the process. The slides must be installed accurately and securely to ensure that the drawers will function properly. Most pull-out drawer kits include two types of slides: cabinet slides, which are attached to the cabinet walls, and drawer slides, which are attached to the drawer boxes. It is important to identify which slide is which before proceeding.
Begin by attaching the cabinet slides to the cabinet walls, aligning them with the marks that were previously made. Use screws of the appropriate length and type to secure the slides in place. Ensure that the screws are driven straight and tight, but do not overtighten them, as this could strip the screw holes or damage the cabinet walls. Use a level to check the alignment of the slides and make any necessary adjustments before fully tightening the screws.
Next, attach the drawer slides to the drawer boxes. Again, align the slides carefully and use screws of the appropriate length and type to secure them in place. Ensure that the slides are flush with the bottom edge of the drawer boxes and that they are parallel to each other. Use a level to check the alignment of the slides and make any necessary adjustments before fully tightening the screws.
Once the drawer slides are attached to both the cabinet walls and the drawer boxes, carefully slide the drawers into the cabinet. Ensure that the drawer slides engage properly and that the drawers slide smoothly. If the drawers do not slide smoothly, check the alignment of the slides and make any necessary adjustments. It may be necessary to loosen the screws and reposition the slides slightly to achieve a proper fit.
If the pull-out drawer kit includes any additional hardware, such as soft-close mechanisms or adjustable dividers, install them according to the manufacturer's instructions. These features can enhance the functionality and convenience of the drawers. Test the soft-close mechanism to ensure that it is working properly. Adjust the dividers to customize the storage space within the drawers.
Addressing Potential Challenges
During the installation process, several challenges may arise. One common issue is the presence of obstructions within the cabinet, such as pipes, wires, or other fixtures. If these obstructions are encountered, it may be necessary to modify the drawer slides or the drawer boxes to accommodate them. In some cases, it may be necessary to relocate the obstructions entirely. Consult with a qualified professional if you are unsure how to proceed.
Another potential challenge is dealing with uneven cabinet walls or floors. This can cause the drawers to bind or wobble. Use shims to level the cabinet and ensure that the drawer slides are properly aligned. If the floor is uneven, consider installing adjustable feet on the bottom of the cabinet to compensate for the unevenness.
If the drawer slides are difficult to install or adjust, consult the manufacturer's instructions or contact their customer support for assistance. They may be able to provide helpful tips or troubleshooting advice. In some cases, it may be necessary to use specialized tools or hardware to complete the installation successfully.
Finally, after the installation is complete, inspect the drawers carefully to ensure that they are functioning properly. Check the alignment of the drawers, the smoothness of the slides, and the security of the hardware. If any issues are found, address them promptly to prevent further damage or problems.
Installing pull-out drawers in kitchen cabinets can significantly improve the functionality and organization of the kitchen. By following these steps and taking appropriate safety precautions, homeowners can successfully complete this project and enjoy the benefits of easier access and increased storage space.

Diy Pull Out Cabinet Drawers Love Renovations

Diy Pull Out Cabinet Drawers Love Renovations

How To Install Drawer Pullouts In Kitchen Cabinets Ers

How To Make Pull Out Shelves For Kitchen Cabinets Ron Hazelton

How To Easily Add Drawers Kitchen Cabinets Small Stuff Counts

Diy Pull Out Drawer Storage Sawdust 2 Stitches

Pot Pan Storage Kitchen Cabinet Diy Design

How To Install Cabinet Pull Out Drawers The Key More Kitchen Storage

Easy Pull Out Drawers For Kitchen Cabinets

Diy Pull Out Cabinet Drawers Love Renovations
Related Posts

