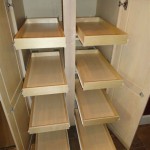
Installing drawers in cabinets is a great way to add convenience and storage space to any room. Whether you are adding a new cabinet to your kitchen, bathroom, or any other room, drawers can make it easier to organize and store items. With a few simple tools and some basic instructions, you can easily learn how to install drawers in cabinets. Here is a step-by-step guide to help you get started.
Step 1: Measure the Inside of the Cabinet. Before you begin installing drawers, you will need to measure the inside of the cabinet so that you know what size drawer you need to purchase. Be sure to measure the width, depth, and height of the cabinet, and also the distance between the sides of the cabinet and the back wall. This will help you determine the size of the drawer slides you will need to purchase.
Step 2: Purchase the Drawer Slides and Drawers. Once you have your measurements, you can go to your local hardware store or home improvement center and purchase the drawer slides and drawers. Make sure you purchase the correct size of slides and drawers for your cabinet. If you are unsure of what size you need, ask an associate for assistance.
Step 3: Install the Drawer Slides. Once you have the drawer slides and drawers, you can begin installing them. Start by attaching the slides to the sides of the cabinet. Make sure they are level, and use a level if necessary. Once the slides are in place, attach the drawers to the slides. Make sure the drawers are securely attached and can move freely.
Step 4: Install the Drawer Pulls. Once the drawers are installed, you will need to add the drawer pulls. You can find a variety of drawer pulls at your local hardware store or home improvement center. Choose the style of pull you like, and then attach it to the front of the drawer. Be sure to use a drill to make the holes for the screws.
Step 5: Add the Drawer Glides. Once you have installed the drawer pulls, you can add the drawer glides. These are the pieces that allow the drawers to open and close smoothly. You will need to measure the distance between the slides and the back wall of the cabinet to determine the correct size of drawer glides. Install the glides according to the manufacturer’s instructions, making sure they are level.
Step 6: Test the Drawers. Once you have installed the drawers and drawer glides, you can test them to make sure they open and close properly. If everything is working correctly, you can enjoy your newly installed drawers!
Installing drawers in cabinets is an easy way to add convenience and storage to any room. With a few simple tools and some basic instructions, you can easily learn how to install drawers in cabinets. Follow these steps and you will be ready to enjoy your newly installed drawers in no time!


Related Posts