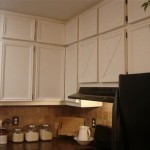
Crown molding can give a kitchen a classic and timeless look. Installing crown molding on your cabinets can be a quick, easy and cost effective way to update the look of your kitchen. It can also add a decorative touch to any cabinet, making it look more luxurious and polished. Here is a look at how to install crown molding on cabinets.
The first step is to measure the inside of the cabinet. Measure the width of the cabinet, the height of the cabinet, the depth of the cabinet and the distance between the top of the cabinet and the ceiling. This will help you determine the size and length of the crown molding you will need to purchase. You should also consider the style of the crown molding you want to use. There are many different styles of crown molding, including traditional, contemporary and ornate.
Once you have the measurements for your cabinet, you can purchase the crown molding in the desired style. Make sure to purchase the right size and type of molding, as this will ensure an easy installation. You will also need to purchase a coping saw, miter saw, sandpaper, wood glue and a hammer.
The next step is to prepare the cabinet. Remove all hardware from the cabinet, and then sand the inside of the cabinet. This will help ensure that the crown molding will adhere properly to the cabinet. Once the cabinet is prepared, you can begin to install the crown molding.
The first step is to cut the molding. Place the molding against the inside of the cabinet, making sure that the edges line up with the edges of the cabinet. Use a coping saw to cut the molding to fit the cabinet perfectly. Once the molding is cut, you can begin to attach it to the cabinet.
Using wood glue, attach the crown molding to the inside of the cabinet. Make sure to use a generous amount of glue and press the molding firmly against the cabinet. If necessary, use a hammer to make sure the molding is secure. Allow the glue to dry for 24 hours.
Once the glue has dried, use a miter saw to cut the crown molding to the desired length. Make sure to measure twice and cut once, as uneven or incorrect cuts can ruin the look of the molding. Once the molding is cut, you can begin to attach it to the ceiling. Place the molding against the ceiling, and then use wood glue to attach it.
When attaching the molding to the ceiling, make sure that the edges of the molding line up with the edges of the cabinet. You can use a level to ensure that the molding is even. Once the molding is attached, you can use a hammer to secure it in place. Allow the glue to dry for 24 hours.
Once the glue has dried, you can sand the edges of the molding for a more polished look. Finally, use a damp cloth to wipe down the molding, and then apply a coat of paint if desired. Installing crown molding on cabinets is a great way to update the look of your kitchen. With a few simple tools and a little patience, you can quickly and easily create a lasting impression.


Related Posts