How to Clean Inside of Wood Kitchen Cabinets with Vinegar and Baking Soda
Maintaining the cleanliness of kitchen cabinets is essential for hygiene and preserving the quality of food storage. Wood cabinets, while aesthetically pleasing, can accumulate grease, food particles, and various spills over time. While commercial cleaning products are readily available, a natural and effective alternative involves using vinegar and baking soda. This method offers a safe, non-toxic, and economical way to clean the interior surfaces of wood cabinets, removing stains, odors, and grime without harsh chemicals that could potentially damage the wood finish or pose health risks.
The effectiveness of vinegar and baking soda lies in their distinct chemical properties. Vinegar, a mild acid, excels at cutting through grease and dissolving mineral deposits and soap scum. Baking soda, a mild alkali, acts as a gentle abrasive, effectively scrubbing away stains and absorbing odors. When these two substances are combined, they create a fizzing action that helps to loosen and lift dirt and grime from surfaces, making it easier to wipe away. This combination is particularly useful in cleaning kitchen cabinets where food spills and grease accumulation are common.
Before commencing the cleaning process, it is crucial to prepare the cabinets and gather the necessary materials. Thorough preparation ensures a smooth and efficient cleaning experience and minimizes the risk of damage to the wood finish. Furthermore, testing the cleaning solution on an inconspicuous area is vital to ascertain its compatibility with the cabinet's surface and prevent any discoloration or damage.
Preparation and Safety Measures
The first step in cleaning wood cabinets is to empty them completely. Remove all items, including food containers, dishes, utensils, and any other stored goods. This allows unrestricted access to all interior surfaces and prevents contamination of the stored items during the cleaning process. Take this opportunity to inspect the items for expiration dates, spills, or damage, and discard or clean accordingly.
Next, gather the required cleaning supplies. This includes white vinegar, baking soda, warm water, a spray bottle, a clean microfiber cloth or sponge, a toothbrush or small scrubbing brush, a bucket, and rubber gloves. Microfiber cloths are preferred as they are gentle on surfaces and effectively trap dirt and grime. The toothbrush or small scrubbing brush will be useful for reaching tight corners and crevices. Rubber gloves protect hands from prolonged exposure to cleaning solutions and potential irritants.
Before applying any cleaning solution to the entire cabinet interior, it is essential to test it on an inconspicuous area. Choose a small, hidden section, such as the inside of a door or the back of a shelf. Apply a small amount of the vinegar and baking soda solution, let it sit for a few minutes, and then wipe it away. Observe the area for any discoloration, damage, or adverse reactions. If no issues arise, it is generally safe to proceed with cleaning the rest of the cabinets. This precautionary step can prevent irreversible damage to the cabinet finish.
Mixing and Applying the Cleaning Solution
Once the preparation is complete and the solution has been tested, prepare the vinegar and baking soda mixture. There are several ways to combine these ingredients depending on the severity of the grime and the type of surface being cleaned. A general-purpose cleaning solution can be made by mixing equal parts of white vinegar and warm water in a spray bottle. For more stubborn stains and grease, a paste of baking soda and water can be used.
To create the general-purpose vinegar solution, simply combine equal parts of white vinegar and warm water in a spray bottle. Shake the bottle gently to ensure the ingredients are well mixed. This solution is suitable for light cleaning and maintenance of the cabinet interiors. The mild acidity of the vinegar will help to cut through grease and remove light stains.
For a more abrasive cleaning action, create a paste by mixing baking soda with a small amount of water. Slowly add water to the baking soda, stirring until a thick paste forms. The consistency should be similar to toothpaste. This paste can be applied directly to stubborn stains and grease build-up. The mild abrasive properties of baking soda will help to scrub away the grime without damaging the wood finish.
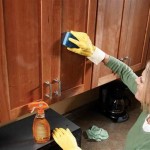
When applying the cleaning solution, whether it’s the vinegar spray or the baking soda paste, it is important to do so in sections. Spray a small area of the cabinet interior with the vinegar solution or apply a thin layer of the baking soda paste. Allow the solution to sit for a few minutes to loosen the dirt and grime. Avoid oversaturating the wood, as excessive moisture can damage the wood fiber and lead to warping or mildew growth. Use the toothbrush or small scrubbing brush to gently scrub any stubborn stains or areas with heavy grime accumulation.
Cleaning and Drying the Cabinets
After allowing the cleaning solution to sit and loosen the grime, it is time to wipe the cabinet interiors clean. Use a clean, damp microfiber cloth to wipe away the vinegar solution or baking soda paste. Rinse the cloth frequently in clean water to remove the dirt and grime. Ensure that all traces of the cleaning solution are removed to prevent residue build-up, which can attract more dirt over time.
For areas that were treated with the baking soda paste, it may be necessary to use a slightly more abrasive scrubbing action to remove the paste completely. A clean, damp sponge can be used for this purpose. Again, ensure that all traces of the baking soda are removed to prevent a powdery residue from forming. If necessary, use a clean, dry cloth to buff the surface and remove any remaining residue.
Once the cabinet interiors are thoroughly cleaned and all cleaning solution residues are removed, it is crucial to allow them to dry completely. Open the cabinet doors and windows to promote air circulation. Use a clean, dry cloth to wipe down the interiors and absorb any remaining moisture. Ensuring the cabinets are completely dry before replacing the stored items will prevent the growth of mold and mildew, which thrive in damp environments. Depending on the humidity and ventilation, drying can take several hours. Consider using a fan to expedite the drying process.
After the cabinets are completely dry, the items can be carefully placed back inside. Before returning the items, consider lining the shelves with shelf paper or non-slip mats. This will provide an extra layer of protection against spills and stains and make future cleanings easier. Organize the items in a way that maximizes space and accessibility. Consider using containers or organizers to keep items neatly arranged and prevent spills from spreading. Regularly inspect the cabinet interiors for any new spills or stains and clean them promptly to prevent them from becoming difficult to remove.

How To Clean Wood Cabinets In The Kitchen Easily Quora

How To Clean Kitchen Cabinets 9 Basics Bob Vila

How To Clean Kitchen Cabinets Everyday Skate

How To Clean Wood Cabinets

How To Clean Grimy Kitchen Cabinets With 2 Ingredients

I Want To Clean And Disinfect The Interior Of My Kitchen Cabinets Would Using Dawn Antibacterial Followed By A Water Rinse Do So Without Staining Wood Quora

4 Proven Ways To Clean Sticky Wood Kitchen Cabinets Lovetoknow

Best Way To Clean Kitchen Cabinets House Cleaning Service Barrington

How To Properly Clean Your Wood Cabinets So They Shine Trends Finishing

How To Clean Kitchen Cabinets In 9 Easy Steps
Related Posts