How To Build Your Own Cabinets For Your Kitchen
Constructing kitchen cabinets can be a significant undertaking, yet it offers substantial rewards. It provides an avenue for customization, cost savings, and the satisfaction of creating a functional and beautiful element of your home. This article outlines the process of building your own kitchen cabinets, covering design considerations, material selection, construction techniques, and installation procedures.
Planning and Design
The initial phase of cabinet construction revolves around meticulous planning and design. Precise measurements and detailed drawings are paramount to ensuring accurate cuts and a cohesive final product. This stage dictates the functionality and aesthetic appeal of the finished cabinets.
Begin by measuring the kitchen space, noting the location of appliances, plumbing, and electrical outlets. Create a floor plan illustrating the existing layout and indicating the desired location for the new cabinets. Consider the overall style of the kitchen and determine the type of cabinets desired, such as base cabinets, wall cabinets, or tall pantry cabinets. Each type serves a different purpose and requires specific design considerations.
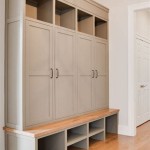
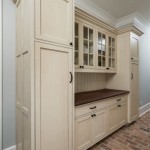
Base cabinets typically sit on the floor and support the countertop. Common dimensions include a standard height of 34.5 inches (allowing for a 1.5-inch countertop to reach the standard 36-inch counter height) and a depth of 24 inches. Wall cabinets are mounted on the wall, generally 18 inches above the countertop. Standard wall cabinet depths range from 12 to 14 inches, and heights can vary depending on the available space and design preference. Tall pantry cabinets provide floor-to-ceiling storage. Dimensions for these cabinets are flexible, allowing for customization to fit specific storage needs and the kitchen's overall design.
Develop detailed drawings for each cabinet, including dimensions for all individual components, such as the cabinet box, face frame (if applicable), doors, and drawers. Use a cabinet design software or create manual drawings with precise measurements. This level of detail minimizes errors during the construction phase.
Material selection is crucial at the planning stage. Solid wood, plywood, and MDF (Medium Density Fiberboard) are common choices for cabinet construction. Solid wood offers durability and aesthetic appeal, while plywood provides strength and stability, and MDF offers a smooth surface for painting and is generally more cost-effective. Consider the budget, desired aesthetic, and the environment where the cabinets will be installed. For example, solid wood might be preferred for visible surfaces, while plywood or MDF could be used for less visible components.
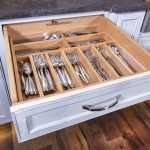
Hardware selection, including hinges, drawer slides, and pulls, should also be considered at this stage. Choose hardware that complements the cabinet style and provides the desired functionality. Consider soft-close hinges and drawer slides for a more luxurious and user-friendly experience.
Construction Techniques
The construction phase involves cutting, assembling, and finishing the cabinet components. This process demands precision and attention to detail to ensure the cabinets are structurally sound and visually appealing. Safe working practices are also paramount.
Begin by cutting the cabinet components according to the dimensions specified in the drawings. Use a table saw, circular saw, or miter saw for accurate cuts. Ensure the blades are sharp and appropriate for the chosen material to prevent splintering or tear-out. It is recommended to cut all components at once to ensure consistency and efficiency.
Assemble the cabinet boxes using screws, nails, or wood glue. Screws and nails provide mechanical fastening, while wood glue creates a strong and durable bond. Consider using pocket-hole joinery for a concealed and robust connection. Pocket-hole joinery involves drilling angled holes in one component and then attaching it to another component with screws. This technique creates a strong joint and hides the screw heads.
If a face frame is desired, construct it separately and attach it to the cabinet box. A face frame is a decorative frame that covers the front edges of the cabinet box, providing a finished appearance and added structural support. The face frame is typically constructed from solid wood and attached with glue and nails or screws.
Construct the doors and drawers according to the design specifications. Doors can be constructed using various methods, such as raised panel, flat panel, or slab doors. Drawers typically consist of a box with a front attached. Use dovetail joints for drawer construction for superior strength and durability. Dovetail joints interlock, creating a strong mechanical connection that resists pulling forces.
Install the chosen hardware, including hinges, drawer slides, and pulls. Ensure the hardware is properly aligned and securely fastened. Consider using a template for consistent hardware placement. This ensures uniformity and a professional finish.
Sand all surfaces smooth, paying particular attention to edges and corners. Use progressively finer grits of sandpaper to achieve a smooth finish. Remove all dust and debris before applying a finish. This step is crucial for achieving a professional-looking and durable finish.
Apply the chosen finish to the cabinets, doors, and drawers. Paint, stain, or varnish are common choices. Apply multiple coats of finish, allowing each coat to dry completely before applying the next. Sand lightly between coats for a smoother finish. A high-quality finish protects the wood from moisture, scratches, and stains, and enhances the overall appearance of the cabinets.
Installation and Finishing Touches
The final stage involves installing the cabinets in the kitchen and adding the finishing touches. Accurate installation is crucial to ensure the cabinets are level, plumb, and securely attached to the walls. This step guarantees the long-term stability and functionality of the cabinetry.
Locate and mark the stud locations on the walls. Install a ledger board at the desired height for the base cabinets. The ledger board provides temporary support while installing the cabinets. This helps ensure the cabinets are level and prevents them from shifting during installation.
Begin installing the base cabinets, starting with the corner cabinets. Level each cabinet and shim as needed to ensure a level surface. Secure the cabinets to the wall studs with screws. Use shims to maintain level and plumb before tightening the screws completely.
Install the wall cabinets, again starting with the corner cabinets. Use a level to ensure the cabinets are plumb and level. Secure the cabinets to the wall studs with screws. Wall cabinets should be securely attached to the studs to prevent them from falling.
Install the countertops according to the manufacturer's instructions. Countertops can be made from various materials, such as laminate, granite, quartz, or solid surface. Ensure the countertop is properly sealed to prevent moisture damage.
Install the doors and drawers, adjusting the hinges and drawer slides as needed for proper alignment and smooth operation. Fine-tune the hardware to ensure the doors and drawers open and close smoothly without any rubbing or sticking.
Install the toe kicks, which are the recessed panels at the base of the cabinets. The toe kicks provide a finished appearance and protect the base of the cabinets from water damage. They also allow for comfortable standing while working at the countertop.
Caulk any gaps between the cabinets and the walls or floor. Caulking provides a clean and professional finish and prevents moisture from entering behind the cabinets. Choose a caulk that matches the cabinet finish.
Install the backsplash, which is the decorative panel behind the countertop. The backsplash protects the wall from splashes and stains. Common backsplash materials include tile, glass, and stone.
Add any final touches, such as under-cabinet lighting or decorative hardware. Under-cabinet lighting provides task lighting for food preparation, while decorative hardware can enhance the overall aesthetic of the kitchen.
Building kitchen cabinets is a complex project, but the rewards of customization, cost savings, and personal satisfaction make it a worthwhile endeavor. By following these steps and paying close attention to detail, a homeowner can create a beautiful and functional kitchen that meets specific needs and preferences. Patience, precision, and a commitment to quality are key to a successful cabinet-building project. Remember to consult with experienced professionals if facing challenges or uncertainties throughout the process.

21 Diy Kitchen Cabinet Ideas For Your Remodel

Diy Kitchen Cabinets Made From Only Plywood

How To Build Cabinets The Complete Guide Houseful Of Handmade

How To Build Your Own Vintage Style Cabinets Daniel Kanter

Diy Budget Open Kitchen Cabinet You Can Build In A Weekend The Ponds Farmhouse

How To Make Diy Kitchen Cabinets

Diy Kitchen Cabinets A Step By Guide

Homemade Modern Ep86 Kitchen Cabinets

Kitchen Cabinet Designs For Contemporary Cooking Spaces

How To Diy Build Your Own White Country Kitchen Cabinets
Related Posts