How To Build Your Own Cabinet Doors
Building your own cabinet doors can be a rewarding project for anyone with basic woodworking skills. It allows for complete customization to meet your specific needs and preferences. This article will guide you through the process of constructing your own cabinet doors, from planning to finishing, ensuring you have all the necessary information to create beautiful and functional doors for your cabinets.
1. Planning and Design
The first step is to carefully plan and design your cabinet doors. This involves determining the size, style, and materials you desire. Consider the following factors:
- Cabinet Size: Measure the existing cabinet openings accurately to ensure the doors fit perfectly.
- Style: Choose a style that complements your cabinets and overall decor. Popular options include shaker, raised panel, flat panel, and beaded styles.
- Materials: Decide on the type of wood or other materials you want to use for your doors. Factors to consider include durability, cost, and appearance.
- Hardware: Select hinges and knobs or pulls that match your style and functionality requirements.
Once you have a clear concept, create sketches or detailed drawings to visualize the final design and ensure all dimensions are accurate. This will serve as your blueprint throughout the construction process.
2. Cutting and Assembling the Door Frame
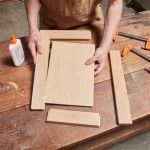
With the design finalized, it's time to start cutting and assembling the door frame. This involves creating the base, stiles, and rails that will form the structure of your door.
- Cut the Stock: Using a table saw or miter saw, cut the wood to the precise dimensions required for the base, stiles, and rails.
- Joints: Choose a suitable joinery method for connecting the frame pieces. Common options include butt joints, rabbet joints, or mortise and tenon joints.
- Glue and Clamp: Apply wood glue to the joint surfaces and clamp the pieces together securely, ensuring they are aligned correctly.
- Secure the Joints: Use screws or dowels to reinforce the joints and create a strong and durable frame.
Allow the glue to dry completely before proceeding to the next step.
3. Creating the Door Panel
The door panel is the central part of the door and can be flat, raised, or recessed, depending on your chosen style. Creating the panel involves the following steps:
- Cut the Panel: Cut the wood to the desired size and shape for the panel, taking into account any raised or recessed features.
- Prepare the Panel: Sand the panel smooth and apply a finish if desired, such as paint or stain.
- Install the Panel: Attach the panel to the frame using various methods, such as rabbet joints, dadoes, or a frame-and-panel system.
Ensure the panel is securely fastened and flush with the frame for a clean and professional look.
4. Finishing Touches
Once the door is assembled, it's time to add the finishing touches. This includes sanding, priming, painting or staining, and installing hardware.
- Sanding: Smooth out any rough edges and imperfections with sandpaper, starting with coarser grit and gradually moving to finer grits for a smooth finish.
- Priming: Apply a primer to the door to create a uniform surface for the final finish and enhance paint adhesion.
- Painting or Staining: Choose your desired finish and apply it evenly using a brush, roller, or spray gun.
- Hardware Installation: Install hinges, knobs, or pulls according to the manufacturer's instructions, ensuring they are properly aligned and secured.
By following these steps carefully, you can create beautiful and functional cabinet doors that enhance the look and functionality of your cabinets.

How To Make Cabinet Doors 9 Steps With Pictures Wikihow

Diy Shaker Cabinet Doors How To Make Your Own For Less Farmhouseish

How To Build Cabinet Doors Update Your Cabinets Or Built Ins

17 Easy Diy Cabinet Door Ideas On A Budget The Handyman S Daughter

3 Ways To Diy Cabinet Doors From Beginner Pro

How To Make Cabinet Doors 9 Steps With Pictures Wikihow

Diy Rustic Industrial Cabinet Doors Tutorial Cherished Bliss

How To Build Cabinet Doors Update Your Cabinets Or Built Ins

Diy Shaker Cabinet Doors How To Make Your Own For Less Farmhouseish

How To Make Your Own Cabinet Doors Beneath My Heart
Related Posts

