How To Build A Built-In Pantry Cabinet
A built-in pantry cabinet offers a customized storage solution, maximizing space and enhancing kitchen organization. Building one requires careful planning and execution, but the results provide a significant improvement in both functionality and aesthetics.
Planning and Design
The initial phase involves determining the pantry's location, dimensions, and internal configuration. Accurate measurements of the designated space are crucial. Consider factors like door swing, proximity to other kitchen elements, and available wall space. Sketching a detailed plan, including shelf placement, drawer dimensions, and any special features, facilitates the building process.
Material Selection
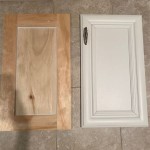
Choosing appropriate materials impacts the pantry's durability and appearance. Common options for the cabinet carcass include plywood, medium-density fiberboard (MDF), and particleboard. Plywood offers strength and stability, while MDF provides a smooth surface for painting. Particleboard is a more budget-friendly option but may be less resistant to moisture. For the face frame and doors, solid wood provides a classic look. Selecting high-quality hinges and drawer slides ensures smooth operation.
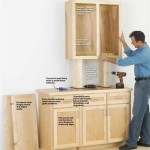
Construction of the Carcass
The carcass forms the main structure of the pantry. Cut the chosen material according to the planned dimensions. Assemble the carcass using wood glue and screws, ensuring square corners and secure joints. Use a Kreg jig for pocket-hole joinery, offering added strength and a cleaner finish. Add supporting members, such as vertical dividers and horizontal bracing, for increased rigidity, especially for taller pantries.
Building Shelves and Drawers
Shelves and drawers maximize storage space and organization. Cut shelves from the same material as the carcass, ensuring they fit snugly within the frame. Consider adjustable shelves for flexibility in accommodating different sized items. For drawers, construct drawer boxes using dovetail joints or simpler butt joints reinforced with glue and screws. Choose appropriate drawer slides based on the drawer size and weight capacity.
Installing the Face Frame
The face frame provides a decorative finish and a mounting point for the doors. Cut the frame pieces from solid wood and assemble them using wood glue and clamps. Attach the face frame to the carcass using screws, ensuring it is flush with the front edges. The face frame adds a professional touch and conceals the raw edges of the carcass.
Hanging the Doors
Pantry doors can be custom-built or purchased pre-made. If building doors, use solid wood or a combination of wood and panels. Ensure the doors are the correct size and fit within the face frame opening, allowing for proper clearance. Attach hinges to the doors and the face frame, ensuring they are aligned for smooth opening and closing. Consider using soft-close hinges for a quieter operation.
Finishing Touches
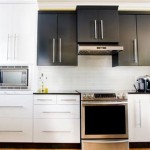
The final steps involve adding finishing touches to complete the pantry. Fill any nail holes or gaps with wood filler and sand the surfaces smooth. Apply a primer and paint or stain to match the existing kitchen décor. Consider adding decorative molding or trim to enhance the visual appeal. Installing door hardware, such as knobs or pulls, completes the project.
Installation of the Pantry
Carefully position the completed pantry cabinet in the designated location. Use shims to level the cabinet and ensure it is plumb. Secure the pantry to the wall studs using screws, providing a stable and secure installation. If the pantry is positioned between existing cabinets, ensure it aligns seamlessly with the surrounding cabinetry. Consider using trim pieces to blend the pantry with adjacent elements.
Internal Organization
Once installed, organize the pantry's interior for optimal storage. Utilize baskets, bins, and other organizers to maximize space and keep items easily accessible. Label shelves and containers for efficient retrieval of goods. Consider installing pull-out shelves or drawers for improved access to items stored at the back of the pantry. Adjust shelf heights as needed to accommodate different sized items.

How To Build Diy Pantry Cabinets Part 1 Building Base

How To Build A Pantry Cabinet The Handyman S Daughter

Build A Pantry Part 1 Cabinet Plans Included The Diy Village

Pantry Cabinet Plans Pictures Ideas Tips From

Build A Pantry Part 1 Cabinet Plans Included The Diy Village

How To Build A Kitchen Pantry Cabinet Larder Cupboard

Custom Diy Pantry Weekend Project How To Build A Kitchen

How To Build A Pantry Cabinet The Handyman S Daughter

How To Build Diy Pantry Cabinets Part 1 Building Base

How To Make A Pantry
Related Posts