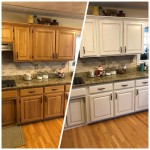
How To Brighten Up Wood Kitchen Cabinets
Wood kitchen cabinets often contribute significantly to the overall aesthetic of a kitchen. Over time, however, they can become dull, faded, or simply appear outdated, regardless of their inherent quality. Brightening wood cabinets can revitalize the entire kitchen space, making it feel more open, clean, and inviting. Several approaches can be employed to achieve this, ranging from deep cleaning to more intensive refinishing techniques. The specific method chosen will depend on the current condition of the cabinets, the desired level of brightness, and the homeowner's commitment to the project.
Before undertaking any brightening project, it's crucial to thoroughly assess the cabinets. Examine them for any signs of significant wear and tear, such as deep scratches, water damage, or peeling veneer. Minor imperfections might be easily addressed with simple cleaning and touch-up solutions, while more extensive damage may necessitate professional restoration or even replacement of certain components. This initial assessment will guide the selection of appropriate cleaning products, refinishing materials, and the overall approach to the transformation.
This article will outline detailed methods for brightening wood kitchen cabinets, encompassing cleaning techniques, light refinishing options, and strategies for enhancing natural light within the kitchen to complement the brighter cabinets. The objective is to provide a comprehensive guide that empowers homeowners to effectively rejuvenate their kitchen cabinets and achieve a brighter, more appealing kitchen environment.
Deep Cleaning and Polishing
Often, the perceived dullness of wood cabinets is merely a result of accumulated grease, grime, and dust. A thorough cleaning can often dramatically improve their appearance. Begin by gathering the necessary supplies: a mild dish soap, warm water, two clean microfiber cloths, a soft-bristled brush (an old toothbrush works well for crevices), and a wood-friendly cleaner or polish.
The initial step involves creating a cleaning solution by mixing a small amount of mild dish soap with warm water. Avoid using harsh detergents or abrasive cleaners, as these can damage the finish. Dip one of the microfiber cloths into the solution, wringing it out thoroughly, so it is damp but not dripping. Gently wipe down all cabinet surfaces, paying particular attention to areas that tend to accumulate grease, such as around the stove and sink. Use the soft-bristled brush to clean any intricate details or hard-to-reach areas.
Once all surfaces have been cleaned with the soapy water, use the second clean, damp microfiber cloth to rinse away any soap residue. It is essential to ensure all soap is removed, as it can leave a dull film on the cabinets if left to dry. After rinsing, thoroughly dry the cabinets with a clean, dry microfiber cloth. This will prevent water spots and further enhance the clean appearance.
After the cabinets are thoroughly cleaned and dried, consider applying a wood-friendly cleaner or polish. This step is not strictly necessary, but it can significantly improve the shine and luster of the wood. Choose a product specifically designed for wood cabinets and follow the manufacturer's instructions carefully. Apply a small amount of the cleaner or polish to a clean microfiber cloth and gently buff it into the wood. This will help protect the finish, add a subtle sheen, and further remove any lingering dirt or grime. Avoid using excessive amounts of polish, as this can lead to a buildup that attracts dust.
For cabinets with a particularly stubborn buildup of grease or grime, a stronger cleaning solution may be required. A mixture of equal parts white vinegar and warm water can be effective for cutting through grease. However, it is crucial to test this solution on an inconspicuous area of the cabinet first to ensure it does not damage the finish. If the vinegar solution is safe to use, follow the same cleaning procedure as outlined above, ensuring thorough rinsing and drying afterwards.
Regular cleaning is essential for maintaining the brightness of wood kitchen cabinets. A quick wipe-down with a damp microfiber cloth every week or two can prevent the buildup of dirt and grime, making it easier to keep the cabinets looking their best. This simple routine can significantly extend the life of the cabinets and help maintain a bright and welcoming kitchen environment.
Light Refinishing Techniques
If cleaning alone does not achieve the desired level of brightness, light refinishing techniques can be employed. These methods involve minimal sanding and alterations to the existing finish, making them ideal for cabinets that are in relatively good condition but have simply lost some of their luster. Two common light refinishing techniques are the application of a tinted varnish or a gel stain.
Tinted varnish offers a subtle way to brighten wood cabinets while preserving the existing grain and character. Select a varnish with a slightly lighter tint than the current cabinet color. Before applying the varnish, lightly sand the cabinet surfaces with fine-grit sandpaper (220-grit or higher) to create a smooth surface for the new finish to adhere to. Remove all sanding dust with a tack cloth. Apply the tinted varnish in thin, even coats using a high-quality brush or sprayer, following the manufacturer’s instructions carefully. Allow each coat to dry completely before applying the next. Multiple thin coats are preferable to one thick coat, as this will result in a smoother, more even finish. This process allows for a gradual lightening of the cabinets without completely obscuring the underlying wood.
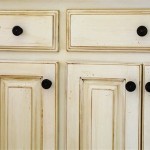
Gel stain is another option for light refinishing. It is particularly useful for cabinets that have a slightly uneven finish or minor blemishes. Unlike traditional stains, gel stain sits on top of the existing finish rather than penetrating it, making it easier to control the color and application. Prepare the cabinet surfaces by lightly sanding them with fine-grit sandpaper and removing all sanding dust. Apply the gel stain with a clean cloth or brush, working in small sections. Wipe off the excess stain with a clean cloth, adjusting the amount of stain removed to achieve the desired level of color. Allow the stain to dry completely. Multiple coats can be applied for a deeper color if desired. After the stain is dry, apply a clear topcoat of polyurethane or varnish to protect the finish and add a layer of durability.
When using either tinted varnish or gel stain, it is crucial to work in a well-ventilated area and to wear appropriate safety gear, such as gloves and a respirator. Always test the chosen product on an inconspicuous area of the cabinet before applying it to the entire surface. This will allow the homeowner to assess the color and finish and ensure that it meets their expectations.
Before beginning any refinishing project, remove all hardware, such as knobs and pulls, from the cabinets. This will make it easier to apply the finish evenly and prevent any unwanted drips or runs. Consider replacing the old hardware with new, brighter hardware to further enhance the overall appearance of the cabinets. Choose hardware that complements the new finish and adds a touch of style to the kitchen.
Enhancing Natural and Artificial Light
Even with brightened cabinets, a poorly lit kitchen can still feel dark and uninviting. Optimizing both natural and artificial light sources is crucial for creating a truly bright and welcoming kitchen environment. Maximizing natural light is often the first step in achieving this goal.
Ensure that windows are clean and unobstructed, allowing as much sunlight as possible to enter the room. Consider trimming any trees or shrubs that may be blocking natural light from reaching the windows. Light-colored window treatments, such as sheer curtains or blinds, can allow sunlight to filter into the room while still providing privacy. Avoid heavy, dark curtains, which can absorb light and make the room feel darker. The strategic placement of mirrors can also help to amplify natural light. Position mirrors on walls opposite windows to reflect sunlight back into the room, creating a brighter and more spacious feel.
In addition to maximizing natural light, it is essential to ensure adequate artificial lighting in the kitchen. Layered lighting is often the most effective approach, combining ambient lighting, task lighting, and accent lighting to create a well-lit and visually appealing space. Ambient lighting provides overall illumination for the kitchen, typically in the form of recessed lighting or a central ceiling fixture. Task lighting focuses on specific work areas, such as the countertops and sink, and is often provided by under-cabinet lighting or pendant lights. Accent lighting is used to highlight specific features, such as artwork or decorative items, and can be achieved with spotlights or track lighting.
Under-cabinet lighting is particularly effective for brightening up the countertops and making it easier to perform tasks such as food preparation. LED strip lights are a popular choice for under-cabinet lighting, as they are energy-efficient, long-lasting, and provide a bright, even light. Consider using light bulbs with a color temperature of around 3000K to 4000K for task lighting. This will provide a bright, white light that is ideal for working in the kitchen. Warmer color temperatures can be used for ambient lighting to create a more inviting and relaxing atmosphere.
Replacing outdated or inefficient light fixtures with newer, brighter models can also significantly improve the overall lighting in the kitchen. Consider upgrading to LED lighting, which is more energy-efficient and provides a brighter, more consistent light than traditional incandescent or fluorescent bulbs. Dimmer switches can be installed to allow for adjusting the brightness of the lights, creating a more flexible and customizable lighting scheme. This allows for adjusting the light levels based on the time of day and the specific task being performed. Brighter lighting can be employed when preparing meals, while a dimmed setting is suitable for dining or relaxing.
By carefully considering both natural and artificial light sources, it is possible to create a kitchen that is not only bright but also functional and aesthetically pleasing. Combined with brightened wood cabinets, a well-lit kitchen can become a truly inviting and enjoyable space.

How To Make Oak Kitchen Cabinets Look Modern Without Covering Them Up

21 Diy Affordable Ways To Redo Kitchen Cabinets Extra Space Storage

How To Make Oak Kitchen Cabinets Look Modern Without Covering Them Up
:max_bytes(150000):strip_icc()/DesignbyNatalieKraiemPhotobyKirstenFrancis-c8c60d48cd3541a9bdb756a933aa3780-a21edbeb7f374a498dd8a5cfbb33cdd1.jpg?strip=all "25 Kitchens With Light Wood Cabinets Sure To Impress")
25 Kitchens With Light Wood Cabinets Sure To Impress

Light Wood Cabinets The Latest Trend In Kitchen Design And How Tune Up Can Help You Achieve It

5 Ways To Make Honey Oak Cabinets Look Modern Decorcabinets Com

Light Wood Cabinets The Latest Trend In Kitchen Design And How Tune Up Can Help You Achieve It

Painting Oak Cabinets Transform Your Kitchen

How To Brighten A Dark Kitchen O Hanlon Bath

21 Diy Affordable Ways To Redo Kitchen Cabinets Extra Space Storage
Related Posts