DIY Build Your Own Kitchen Cabinets: A Comprehensive Guide
Embarking on a DIY kitchen cabinet project can be a challenging yet rewarding endeavor. Constructing your own cabinets allows for customization to precise specifications, cost savings compared to purchasing pre-made units, and the satisfaction of creating a functional and aesthetically pleasing feature in your home. This article provides a comprehensive guide to building your own kitchen cabinets, covering essential planning, material selection, construction techniques, and installation considerations.
Planning and Design: The Foundation of Success
Prior to any physical construction, meticulous planning and design are paramount. This phase dictates the overall success of the project, ensuring that the finished cabinets meet both functional and aesthetic requirements.
The initial step involves a thorough assessment of the existing kitchen space. Measure the dimensions of the area where the cabinets will be installed, paying close attention to wall lengths, height restrictions (such as soffits or bulkheads), and the location of plumbing and electrical fixtures. Accurate measurements are crucial for proper fit and avoiding costly errors later in the process.
Next, determine the desired layout and configuration of the cabinets. Consider the placement of major appliances like the refrigerator, oven, and dishwasher, and how the cabinets will integrate with these elements. Decide on the number and size of base cabinets, wall cabinets, and any specialty units (such as pantry cabinets or corner cabinets). Graph paper or digital design software can be helpful in visualizing the layout and ensuring efficient use of space.
When selecting a cabinet style, consider the overall aesthetic of the kitchen and the desired level of ornamentation. Common styles include shaker, slab, raised panel, and recessed panel. Each style offers a different visual appeal and level of complexity in construction. Decide on the preferred door and drawer front designs, as these elements contribute significantly to the overall look of the cabinets.
Once the layout and style have been determined, create detailed drawings or blueprints for each cabinet unit. These plans should include precise dimensions for all components, including the cabinet box, doors, drawers, shelves, and hardware. Indicate the materials to be used for each part and specify the joinery methods (e.g., screws, dowels, dovetails). Clear and accurate drawings will serve as a roadmap throughout the construction process.
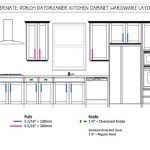
Selecting appropriate hardware is essential for both functionality and aesthetics. Choose hinges, drawer slides, knobs, and pulls that complement the cabinet style and provide smooth, reliable operation. Consider soft-close mechanisms for doors and drawers to enhance user experience and minimize noise.
Material Selection: Choosing the Right Components
The choice of materials significantly impacts the durability, appearance, and cost of the finished cabinets. Selecting the appropriate materials for each component is crucial for ensuring long-lasting performance and achieving the desired aesthetic.
Cabinet boxes are typically constructed from plywood, particleboard, or medium-density fiberboard (MDF). Plywood offers excellent strength and moisture resistance, making it a good choice for high-moisture areas. Particleboard is a more economical option but is less resistant to moisture and may require careful sealing. MDF provides a smooth, uniform surface that is ideal for painting or applying laminate veneers.
Cabinet doors and drawer fronts can be made from solid wood, plywood, MDF, or a combination of materials. Solid wood offers a classic look and can be stained or painted to achieve a variety of finishes. Plywood provides good stability and can be used for larger panels. MDF is a cost-effective option that is well-suited for painted finishes.
Shelves can be made from the same materials as cabinet boxes, but adjustable shelves often require additional support. Consider using shelf pins or shelf standards to provide adjustability and prevent sagging under heavy loads. Glass shelves can also be used to add visual interest and create a more open feel.
For cabinet hardware, consider the materials used and the durability of the finish. Stainless steel and brushed nickel are popular choices for hinges, drawer slides, knobs, and pulls, as they are resistant to corrosion and offer a sleek, modern look. Ensure that the hardware is compatible with the cabinet style and provides smooth, reliable operation.
When selecting adhesives, choose a high-quality wood glue that is appropriate for the type of joinery being used. Polyurethane glue is a strong, durable option that is suitable for bonding a variety of materials. Consider using construction adhesive for attaching cabinet boxes to walls or floors.
Appropriate choices of finishes and sealants will protect the wood from moisture and wear. Paints, stains, varnishes, and sealants are available to protect the wood from moisture damage. Select finishes that match the desired aesthetic and provide a durable, easy-to-clean surface.
Construction Techniques: Bringing the Design to Life
The construction phase involves cutting, assembling, and finishing the cabinet components according to the detailed plans. Mastering basic woodworking techniques and adhering to precise measurements are essential for achieving professional-looking results.
Begin by cutting all cabinet components to the specified dimensions. Use a table saw, circular saw, or miter saw to ensure accurate and clean cuts. Label each piece clearly to avoid confusion during assembly. Consider cutting a few test components to verify the accuracy of your measurements and cutting techniques.
Assemble the cabinet boxes using screws, dowels, or other joinery methods. Predrill holes to prevent splitting the wood. Apply wood glue to all joints to create a strong, durable bond. Use clamps to hold the components together while the glue dries. Ensure that the cabinet boxes are square and level before proceeding to the next step.
Construct the doors and drawer fronts according to the chosen style. For shaker-style doors, create a frame using stiles and rails, and insert a center panel. For slab doors, simply cut the panel to size and apply edge banding. Assemble the drawer boxes using dovetail joints or other secure joinery methods. Attach drawer slides to the cabinet boxes and drawer boxes, ensuring smooth and accurate movement.
Install shelves using shelf pins or shelf standards. For adjustable shelves, drill holes at regular intervals to allow for flexible placement. For fixed shelves, glue and screw them into place for added stability. Consider adding a back panel to the cabinet boxes for added rigidity and to conceal wall imperfections.
Apply the chosen finish to the cabinet boxes, doors, and drawer fronts. Sand the surfaces smooth and apply a primer coat. Allow the primer to dry completely before applying the final coat of paint, stain, or varnish. Apply multiple coats of finish, sanding lightly between each coat, to achieve a smooth, durable surface.
Install the cabinet hardware, including hinges, drawer pulls, knobs, and soft-close mechanisms. Ensure that the hardware is properly aligned and securely attached. Test the operation of all doors and drawers to ensure smooth and reliable movement.
Installation Considerations: Achieving a Professional Finish
The final step involves installing the finished cabinets in the kitchen, ensuring they are level, plumb, and securely attached to the walls and floor. Proper installation is crucial for the long-term stability and functionality of the cabinets.
Locate the wall studs using a stud finder and mark their positions on the walls. Use a level to draw horizontal lines to indicate the top and bottom of the base cabinets and wall cabinets. These lines will serve as guides for installation.
Begin by installing the base cabinets. Position the cabinets along the marked lines and use shims to level them. Secure the cabinets to the wall studs using screws. Connect the cabinets to each other using screws or bolts. Ensure that the cabinets are flush with each other and that there are no gaps or overlaps.
Install the wall cabinets, starting with the uppermost units. Use a ledger board to support the cabinets while they are being installed. Secure the cabinets to the wall studs using screws. Connect the cabinets to each other using screws or bolts. Ensure that the cabinets are level and plumb.
Install the countertops and backsplashes according to the manufacturer's instructions. Seal any gaps or seams with caulk to prevent moisture damage. Install the plumbing and electrical fixtures, ensuring that they are properly connected and functioning correctly.
Add the final touches, such as trim, molding, and lighting. These elements will enhance the overall appearance of the kitchen and create a cohesive, professional look. Inspect the cabinets for any imperfections and make any necessary adjustments or repairs.
Building your own kitchen cabinets is a significant undertaking that requires careful planning, meticulous execution, and a commitment to quality. By following the guidelines outlined in this article, it is possible to create custom cabinets that meet your specific needs and enhance the beauty and functionality of your kitchen.

Build Your Own Cabinets Without Expensive Tools Houseful Of Handmade

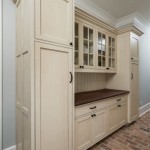
How To Diy Build Your Own White Country Kitchen Cabinets

How To Build Your Own Kitchen Cabinets With Pictures Instructables

Should You Build Your Own Kitchen Cabinets Lily Ann

How To Build Your Own Kitchen Cabinets Building Diy New

Diy Kitchen Cabinets Made From Only Plywood

Diy Budget Open Kitchen Cabinets Build Your Own In A Weekend

How To Build Your Own Vintage Style Cabinets Daniel Kanter

How To Build Cabinets The Complete Guide Houseful Of Handmade

How To Diy Build Your Own White Country Kitchen Cabinets
Related Posts