Can You Replace Drawer Slides On Old Cabinets? A Comprehensive Guide
Replacing drawer slides on old cabinets is a common home improvement task that can significantly enhance the functionality and aesthetics of your kitchen, bathroom, or any other space with built-in storage. Over time, drawer slides can become worn, rusty, or simply fail to operate smoothly, leading to frustrating experiences. Fortunately, replacing them is often a straightforward process that can be accomplished with basic tools and a little patience.
The feasibility of replacing drawer slides on older cabinets largely depends on several factors, including the type of existing slides, the construction of the cabinet, and the availability of compatible replacement slides. Understanding these factors is crucial for a successful replacement project. This article will delve into the intricacies of replacing drawer slides on older cabinets, providing a comprehensive guide to help you navigate the process.
Identifying the Type of Existing Drawer Slides
The first step in replacing drawer slides is to identify the type of slides currently installed in your cabinets. This identification process is crucial because it dictates the type of replacement slides you will need and the installation method you will employ. There are several common types of drawer slides found in older cabinets, each with its own unique characteristics.
Side-Mount Slides: These are the most prevalent type of drawer slides, particularly in older cabinets. They are installed on the sides of the drawer box and the inside walls of the cabinet. Side-mount slides typically consist of two metal or plastic channels that interlock, allowing the drawer to slide in and out. They are relatively easy to identify and replace, making them a popular choice for DIY projects.
Center-Mount Slides: Center-mount slides are installed underneath the center of the drawer box and attach to a rail or support within the cabinet. They are less common than side-mount slides and are often found in older or more budget-friendly cabinets. Replacing center-mount slides can be slightly more complex, as it may require precise alignment and attachment to the cabinet frame.
Bottom-Mount Slides: These slides are attached to the bottom edges of the drawer box and to the cabinet floor. They are designed to provide support and stability for heavier drawers. Bottom-mount slides are often found in kitchen cabinets and may require specialized hardware for installation.
Euro-Style Slides: Euro-style slides, also known as concealed slides, are mounted inside the drawer box and the cabinet frame, providing a clean, frameless look. They are commonly found in contemporary cabinets and offer features such as soft-close mechanisms and full extension capabilities. Replacing Euro-style slides may require more specialized tools and techniques.
Once you have identified the type of drawer slides in your cabinets, you can begin researching suitable replacement options. Consider factors such as load capacity, extension length, and features like soft-close mechanisms when selecting your new slides.
Assessing the Cabinet Construction
The construction of your cabinets plays a significant role in determining the ease and feasibility of replacing drawer slides. Older cabinets may have different construction methods and materials compared to modern cabinets, which can impact the installation process. It is important to carefully assess the cabinet construction before proceeding with the replacement.
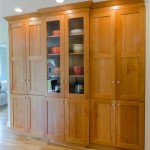
Framed Cabinets: Framed cabinets have a face frame that surrounds the cabinet opening. This frame provides structural support and can make installing drawer slides more challenging. You may need to use shims or spacers to ensure the slides are properly aligned with the drawer box.
Frameless Cabinets: Frameless cabinets, also known as European-style cabinets, do not have a face frame. The cabinet doors and drawers attach directly to the cabinet box. This simpler construction can make installing drawer slides easier, as there is no frame to obstruct the installation process.
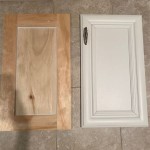
Cabinet Material: The material of the cabinet box can also affect the installation process. Older cabinets may be made of solid wood, plywood, or particleboard. Solid wood is generally the easiest material to work with, while particleboard can be more prone to crumbling or splitting. When working with particleboard, it is important to use caution and avoid over-tightening screws.
In addition to the overall construction, you should also inspect the condition of the cabinet box. Look for signs of damage, such as cracks, splits, or water damage. Repair any damage before installing the new drawer slides to ensure a stable and secure installation.
Selecting and Installing Replacement Drawer Slides
After identifying the type of existing slides and assessing the cabinet construction, the next step is to select and install the replacement drawer slides. This process involves careful measurement, preparation, and installation techniques to ensure a successful outcome.
Measuring and Selecting Replacement Slides: Accurately measure the length of the existing drawer slides. This measurement is crucial for selecting replacement slides of the correct size. Measure the distance from the back of the cabinet to the front edge of the cabinet opening. Choose replacement slides that match this length as closely as possible. It's also important to measure the height of the drawer opening to ensure that the new slides will fit without any obstructions.
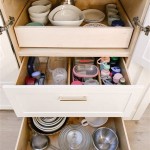
Consider also the weight capacity of the slides, especially for drawers that will hold heavy items. Opt for slides with a higher weight rating than you anticipate needing to provide a safety margin.
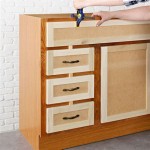
Preparing the Cabinet and Drawer: Before installing the new slides, remove the old drawer slides from the cabinet and the drawer box. Clean the surfaces where the new slides will be installed, removing any debris, dust, or old adhesive. If there are any holes from the old slides, you may need to fill them with wood filler and sand them smooth to create a clean surface for the new screws.
Installing the Replacement Slides: Begin by attaching the cabinet portion of the new drawer slides to the inside walls of the cabinet. Use the screws provided with the slides and ensure they are properly aligned. Use a level to ensure the slides are perfectly horizontal.
Next, attach the drawer portion of the new drawer slides to the sides of the drawer box. Again, ensure they are properly aligned and level. Test the fit by sliding the drawer into the cabinet. If the drawer does not slide smoothly, check the alignment of the slides and adjust as needed. Shims may be required to achieve perfect alignment, especially in older cabinets where the surfaces may not be perfectly square.
Addressing Common Challenges: Several challenges may arise during the drawer slide replacement process. Older cabinets may have uneven surfaces, damaged wood, or misaligned frames. These issues can be addressed with careful preparation and attention to detail. Here are some common challenges and solutions:
Uneven Surfaces: Use shims to create a level surface for the drawer slides. Place shims between the slides and the cabinet or drawer box to compensate for any unevenness.
Damaged Wood: Repair any damaged wood before installing the new slides. Use wood filler to fill in holes or cracks, and sand the surface smooth before attaching the slides.
Misaligned Frames: Check the alignment of the cabinet frame and adjust as needed. Loosen the screws holding the frame together and use a level to ensure it is square. Re-tighten the screws once the frame is properly aligned.
Difficulty Sliding: If the drawer is difficult to slide, check the alignment of the drawer slides and adjust as needed. Make sure the slides are parallel to each other and that there are no obstructions preventing smooth movement. Lubricate the slides with a silicone-based lubricant to improve performance.
Screws Stripping: If the screws are stripping the wood, use longer screws or drill pilot holes before inserting the screws. Pilot holes will help guide the screws and prevent them from stripping the wood.
Replacing drawer slides on old cabinets does not have to be a daunting task. It’s a manageable project that requires patience, careful planning, and the right tools. By understanding the different types of slides, properly assessing the cabinet construction, and employing the correct installation techniques, you can breathe new life into your old cabinets and enjoy smooth-gliding drawers for years to come.
Remember to always prioritize safety when working with tools and hardware. Wear safety glasses to protect your eyes from flying debris and use caution when operating power tools. If you are unsure about any aspect of the installation process, consult with a professional carpenter or handyman.

How To Replace Old Drawer Slides Only 5 Easy Steps Vadania Home Upgrader

Replacing Drawer Slides Extreme How To

How To Replace Old Drawer Slides Only 5 Easy Steps Vadania Home Upgrader

How To Install Drawer Slides On A Vintage Dresser Shades Of Blue Interiors

How To Replace Old Drawer Slides Only 5 Easy Steps Vadania Home Upgrader

How To Install Drawer Slides On A Vintage Dresser Shades Of Blue Interiors

How To Install Drawer Slides On A Vintage Dresser Shades Of Blue Interiors

Fixing Drawers How To Make Creaky Glide Diy

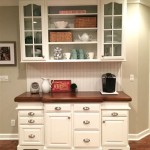
Budget Kitchen Renovation Replacing Drawer Slides

How To Replace Drawer Slides The Vixen S Den
Related Posts