Can You Repaint Cabinets That Have Already Been Painted? A Comprehensive Guide
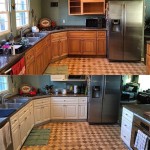
Repainting cabinets is a popular and cost-effective way to refresh the look of a kitchen or bathroom without undergoing a full renovation. However, many homeowners wonder if it's possible to repaint surfaces that have already been painted. The short answer is yes, but the success of the project hinges on proper preparation, technique, and understanding of the existing paint and surface conditions. This article will provide a detailed guide on how to repaint cabinets that have already been painted, ensuring a durable and aesthetically pleasing finish.
Assessing the Existing Paint and Cabinet Condition
Before embarking on any repainting project, a thorough assessment of the existing paint and cabinet condition is crucial. This initial evaluation will dictate the necessary steps for preparation and the types of materials required. Consider the following factors:
Paint Type: Identifying the type of paint previously used is essential. Latex (water-based) and oil-based paints require different approaches. A simple test can help determine the paint type. Rub a small area of the painted surface with a cotton ball soaked in denatured alcohol. If the paint comes off, it's likely latex. If it doesn't, it's likely oil-based. Knowing this will inform your choice of primer and topcoat. Applying latex paint over oil-based paint without proper preparation can lead to poor adhesion and peeling.
Paint Condition: Examine the existing paint for signs of damage such as chipping, peeling, cracking, or bubbling. If the existing paint is in poor condition, extensive preparation will be necessary to create a smooth and stable surface for the new paint. Loose or flaking paint must be removed. Extensive damage may necessitate stripping the cabinets down to the bare wood, which is a more labor-intensive process.
Cabinet Material: The material of the cabinets – whether solid wood, veneer, laminate, or MDF (medium-density fiberboard) – will affect the preparation methods and the types of paint that can be used. Solid wood is generally the most forgiving and durable, while laminate and MDF require careful preparation to ensure proper adhesion.
Surface Cleanliness: The cabinets must be thoroughly cleaned to remove grease, grime, and dirt. Any contaminants on the surface will prevent the new paint from adhering properly, leading to premature failure. Consider the location of the cabinets – kitchen cabinets are more likely to have accumulated grease buildup than bathroom cabinets.
Upon completing the assessment, a comprehensive plan outlining the required preparation steps and materials can be developed.
Preparing the Cabinets for Repainting
Proper preparation is arguably the most important aspect of repainting cabinets. A poorly prepared surface will result in a subpar finish, regardless of the quality of the paint used. The following steps outline the necessary preparation process:
Removing Hardware: Begin by removing all hardware, including knobs, pulls, hinges, and any other decorative elements. This will ensure a clean, professional finish and prevent paint from getting on the hardware. Store the hardware in a safe place to avoid losing any pieces. Consider labeling the hardware and corresponding cabinets to ensure easy reinstallation.
Cleaning the Surfaces: Thoroughly clean the cabinets with a degreasing cleaner specifically designed for painted surfaces. Trisodium phosphate (TSP) is a strong cleaner that can effectively remove grease and grime, but it requires careful handling and proper ventilation. Alternatively, a commercially available kitchen cleaner can be used. Rinse the cabinets thoroughly with clean water and allow them to dry completely.
Sanding: Sanding is crucial for creating a surface that the new paint can adhere to. If the existing paint is glossy, sanding will dull the surface and provide "tooth" for the new paint to grip. Use a medium-grit sandpaper (around 120-180 grit) to lightly sand the entire surface. Focus on areas with imperfections or imperfections. For heavily damaged or uneven surfaces, a coarser grit sandpaper (around 80-100 grit) may be necessary, followed by a finer grit to smooth the surface. Sand in the direction of the wood grain, if applicable.
Removing Dust: After sanding, remove all dust particles with a vacuum cleaner and a tack cloth. Dust can interfere with paint adhesion and create a textured finish. A tack cloth is a sticky cloth specifically designed to pick up fine dust particles.
Priming: Applying a primer is essential, especially when painting over oil-based paint with latex paint, or when painting over a dark color with a lighter color. Primer creates a uniform surface for the new paint to adhere to, blocks stains, and improves the overall finish. Choose a primer that is compatible with both the existing paint and the new paint. Oil-based primers are generally better for blocking stains and providing a durable base, while latex primers are easier to clean up and have lower VOCs (volatile organic compounds). Apply the primer in thin, even coats, following the manufacturer's instructions. Allow the primer to dry completely before proceeding to the next step.
Filling Imperfections: Use wood filler or spackle to fill any dents, scratches, or imperfections on the cabinet surfaces. Allow the filler to dry completely, then sand it smooth with fine-grit sandpaper (around 220 grit). Remove any dust created by sanding before proceeding.
By diligently following these preparation steps, a solid foundation for a successful repainting project will be established.
Applying the New Paint
Once the cabinets are properly prepared, applying the new paint requires careful technique and the right tools. The choice of paint and application method will significantly impact the final result.
Selecting the Right Paint: Choose a high-quality paint specifically designed for cabinets. These paints are typically more durable and resistant to chipping and scratching than standard wall paints. Options include acrylic latex enamel, alkyd enamel, and specialized cabinet paints. Acrylic latex enamel is a popular choice due to its durability, ease of cleanup, and low VOCs. Alkyd enamel provides a harder, more durable finish but requires mineral spirits for cleanup and has higher VOCs. Consider the desired sheen level, from matte to high gloss, keeping in mind that higher gloss levels are more durable but also highlight imperfections.
Choosing Application Tools: The choice of application tools depends on the desired finish and the type of paint being used. Options include brushes, rollers, and sprayers. Brushes are best for small details and tight spaces, while rollers are better for larger, flat surfaces. Sprayers provide the smoothest, most professional finish but require more skill and preparation to avoid runs and drips. A combination of tools may be necessary to achieve the desired result.
Painting Technique: Apply the paint in thin, even coats, avoiding drips and runs. Allow each coat to dry completely before applying the next coat. Sand lightly between coats with fine-grit sandpaper (around 320 grit) to remove any imperfections and create a smoother surface. Apply at least two coats of paint for even coverage and durability. For brushing, use long, smooth strokes in the direction of the wood grain, if applicable. For rolling, use a short nap roller and apply the paint in a "W" pattern, then roll over the area to smooth it out. When spraying, maintain a consistent distance from the surface and overlap each pass slightly.
Drying and Curing: Allow the paint to dry completely according to the manufacturer's instructions. Drying time can vary depending on the type of paint, humidity, and temperature. It is also important to allow the paint to fully cure before reassembling the cabinets. Curing can take several days or weeks, depending on the paint type. Avoid heavy use of the cabinets during the curing process.
Reassembling Hardware: Once the paint is fully dry and cured, reassemble the hardware. Be careful not to scratch the new paint. If necessary, use painter's tape to protect the painted surfaces while attaching the hardware.
By carefully selecting the right paint, using proper application techniques, and allowing sufficient drying and curing time, a durable and beautiful finish can be achieved when repainting previously painted cabinets.

Avoid These Mistakes How To Paint Cabinets That Are Already Painted Grace In My Space

How To Repaint Painted Cabinets

Avoid These Mistakes How To Paint Cabinets That Are Already Painted Grace In My Space

How To Repaint Kitchen Cabinets Painted By Kayla Payne

How To Repaint Painted Cabinets

How To Repaint Painted Cabinets

Update On Our Diy White Painted Kitchen Cabinets 2 Years Later

How To Repaint Painted Cabinets For A Professional Finish Full Hearted Home

How To Repaint Painted Cabinets

Painted Kitchen Cabinets One Year Later The Palette Muse
Related Posts