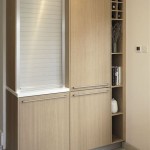
Can You Paint Over Already Painted Cabinets?
The question of whether already painted cabinets can be repainted is a common one among homeowners looking to refresh their kitchens or bathrooms without the expense of a complete cabinet replacement. The simple answer is yes, already painted cabinets can be repainted. However, a successful and long-lasting paint job requires careful preparation and the right techniques. Neglecting the necessary steps can lead to peeling, chipping, and an overall unsatisfactory outcome. This article will explore the key considerations and processes involved in painting over previously painted cabinets, ensuring a durable and aesthetically pleasing finish.
Before embarking on a cabinet repainting project, it’s crucial to assess the existing cabinet condition. Factors such as the type of paint previously used, the presence of any damage (e.g., chips, scratches, water damage), and the overall structural integrity of the cabinets will influence the preparation and painting process. Identifying these issues beforehand will help determine the necessary steps to achieve optimal results.
Assessing the Existing Paint and Cabinet Condition
The type of paint currently on the cabinets significantly impacts the preparation process. If the existing paint is oil-based, it will require a specific type of primer to ensure proper adhesion of the new paint layer, especially if using a latex-based paint. Conversely, if the existing paint is latex-based, a latex or acrylic primer is generally suitable. Determining the type of existing paint can be done through a simple test. Rub a small area with a cotton ball soaked in denatured alcohol. If the paint softens or comes off, it is likely latex-based. If it doesn't react, it's likely oil-based.
Damage to the cabinets, such as chips, scratches, or water damage, needs to be addressed before painting. Chips and scratches should be filled with wood filler, sanded smooth, and primed. Water damage can often indicate underlying structural issues that require repair or even cabinet replacement. Ignoring these damages will lead to a flawed and uneven finish.
The overall structural integrity of the cabinets is another vital consideration. If the cabinets are warping, sagging, or have loose hinges or hardware, addressing these issues before painting is essential. Reinforcing the cabinets or replacing damaged hardware will ensure the longevity and functionality of the finished product. Painting over unstable or damaged cabinets will only accentuate the problems and lead to premature failure of the paint job.
Proper Preparation is Paramount
The preparation phase is arguably the most important step in repainting already painted cabinets. This process involves cleaning, sanding, and priming the cabinets to create a smooth, clean surface that promotes optimal paint adhesion. Skipping or skimping on these steps can result in poor adhesion, an uneven finish, and premature peeling or chipping.
The first step is thorough cleaning. Over time, cabinets accumulate grease, grime, and dust, which can interfere with paint adhesion. The cabinets should be cleaned with a degreasing cleaner, such as trisodium phosphate (TSP) or a TSP substitute, following the manufacturer's instructions carefully. Rinse the cabinets thoroughly with clean water and allow them to dry completely before proceeding.
Sanding is essential for creating a textured surface that allows the primer and paint to grip effectively. Use a medium-grit sandpaper (e.g., 120-grit) to lightly scuff the entire surface of the cabinets. Focus on areas that are particularly glossy or have imperfections. Sanding is not about removing the existing paint entirely, but rather about creating a profile for better adhesion. After sanding, remove all dust with a tack cloth or a damp cloth.
Priming is the final crucial step in the preparation process. Primer creates a uniform surface, seals any remaining stains or imperfections, and enhances paint adhesion. Choose a primer that is compatible with both the existing paint and the new paint you plan to use. For oil-based paints, an oil-based primer is generally recommended. For latex-based paints, a latex or acrylic primer is suitable. Apply the primer in thin, even coats, following the manufacturer's instructions. Allow the primer to dry completely before proceeding to the painting stage. In some cases, two coats of primer may be necessary for optimal results.
Choosing the Right Paint and Application Techniques
Selecting the appropriate paint and employing proper painting techniques are critical for achieving a professional-looking and durable finish. The type of paint, the method of application (brush, roller, or sprayer), and the number of coats will all influence the final outcome.
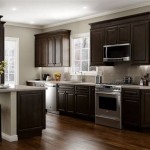
For cabinets, alkyd or acrylic enamel paints are generally recommended. These paints are durable, washable, and provide a smooth, hard finish that can withstand the wear and tear of daily use. Latex paints are also an option, but they may not be as durable as enamels. Consider the sheen level as well. Semi-gloss or gloss sheens are typically used for cabinets due to their durability and ease of cleaning. Matte or eggshell sheens, while more aesthetically pleasing to some, are less durable and more difficult to clean.
The application method can significantly impact the appearance of the finished cabinets. Brushing is the most common method for DIY projects, but it can leave brush marks if not done carefully. Using a high-quality brush and applying the paint in thin, even strokes can minimize brush marks. Rolling can provide a smoother finish than brushing, but it's important to use a roller with a short nap to avoid creating a textured surface. Spraying, either with an airless sprayer or a HVLP (High Volume Low Pressure) sprayer, provides the smoothest and most professional-looking finish. However, spraying requires more equipment and skill to avoid drips, runs, and overspray.
Apply the paint in thin, even coats, allowing each coat to dry completely before applying the next. Typically, two coats of paint are necessary for full coverage and a durable finish. Lightly sand between coats with a fine-grit sandpaper (e.g., 220-grit) to remove any imperfections and ensure optimal adhesion of the subsequent coat. After the final coat of paint has dried completely, allow the cabinets to cure for several days before reattaching the hardware and putting them back into use. Curing allows the paint to fully harden and become more resistant to scratches and chips.
Finally, consider the environment when painting. Ensure proper ventilation to avoid the build-up of fumes and to promote faster drying. Maintain a consistent temperature in the work area, as extreme temperatures can affect the drying time and the overall finish. Protect the surrounding areas with drop cloths and painter's tape to prevent paint splatters and spills.
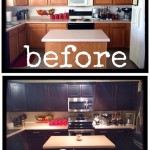
By carefully assessing the existing cabinet condition, preparing the surfaces properly, and selecting the right paint and application techniques, it is possible to successfully repaint already painted cabinets and achieve a durable and aesthetically pleasing finish that enhances the look and functionality of your kitchen or bathroom.

Avoid These Mistakes How To Paint Cabinets That Are Already Painted Grace In My Space

Do It Yourself Divas Diy How To Paint Over Red Painted Cabinets Walls

How To Repaint Kitchen Cabinets Painted By Kayla Payne

Painted Kitchen Cabinets One Year Later The Palette Muse

How To Paint Cabinets That Have Already Been Painted Beauty And The Bustle

How To Paint Kitchen Cabinets A Step By Guide Confessions Of Serial Do It Yourselfer

How To Repaint Kitchen Cabinets Painted By Kayla Payne

How To Paint Cabinets That Have Already Been Painted Beauty And The Bustle

The Right Way To Paint Your Kitchen Cabinets And Save Factory Finish Guaranteed Emily Henderson

Why I Repainted My Chalk Painted Cabinets Sincerely Sara D Home Decor Diy Projects
Related Posts