Painting Over Previously Painted Wood Cabinets: A Comprehensive Guide
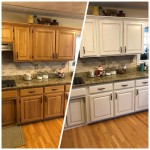
Repainting wooden cabinets offers a cost-effective method to rejuvenate a kitchen or bathroom without the expense of a complete remodel. While technically feasible to paint over existing paint, achieving a durable and professional finish requires meticulous preparation and the application of proper techniques. Neglecting crucial steps can result in peeling, chipping, and an overall unsatisfactory outcome. This article outlines the necessary procedures and considerations for successfully painting over already painted wood cabinets.
Surface Preparation: The Foundation for Adhesion
The longevity and appearance of any paint job hinges on the quality of surface preparation. Ignoring this step almost invariably leads to paint failure. The goal is to create a clean, slightly textured surface that promotes optimal adhesion for the new paint layers.
Cleaning: The initial step involves thoroughly cleaning the cabinets to remove grease, grime, and any other contaminants. Kitchen cabinets, in particular, accumulate cooking residues that can impede paint adherence. Use a degreasing cleaner specifically formulated for kitchen surfaces. Trisodium phosphate (TSP) was traditionally used, but phosphate-free alternatives are readily available and environmentally preferable. Follow the manufacturer's instructions for dilution and application. After cleaning, rinse the cabinets thoroughly with clean water and allow them to dry completely.
Sanding: Sanding is crucial for creating a mechanical bond between the existing paint and the new paint layers. Use a medium-grit sandpaper (around 120-180 grit) to lightly scuff the surface of the cabinets. The objective is not to remove the existing paint entirely, but rather to create a profile that the new paint can grip onto. Pay particular attention to edges and corners, which are prone to chipping. For intricate details or hard-to-reach areas, consider using a sanding sponge or a detail sander.
Dust Removal: After sanding, meticulously remove all sanding dust. Use a vacuum cleaner with a brush attachment to thoroughly clean the cabinets. Follow up with a tack cloth to pick up any remaining dust particles. Dust contamination can compromise the finish, resulting in a rough or uneven surface.
Repairing Imperfections: Examine the cabinets for any imperfections, such as dents, scratches, or cracks. Fill these imperfections with wood filler, following the manufacturer's instructions. Allow the wood filler to dry completely, and then sand it smooth so that it is flush with the surrounding surface. Again, remove all dust particles after sanding.
Priming: Creating a Uniform and Adhesive Base
Priming is a critical step, especially when painting over previously painted surfaces. Primer serves several important functions:
Adhesion Promotion: Primer provides a consistent and adhesive surface for the paint to bond to. It bridges the gap between the existing paint and the new paint, ensuring a strong and durable bond. This is particularly important if the existing paint has a glossy finish, which can be difficult for new paint to adhere to directly.
Stain Blocking: Certain wood species or existing paint colors can bleed through the new paint layer, resulting in discoloration. Primer acts as a barrier, preventing stains from bleeding through and ensuring a uniform color. This is especially important when painting light colors over dark colors.
Uniformity: Primer creates a uniform surface, hiding any variations in color or texture. This results in a more even and consistent paint finish. It also helps to reduce the number of topcoats required to achieve the desired color and opacity.
Choose a high-quality primer specifically formulated for adhesion. Oil-based primers offer excellent adhesion and stain-blocking properties, but they require more cleanup and have a longer drying time. Water-based primers are easier to clean up and dry faster, and are generally preferred for their lower VOC content. Consider using a bonding primer for particularly challenging surfaces or when dealing with glossy finishes. Apply the primer in thin, even coats, following the manufacturer's instructions. Allow the primer to dry completely before applying the topcoat. Lightly sand the primed surface with a fine-grit sandpaper (around 220 grit) to remove any imperfections and create an even smoother surface.
Selecting the Right Paint and Application Techniques
The choice of paint significantly impacts the final appearance, durability, and ease of maintenance of the painted cabinets. Selecting the appropriate paint type and employing proper application techniques are essential for achieving a professional-looking finish.
Paint Type: For kitchen and bathroom cabinets, alkyd or acrylic enamel paints are generally recommended. These paints offer excellent durability, moisture resistance, and cleanability. Alkyd paints provide a hard, durable finish but require mineral spirits for cleanup. Acrylic enamel paints are water-based, making them easier to clean up and have lower VOC content. Consider using a paint specifically formulated for cabinets, as these paints are designed to withstand frequent use and cleaning. Avoid using flat paints, as they are difficult to clean and tend to show dirt and fingerprints. Semi-gloss or gloss finishes are generally preferred for cabinets, as they are more durable and easier to clean.
Application Techniques: The method of paint application also affects the final finish. Brushing, rolling, and spraying are common application methods. Brushing is suitable for smaller areas and intricate details. Use a high-quality brush with synthetic bristles for water-based paints and natural bristles for oil-based paints. Apply the paint in thin, even strokes, following the direction of the wood grain. Rolling is a faster method for larger, flat surfaces. Use a foam roller or a short-nap roller for a smooth finish. Spraying provides the most even and professional-looking finish. If using a sprayer, thin the paint according to the manufacturer's instructions. Apply the paint in thin, even coats, overlapping each pass slightly. Whether brushing, rolling, or spraying, apply multiple thin coats rather than one thick coat. This will prevent drips, runs, and uneven coverage. Allow each coat to dry completely before applying the next coat. Lightly sand between coats with a fine-grit sandpaper (around 320 grit) to remove any imperfections and create an even smoother surface.
Two or three topcoats are typically sufficient for achieving the desired color and durability. After the final coat, allow the paint to cure completely before reinstalling the cabinet hardware. Curing time can vary depending on the paint type and environmental conditions, so consult the manufacturer's instructions. Handle the painted cabinets with care during the curing process to avoid scratching or damaging the finish.
Hardware Considerations: Reusing existing hardware or replacing it with new hardware can significantly impact the overall aesthetic of the cabinets. If reusing existing hardware, clean it thoroughly before reinstalling it. Consider painting or refinishing the hardware to match the new cabinet color. If replacing the hardware, choose hardware that complements the style of the cabinets and the surrounding decor. Measure the existing hardware to ensure that the new hardware will fit properly. Fill any existing hardware holes with wood filler if they are not compatible with the new hardware.
Careful planning, meticulous surface preparation, and proper execution are paramount for achieving a successful and long-lasting paint job when painting over previously painted wooden cabinets. The steps outlined above provide a comprehensive guide to help ensure a professional-looking result.

Kitchen Refresh Can You Paint Over Painted Cabinets

Can I Paint Over Stained Wood Williams Painting

Kitchen Refresh Can You Paint Over Painted Cabinets

Do You Have To Prime Cabinets That Are Already Painted

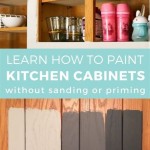
How To Paint Kitchen Cabinets From A Diyer Who Has Done It 3 Times

How To Paint Laminate Cabinets Without Sanding The Palette Muse

How To Paint Kitchen Cabinets The Love Notes Blog

Exactly How To Paint Oak Cabinets Written By A Pro Painted Kayla Payne

Should I Paint My Kitchen Cabinets

Questionnaire Is It Better To Paint Or Restain Wood Cabinets
Related Posts