A Comprehensive Guide to Professional Cabinet Installation
Cabinetry plays a crucial role in enhancing the functionality, aesthetics, and storage capacity of any space. Installing cabinets requires precision, meticulous planning, and attention to detail to ensure durability, proper alignment, and a seamless finish. This guide will provide you with essential insights into the process of cabinet installation, helping you achieve professional-grade results.
1. Planning and Preparation
Before embarking on the installation process, thorough planning is essential. Determine the exact placement of each cabinet, taking into account the available space, door swing clearances, and the overall layout of the room. Additionally, assemble all necessary tools and materials, including a level, tape measure, stud finder, screwdriver, drill, and safety glasses.
2. Cabinet Assembly
Unpack the cabinets and inspect them for any damage. Carefully follow the assembly instructions provided by the manufacturer. Use a level to ensure that the cabinets are level and plumb throughout the assembly process. Secure the cabinets together using the provided hardware, ensuring a tight fit.
3. Cabinet Placement
Determine the exact location of each cabinet using a level and measuring tape. Mark the mounting points on the wall studs using a stud finder. Use a drill to create pilot holes for the mounting screws. Lift the cabinet into place and secure it to the wall studs using the appropriate screws.
4. Leveling and Alignment
Using a level, check the horizontality and verticality of each cabinet. Adjust the mounting screws as needed to level and align the cabinets. Use shims or spacers to compensate for uneven walls or floors, ensuring a flush fit.
5. Door and Drawer Installation
Install the cabinet doors and drawers by aligning them with the hinges and drawer slides. Tighten the screws to secure them in place. Adjust the hinges and drawer slides as necessary to ensure smooth opening and closing.
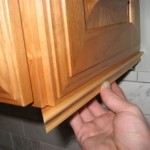
6. Trim and Finishing
Once the cabinets are installed, add the finishing touches to enhance their aesthetics. Install toe kicks, crown molding, or other decorative elements to create a cohesive and polished look. Caulk any gaps between the cabinets and the walls or ceiling to prevent moisture penetration and enhance the overall appearance.
7. Troubleshooting
During the installation process, you may encounter certain challenges. Loose screws can be tightened using a screwdriver. If the cabinets are not level or aligned, adjust the mounting screws or use shims. If the doors or drawers do not open or close smoothly, adjust the hinges or drawer slides accordingly. For more complex issues, consult with a professional cabinet installer.
Conclusion
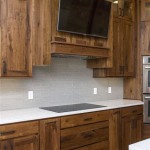
Installing cabinets requires meticulous planning, attention to detail, and the right tools and materials. By following these steps and addressing any troubleshooting issues effectively, you can achieve a professional-grade cabinet installation. The finished result will not only enhance the functionality of your space but also add aesthetic value and create a cohesive and organized environment.

Kitchen Cabinet Installation Guide Step By

Step By Guide To Installing Kitchen Cabinets Diy Cabinetcorp

Assembly Amp Installation Instructions Cabinets To Go

Kitchen Cabinet Installation Guide Step By

Setting Kitchen Cabinets Jlc

The Friendly Survival Guide To Installing Sektion Kitchen Cabinets

Installation Tips Euro Rite Cabinets

Kitchen Cabinet Installation Guide 2024 Installing Cabinets Design

Wardrobe Installation Guide Pa Kitchen

How To Install Upper Cabinets Like A Pro Cabinetselect Com
Related Posts