Achieving A Perfect Finish: How To Paint Kitchen Cabinets White
Painting kitchen cabinets white can transform the space, creating a clean, bright, and airy atmosphere. But achieving that perfect, professional-looking finish requires more than just slapping on a coat of paint. Careful preparation, the right tools, and a methodical approach are crucial for a flawless result that stands the test of time. This article will guide you through the process, step by step, offering expert advice and practical tips to help you achieve the kitchen of your dreams.
1. Preparation is Key: Setting the Stage for Success
The success of your paint job hinges on thorough preparation. This stage may seem tedious, but it lays the foundation for a smooth, even finish.
Start by emptying the cabinets completely, removing all contents, hardware, and shelves. This allows for unhindered access to all surfaces. Next, clean the cabinets thoroughly with a degreaser to remove any grease, grime, or residue that can interfere with paint adhesion. A scraper can be used to remove any stubborn debris or loose paint.
Once clean, sand the cabinets to create a smooth, even surface. Start with a coarse-grit sandpaper (80-120 grit) to tackle any imperfections or previous paint layers. Then, switch to a finer-grit sandpaper (180-220 grit) to smooth out the surface and prepare it for priming.
Finally, mask off surrounding areas, including countertops, walls, and appliances, using painter's tape. This protects them from accidental paint splatters and ensures a clean, professional look.
2. Priming: Establishing a Solid Foundation
Priming is an essential step that provides a uniform surface for the paint to adhere to. It also hides any imperfections or color variations in the wood, creating a consistent base for the final coat.
Choose a primer specifically designed for cabinetry. This type of primer is formulated to provide a smooth, durable finish that resists moisture and staining, essential for kitchen environments. Apply the primer in thin, even coats, allowing each coat to dry completely before applying the next. Pay close attention to corners and edges to ensure adequate coverage.
After priming, lightly sand the surface with fine-grit sandpaper (220 grit) to create a perfectly smooth surface for the final paint application. This step removes any imperfections or brushstrokes that might show through the paint.
3. Painting: Applying the Perfect Finish
The painting process is where precision and technique are paramount. Using a quality paintbrush or paint sprayer, apply the white paint in thin, even coats. Follow the manufacturer's instructions regarding drying time between coats.
For a professional-looking finish, utilize a technique known as "cross-hatching." This involves applying the first coat of paint vertically, followed by a second coat that crosses the direction of the first coat horizontally. This method ensures even coverage and minimizes brushstrokes.
If you prefer a sprayer for a smooth, even finish, use a high-quality paint sprayer designed for cabinetry. This option provides a consistent application and minimizes the risk of brushstrokes. However, proper masking and ventilation are essential when using a paint sprayer.
After each coat, allow the paint to dry completely according to the manufacturer's instructions. This ensures proper adhesion and prevents smudging or streaks. If using a paint sprayer, be sure to clean it thoroughly after each use.
4. Finishing Touches: Enhancing the Transformation
Once the paint has fully cured, it's time to add the finishing touches. This may include sanding the final coat with fine-grit sandpaper to smooth out any imperfections and create a perfectly smooth surface.
Next, apply a sealant to protect the paint from moisture, scratches, and stains. This step is crucial for kitchen cabinets, which are constantly exposed to spills, grease, and wear. Apply the sealant according to the manufacturer's instructions, ensuring even coverage.
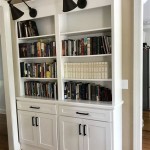
Finally, reinstall the hardware, shelves, and cabinet contents, taking care to align them properly. Once everything is back in place, admire your transformed kitchen, boasting beautifully painted cabinets that enhance the space and create a truly inviting atmosphere.

How To Paint Oak Cabinets And Hide The Grain Tutorial

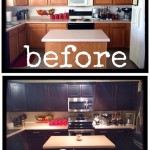
Painted White Cabinets Before And After Reveal Photos Renovated Faith

How To Prep And Paint Kitchen Cabinets Lowe S

How To Paint Laminate Kitchen Cabinets Perfect Finish Tips

Painted Cabinets Vancouver Pros Cons Kitchen Makeovers

How To Paint Oak Cabinets And Hide The Grain Tutorial

Best Paint For Cabinets How To Get A Perfect Finish Every Time Mallory Nikolaus

Ask Maria Help My White Painted Kitchen Cabinets Look Bad Advice For Homeowners

Pros And Cons Of Painting Kitchen Cabinets White De Manor Farm By Laura Janning

Painted White Cabinets Before And After Reveal Photos Renovated Faith
Related Posts