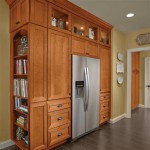
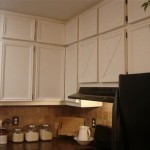
How To Brighten Up Oak Kitchen Cabinets
Oak kitchen cabinets, a staple in many homes, often possess a warm and inviting character. However, their naturally darker tone and prominent grain can sometimes make a kitchen feel dated or dim. While completely replacing these cabinets is an option, it’s a costly and disruptive one. Fortunately, numerous strategies exist to brighten up oak cabinets without resorting to such drastic measures. These approaches range from simple cleaning and hardware updates to more involved techniques like painting and glazing, each offering a unique path towards achieving a lighter, more contemporary kitchen aesthetic.
Understanding Oak and Its Characteristics
Before embarking on any brightening project, it is crucial to comprehend the nature of oak and its inherent features. Oak is a hardwood known for its durability and distinctive grain pattern. This grain, while aesthetically pleasing to some, can also contribute to the perceived darkness of the wood. The open grain structure of oak also means that it readily absorbs finishes, which can influence the final appearance after painting or staining. Furthermore, the existing finish on the cabinets, often an oil-based varnish or lacquer, will impact the preparation required for refinishing. Proper assessment of these factors is essential for selecting the most effective brightening method and ensuring a successful outcome.
The type of oak—red oak or white oak—also plays a role. Red oak has pinkish undertones, while white oak has more yellow or gray undertones. Understanding which type of oak one is working with is essential when choosing paints, stains, or glazes to complement or neutralize the existing color. Failing to account for these undertones can result in an undesirable final color that clashes with the rest of the kitchen's design.
Cleaning and Surface Preparation: The Foundation for Brightness
Often, the simplest solution is the most effective. Before considering any complex refinishing techniques, thoroughly cleaning the oak cabinets is paramount. Years of accumulated grease, grime, and dust can significantly darken the appearance of the wood. A solution of mild dish soap and warm water, applied with a soft cloth or sponge, is generally sufficient for removing surface dirt. For more stubborn grease deposits, a dedicated degreaser designed for kitchen surfaces may be necessary.
After cleaning, a thorough rinsing with clean water and drying with a lint-free cloth are essential. This prevents any soap residue from interfering with subsequent finishing steps. Allow the cabinets to dry completely before proceeding. This cleaning process alone can significantly improve the brightness of the cabinets, revealing the natural wood grain and color that may have been obscured by years of accumulated grime.
If the existing finish is in good condition, lightly sanding the surface with fine-grit sandpaper (220-grit or higher) will create a better surface for paint or primer to adhere to. This step ensures that the new finish will bond properly and resist chipping or peeling. However, if the existing finish is damaged, cracked, or peeling, more extensive preparation is needed. This may involve using a paint scraper or chemical stripper to remove the old finish entirely before sanding. Safety precautions, such as wearing gloves and eye protection, should be taken when using chemical strippers.
Regardless of the preparation method, dust should be removed thoroughly after sanding. A tack cloth or vacuum cleaner with a brush attachment is effective for this. The final surface should be clean, dry, and free of any contaminants that could interfere with the adhesion of the new finish.
Strategic Paint Color Choices: Illuminating Oak
Painting oak cabinets is a transformative way to brighten a kitchen. However, selecting the right paint color is critical. Opting for light and reflective colors is essential for maximizing brightness. Shades of white, off-white, cream, and light gray are popular choices for their ability to reflect light and create a more open and airy feel. However, the specific shade should be chosen based on the existing color palette of the kitchen, including countertops, flooring, and backsplash.
Cool-toned whites and grays can work well in kitchens with stainless steel appliances and contemporary design elements. Warmer whites and creams can complement kitchens with warmer color schemes and traditional features. It is advisable to test paint samples in the kitchen under different lighting conditions before committing to a specific color. This allows one to evaluate how the color appears at different times of the day and in different areas of the kitchen.
The type of paint is also a significant factor. High-quality acrylic latex paint is generally recommended for kitchen cabinets due to its durability, ease of cleaning, and low odor. Semi-gloss or gloss finishes are preferable for their ability to reflect light and resist moisture and stains. Matte finishes, while trendy, are less durable and more difficult to clean in a kitchen environment.
Proper priming is crucial when painting oak cabinets. Oak's open grain can soak up paint unevenly, resulting in a blotchy finish. A high-quality primer designed for wood surfaces will seal the grain and provide a smooth, uniform surface for the paint to adhere to. Tinting the primer to a similar shade as the paint can also improve coverage and reduce the number of paint coats required. Two coats of primer are often recommended, especially when painting oak cabinets a light color.
Refacing: A Modern Facelift for Oak
Refacing kitchen cabinets involves replacing the existing cabinet doors and drawer fronts with new ones while keeping the existing cabinet boxes in place. This is a less expensive and less disruptive alternative to completely replacing the cabinets. Refacing allows one to dramatically change the style and color of the cabinets without the extensive demolition and reconstruction associated with a full kitchen remodel.
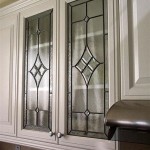
When refacing oak cabinets, one has the option of choosing new doors and drawer fronts made from a variety of materials, including wood, laminate, and Thermofoil. Lighter-colored materials and styles, such as shaker-style doors in white or light gray, can significantly brighten the kitchen. Glass-fronted doors are another option for adding visual interest and allowing light to penetrate into the cabinet interiors.
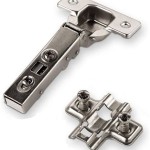
The refacing process typically involves removing the existing doors and drawer fronts, applying a veneer or matching material to the exposed cabinet boxes, and installing the new doors and drawer fronts with new hinges and hardware. It is essential to hire a qualified professional to ensure that the refacing is done properly and that the new doors and drawer fronts fit seamlessly with the existing cabinet boxes. Improper installation can result in uneven gaps, misaligned doors, and other cosmetic issues.
Hardware Updates: Small Changes, Big Impact
Changing the hardware on oak cabinets is a relatively inexpensive and simple way to update their appearance and contribute to a brighter kitchen. Replacing dark or outdated knobs and pulls with lighter, more modern options can make a significant difference. Chrome, brushed nickel, and stainless steel hardware are popular choices for their sleek and contemporary look. Glass or acrylic knobs and pulls can also add a touch of elegance and reflect light, enhancing the overall brightness of the kitchen.
When selecting new hardware, it is important to consider the existing style and color palette of the kitchen. The hardware should complement the other design elements and not clash with the overall aesthetic. The size and style of the hardware should also be appropriate for the size and style of the cabinets. Small, delicate knobs can look out of place on large, imposing cabinets, while oversized pulls can overwhelm smaller cabinets.
Before installing new hardware, it is important to measure the existing hole spacing to ensure that the new hardware will fit properly. If the new hardware has a different hole spacing, it may be necessary to fill the existing holes and drill new ones. A wood filler can be used to fill the existing holes, and a drill with appropriate drill bits can be used to create new holes. It is important to follow the manufacturer's instructions carefully when installing new hardware to ensure that it is securely attached and functioning properly.
Strategic Use of Lighting: Illuminating the Space
Adequate lighting is crucial for brightening any kitchen, regardless of the cabinet color. Replacing outdated or inadequate light fixtures with brighter, more efficient options can significantly improve the overall illumination of the space. Under-cabinet lighting is particularly effective for brightening the countertop area and highlighting the cabinets. LED strip lights are a popular choice for under-cabinet lighting due to their energy efficiency, long lifespan, and low profile.
Recessed lighting is another option for providing general illumination in the kitchen. Recessed lights can be strategically placed to highlight specific areas, such as the sink or the cooking area. Pendant lights can be used to add a decorative touch and provide task lighting over islands or peninsulas. The color temperature of the light bulbs is also important. Cool white light bulbs (4000K-5000K) tend to be brighter and more energizing, while warm white light bulbs (2700K-3000K) tend to create a more cozy and inviting atmosphere. The choice of color temperature should be based on the overall design aesthetic of the kitchen and the desired mood.
Natural light is also a valuable asset in brightening a kitchen. Maximizing natural light by keeping windows clean and unobstructed can make a significant difference. Light-colored window treatments, such as sheer curtains or blinds, can allow natural light to filter into the kitchen while still providing privacy. Mirrors can also be used to reflect light and create the illusion of a larger space.

How I Updated My Oak Cabinets Without Paint By Using Briwax Easy Budget Kitchen Makeover Only 24

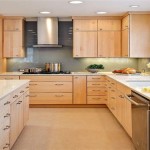
How To Make Oak Kitchen Cabinets Look Modern Without Covering Them Up

How To Make Oak Kitchen Cabinets Look Modern Without Covering Them Up

How To Make Oak Kitchen Cabinets Look Modern Without Covering Them Up

How To Make Oak Kitchen Cabinets Look Modern Without Covering Them Up

Updating A Kitchen With Oak Cabinets Without Painting Them

How To Make Oak Kitchen Cabinets Look Modern Without Covering Them Up

How To Make An Oak Kitchen Cool Again Copper Corners

What Kitchen Color Schemes Work With Oak Cabinets The Homes I Have Made

How To Stain Dark Or Yellow Kitchen Cabinets Lighter
Related Posts