How To Paint Over Factory Painted Cabinets
Painting factory-finished cabinets is a significant undertaking that can dramatically transform a kitchen or bathroom. While the factory finish offers durability, it often locks homeowners into a specific aesthetic. Repainting offers a cost-effective alternative to replacing cabinets, allowing for customization and a refreshed look. However, successfully painting over a factory finish necessitates careful preparation and the use of appropriate materials. This article provides a comprehensive guide to painting factory-finished cabinets, ensuring a professional and lasting result.
Key Point 1: Preparation is Paramount
The success of any paint job, particularly when dealing with a durable factory finish, hinges on meticulous preparation. Skimping on this stage will inevitably lead to adhesion problems, peeling, and a less-than-desirable final product. A thorough cleaning, surface preparation, and proper protection of the surrounding area are crucial.
Cleaning the Cabinets: Factory-finished cabinets often accumulate grease, grime, and dust over time, even if they appear clean. These contaminants can prevent the paint from adhering properly. Begin by removing all hardware, including knobs, pulls, hinges, and door catches. Then, using a degreasing cleaner specifically designed for kitchen cabinets, thoroughly clean all surfaces to be painted. TSP (trisodium phosphate) is a common and effective option, but always follow the manufacturer's instructions and wear appropriate safety gear, including gloves and eye protection. Rinse the cabinets thoroughly with clean water and allow them to dry completely.
Sanding the Surface: Factory finishes are typically very smooth and glossy, making it difficult for paint to adhere. Sanding the surface provides the necessary tooth for the primer to grip. Use a medium-grit sandpaper, such as 120-grit or 150-grit, to lightly scuff the surface of the cabinets. Focus on dulling the existing finish rather than removing it entirely. Avoid applying excessive pressure, as this can damage the cabinet material. Sand all surfaces to be painted, including doors, drawers, and the cabinet frames. After sanding, use a tack cloth or a vacuum with a brush attachment to remove all sanding dust. Ensure all surfaces are completely clean and dust-free before proceeding.
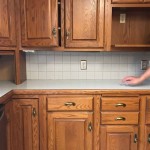
Protecting the Surrounding Area: Painting can be a messy process, so it's essential to protect the surrounding area. Cover countertops, floors, appliances, and walls with drop cloths or painter's plastic. Use painter's tape to mask off any areas you don't want to paint, such as the inside edges of the cabinet frames or the walls adjacent to the cabinets. Pay close attention to detail when masking to ensure clean, crisp lines.
Repairing Imperfections: Before priming, take the time to inspect the cabinets for any imperfections, such as chips, dents, or cracks. Fill these imperfections with wood filler or spackle, following the manufacturer's instructions. Allow the filler to dry completely, and then sand it smooth, blending it seamlessly with the surrounding surface. Again, remove any dust generated by sanding.
Key Point 2: Selecting the Right Primer and Paint
Choosing the appropriate primer and paint is crucial for achieving a durable and aesthetically pleasing finish. Not all primers and paints are created equal, and selecting products specifically designed for cabinets will significantly improve the outcome. Adhesion and durability are primary considerations.
Choosing the Right Primer: Primer serves as a crucial bonding layer between the existing factory finish and the new paint. It also helps to seal the surface and prevent tannins from bleeding through, particularly on wooden cabinets. For factory-finished cabinets, an adhesion-promoting primer is essential. These primers are formulated to bond to slick, non-porous surfaces. Options include bonding primers, which chemically bond to the surface, and shellac-based primers, which offer excellent adhesion and stain-blocking properties. Consult with a paint specialist at a reputable paint store to determine the best primer for the specific type of factory finish on the cabinets. Apply the primer in thin, even coats, following the manufacturer's instructions. Allow the primer to dry completely before proceeding to the next step. Lightly sand the primed surface with fine-grit sandpaper (220-grit) to remove any imperfections and create an even smoother surface for the paint.
Selecting the Right Paint: The paint chosen for cabinets should be durable, washable, and resistant to chipping and scratches. Alkyd (oil-based) paints and acrylic-latex paints are both popular choices. Alkyd paints offer excellent durability and create a hard, smooth finish, but they have a strong odor and require mineral spirits for cleanup. Acrylic-latex paints are lower in VOCs (volatile organic compounds), easier to clean up with water, and offer good durability. For cabinets, a specialized cabinet paint is often recommended. These paints are formulated to withstand the wear and tear of daily use and offer a chip-resistant finish. Consider a semi-gloss or gloss finish for cabinets, as these finishes are easier to clean and more resistant to stains. Flat or matte finishes are generally not recommended for cabinets due to their lower durability and difficulty in cleaning.
Application Techniques: Whether using a brush, roller, or sprayer, proper application techniques are crucial for achieving a smooth and professional finish. When using a brush, choose a high-quality synthetic brush with fine bristles. Apply the paint in thin, even strokes, following the grain of the wood. Avoid applying too much paint at once, as this can lead to drips and runs. When using a roller, choose a roller with a short nap (1/4-inch or 3/8-inch) for a smooth finish. Apply the paint in thin, even coats, overlapping each stroke slightly. When using a sprayer, follow the manufacturer's instructions carefully and practice on a scrap piece of wood before painting the cabinets. Apply the paint in thin, even coats, holding the sprayer at a consistent distance from the surface. Regardless of the application method, allow each coat of paint to dry completely before applying the next coat. Lightly sand between coats with fine-grit sandpaper (220-grit or 320-grit) to remove any imperfections and create an even smoother surface.
Key Point 3: Achieving a Professional Finish
The final steps are just as important as the preparation and the selection of materials. Attention to detail during the painting process and proper reassembly are vital for achieving a truly professional-looking outcome.
Applying Multiple Coats: Typically, two coats of paint are necessary to achieve full coverage and a durable finish. After the first coat of paint has dried completely, lightly sand the surface with fine-grit sandpaper (220-grit or 320-grit) to remove any imperfections and create an even smoother surface. Remove all sanding dust with a tack cloth or vacuum. Apply the second coat of paint, following the same application techniques as the first coat. Allow the second coat to dry completely before proceeding.
Addressing Drips and Runs: Despite careful application, drips and runs can sometimes occur. If you notice a drip or run while the paint is still wet, use a brush to gently smooth it out. If the paint has already dried, use a scraper or sandpaper to carefully remove the drip or run. Prime and paint the area again to ensure a smooth and even finish.
Reassembling the Cabinets: Once the paint has dried completely, carefully remove the painter's tape. Reinstall the hardware, including knobs, pulls, hinges, and door catches. Ensure that all screws are tightened securely. If necessary, replace old or worn hardware to give the cabinets an even more updated look. Reattach the doors and drawers to the cabinet frames, ensuring that they are properly aligned. If the doors or drawers are sticking or rubbing, adjust the hinges or drawer slides as needed. Clean the painted surfaces with a mild soap and water to remove any fingerprints or smudges. Allow the paint to fully cure according to the manufacturer's instructions before using the cabinets heavily. Curing can take several days or weeks, depending on the type of paint used.
Maintaining the Painted Cabinets: To keep painted cabinets looking their best, clean them regularly with a mild soap and water. Avoid using harsh chemicals or abrasive cleaners, as these can damage the paint finish. Wipe up spills and splatters immediately to prevent staining. Use coasters and placemats to protect the cabinets from scratches and water rings. With proper care and maintenance, painted factory-finished cabinets can provide years of beauty and functionality.
Successfully painting factory-finished cabinets requires patience, attention to detail, and the use of quality materials. By following these guidelines, homeowners can achieve a professional and lasting finish, transforming their kitchens or bathrooms without the expense of replacing the entire cabinetry.

How To Paint Grainy Oak Cabinets And Get A Smooth Finish

Get A Factory Finish On Your Painted Cabinets Step By The Handyman

How To Paint Maple Kitchen Cabinets Step By Painting Tutorial

Ask Maria Help My White Painted Kitchen Cabinets Look Bad Advice For Homeowners

Painting Poly Coated Cabinets

How To Paint Kitchen Cabinets A Step By Guide Confessions Of Serial Do It Yourselfer

Best Paint For Cabinets A Factory Smooth Finish Stefana Silber

How To Paint Theril Cabinets Life On Virginia Street

My Kitchen Magician Bower Power

Avoid These Mistakes How To Paint Cabinets That Are Already Painted Grace In My Space
Related Posts