How To Install Cabinet Drawer Slides: A Comprehensive Guide
Installing cabinet drawer slides is a fundamental skill for both woodworking enthusiasts and those undertaking home improvement projects. Accurate installation ensures smooth drawer operation, prolongs the lifespan of both the drawers and the cabinets, and contributes to the overall functionality of a space. This guide details the process step-by-step, providing the necessary information for successful drawer slide installation.
Prior to beginning the installation, it is crucial to gather all the necessary tools and materials. This preparation will streamline the process and minimize potential interruptions. The required tools include a measuring tape, a pencil, a level, a drill with various drill bits, a screwdriver (both Phillips head and flathead may be needed), and safety glasses. Materials needed are the drawer slides themselves, screws appropriate for the cabinet and drawer material, and potentially shims if the cabinet faces are not perfectly aligned.
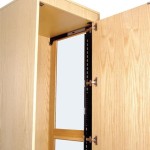
Understanding the different types of drawer slides is imperative for selecting the appropriate hardware for the project. The most common types are side-mount, center-mount, and under-mount slides. Side-mount slides are the most versatile and widely used, offering good stability and load-bearing capacity. Center-mount slides are typically used for smaller drawers and offer a cleaner aesthetic. Under-mount slides provide a hidden appearance and often include soft-close mechanisms. The choice depends on the drawer size, weight capacity requirements, and desired aesthetic.
Key Point 1: Preparation and Marking
The initial step involves meticulously measuring and marking the interior of the cabinet and the sides of the drawer to indicate the precise locations for the drawer slides. Accuracy is paramount; even slight misalignments can result in drawers that bind, stick, or fail to operate smoothly. A level is essential during this stage to ensure that the slides are mounted perfectly horizontally.
Begin by determining the desired vertical position of the drawer within the cabinet opening. Measure from the top or bottom of the cabinet opening and mark this position on both sides of the cabinet interior. Use a level to draw a horizontal line connecting these marks. This line represents the bottom edge of the cabinet-side drawer slide. Repeat this process for each drawer in the cabinet.
For the drawer itself, measure the distance from the bottom of the drawer box to the center of the slide mounting holes. Transfer this measurement to the sides of the drawer and mark the corresponding line. Again, ensuring that these lines are level is crucial for proper drawer function.
It is often beneficial to use a combination square to assist in marking the lines. A combination square ensures that the lines are perfectly perpendicular to the front edge of the cabinet and drawer, further minimizing the risk of misalignment.
If the cabinet faces are not perfectly aligned, shims may be required to create a consistent mounting surface. Shims are thin pieces of wood or plastic that are placed behind the drawer slides to compensate for irregularities in the cabinet frame. Placing a level across the cabinet face will quickly reveal any areas that require shimming.
Key Point 2: Installation of Cabinet-Side Slides
With the markings completed, the next step is to attach the cabinet-side drawer slides to the cabinet interior. Position the cabinet-side slide along the marked line, ensuring that the front edge of the slide is flush with the front edge of the cabinet frame. Use a drill and appropriate-sized drill bit to create pilot holes through the slide's mounting holes and into the cabinet frame. The pilot holes prevent the wood from splitting and ensure that the screws are properly aligned.
Select screws that are of the appropriate length and type for the cabinet material. Screws that are too long may protrude through the back of the cabinet, while screws that are too short may not provide sufficient holding power. Ideally, the screws should penetrate at least half the thickness of the cabinet frame. Use a screwdriver to securely fasten the slides to the cabinet. Avoid over-tightening the screws, as this can strip the threads and weaken the connection.
Repeat this process on the opposite side of the cabinet, ensuring that the slides are aligned horizontally. A level can be used to verify the alignment before the screws are fully tightened. If shimming is necessary, place the shims behind the slides before fastening them to the cabinet. The shims should be positioned to provide a consistent and level mounting surface.
For cabinets with face frames, it may be necessary to use spacers or blocks to create a consistent mounting surface for the drawer slides. The face frame can often protrude beyond the inside edge of the cabinet box, creating an uneven surface. Spacers or blocks can be attached to the cabinet box to bring the mounting surface flush with the face frame.
Key Point 3: Installation of Drawer-Side Slides and Testing
After the cabinet-side slides are securely installed, the drawer-side slides can be attached to the drawer box. Position the drawer-side slide along the marked line on the side of the drawer, ensuring that the front edge of the slide is flush with the front edge of the drawer box. Drill pilot holes through the slide's mounting holes and into the drawer box.
Select screws that are of the appropriate length and type for the drawer material. As with the cabinet-side slides, avoid using screws that are too long or too short. Securely fasten the slides to the drawer box, avoiding over-tightening the screws.
Repeat this process on the opposite side of the drawer, ensuring that the slides are aligned horizontally. A level can be used to verify the alignment before the screws are fully tightened. Once both drawer-side slides are installed, carefully insert the drawer into the cabinet, aligning the slides on the drawer with the slides on the cabinet. Gently push the drawer into the cabinet, ensuring that the slides engage properly.
Test the drawer's operation by opening and closing it several times. The drawer should slide smoothly and without any binding or sticking. If the drawer is not operating smoothly, check for any misalignments in the slides. Small adjustments may be necessary to achieve optimal drawer function. Loosen the screws on the slides and reposition them slightly, then re-tighten the screws.
If the drawer is still binding, examine the drawer box itself for any warps or imperfections. A warped drawer box can cause the slides to bind, even if they are properly aligned. In some cases, it may be necessary to replace the drawer box if it is severely warped.
For drawers with soft-close mechanisms, ensure that the mechanism is functioning correctly. The drawer should close smoothly and quietly without slamming shut. If the soft-close mechanism is not functioning properly, consult the manufacturer's instructions for troubleshooting tips.
Once the slides are installed and the drawer is operating smoothly, inspect the installation for any loose screws or other potential problems. Tighten any loose screws and make any necessary adjustments to ensure that the installation is secure and reliable. Proper installation of cabinet drawer slides enhances the functionality and longevity of the cabinetry.
In cases where drawers are exceptionally wide or heavy, the use of heavy-duty drawer slides is recommended. These slides are designed to handle increased weight loads and provide greater stability. Heavy-duty slides typically feature ball-bearing construction and thicker metal components.
Furthermore, consider the overall aesthetic of the cabinetry when selecting drawer slides. While under-mount slides provide a clean and hidden appearance, side-mount slides may be a more practical choice for projects where budget is a primary concern. The choice depends on the specific requirements of the project and the desired aesthetic outcome.
Ongoing maintenance is essential for ensuring the continued smooth operation of cabinet drawers. Periodically inspect the drawer slides for any signs of wear or damage. Clean the slides with a dry cloth to remove any dust or debris. Lubricate the slides with a silicone-based lubricant to reduce friction and improve their performance. Addressing minor issues promptly can prevent more significant problems from developing over time.
When retrofitting existing cabinets with new drawer slides, it is crucial to carefully measure the existing drawer box and cabinet opening to ensure that the new slides will fit properly. Existing hardware may need to be removed, and any holes or imperfections in the cabinet or drawer box may need to be filled and repaired. This meticulous preparation ensures a seamless and professional-looking installation.

How To Install Cabinet Drawers With Ball Bearing Slides Houseful Of Handmade

How To Install Drawer Slides Step By With Photos Vadania Home Upgrader

How To Install Drawer Slides Build Basic

How To Install A 3832 Drawer Slide On Frameless Cabinet In Few Steps

How To Install Drawer Slides Build Basic

Drawer Slides Demystified Wood

My 9 Best Tips For Installing Cabinet Drawers Remodelando La Casa

How To Install Drawer Slides The Easy Way

How To Install Drawer Slides On A Vintage Dresser Shades Of Blue Interiors

Installing Drawer Slides Canadian Woodworking
Related Posts