How to Make Sliding Drawers for Kitchen Cabinets
Upgrading existing kitchen cabinets with sliding drawers significantly enhances functionality and accessibility. Drawers offer superior organization compared to static shelves, allowing for easier retrieval of items stored deep within a cabinet. This article outlines the process of constructing and installing sliding drawers, covering essential materials, tools, and techniques.
Planning and Measurement
Accurate planning and measurement are critical for a successful drawer installation. The first step involves determining the interior dimensions of the cabinet opening where the drawer will be installed. Measure the width, height, and depth of the opening. It is crucial to account for any obstructions, such as pipes or supporting structures, within the cabinet.
The drawer box dimensions will be slightly smaller than the interior cabinet dimensions to allow for smooth sliding action. The amount of clearance depends on the type of drawer slides being used. Consult the specifications for the chosen slides to determine the recommended clearance. Typically, a clearance of 1/2 inch to 1 inch on both the width and height is sufficient.
For example, if the interior cabinet opening is 24 inches wide and 20 inches high, and using slides that require a 1/2-inch clearance on each side, the drawer box width should be 23 inches (24 - 0.5 - 0.5). Similarly, the drawer box height will be determined by subtracting the required clearance from the cabinet opening height. The drawer depth is typically determined by the maximum usable space within the cabinet, minus the space needed for the drawer slides at the back
Consider the desired drawer depth. Longer drawers maximize storage capacity but may require stronger drawer slides. Measure the depth of the cabinet and subtract the space needed for the drawer slide mechanism at the back of the cabinet. This measurement will determine the maximum allowable drawer depth.
Before proceeding with cutting the wood, create a detailed cutting list. This list should specify the dimensions of each drawer component: the drawer front, back, sides, and bottom. Double-check all measurements for accuracy to minimize errors during the construction phase.
Materials and Tools
Selecting appropriate materials and tools is essential for constructing durable and functional drawers. The choice of wood depends on the desired aesthetic and budget. Common choices include plywood, solid wood (such as poplar or maple), and melamine board.
Plywood offers stability and affordability, making it a popular choice for drawer boxes. Solid wood provides a more premium look and feel but can be more expensive and susceptible to warping. Melamine board is a cost-effective option that is easy to clean but may not be as durable as plywood or solid wood.
For drawer slides, options include side-mount, under-mount, and center-mount slides. Side-mount slides are the most common and are easy to install. Under-mount slides offer a concealed appearance and often include soft-close mechanisms. Center-mount slides are typically used for smaller drawers and have a lower weight capacity.
Essential tools include a table saw or circular saw for cutting the wood, a drill with various drill bits, a measuring tape, a square, a screwdriver (or drill with screwdriver bits), clamps, and sandpaper. A router with a rabbeting bit can be helpful for creating grooves for the drawer bottom.
Other necessary materials include wood glue, screws, and finish (such as paint, stain, or varnish) for the drawer box. Consider purchasing edge banding if using plywood or melamine to conceal the exposed edges.
Drawer Box Construction
Once the materials and tools are gathered, the drawer box construction can begin. Start by cutting the drawer components according to the cutting list. Ensure all cuts are accurate and square for a professional-looking result.
There are several methods for joining the drawer components. Common methods include butt joints with screws, rabbet joints, dado joints, and dovetail joints. Butt joints are the simplest but weakest. Rabbet and dado joints provide more strength and stability. Dovetail joints are the strongest and most visually appealing but require more skill to execute.
For butt joints, apply wood glue to the edges of the drawer sides and attach them to the drawer front and back using screws. Use clamps to hold the pieces together while the glue dries. Predrill pilot holes for the screws to prevent the wood from splitting.
For rabbet joints, cut a rabbet (a groove along the edge) on the drawer front and back to accept the drawer sides. Apply wood glue to the rabbet and attach the sides using screws or nails. Clamping is essential to ensure a tight bond.
The drawer bottom can be attached using several methods. One common method is to cut a groove (dado) in the drawer sides, front, and back to accept the drawer bottom. Slide the drawer bottom into the grooves and secure it with glue or screws. Alternatively, the drawer bottom can be attached to the bottom edges of the drawer box using screws and glue.
After assembling the drawer box, sand all surfaces smooth to remove any splinters or sharp edges. Apply edge banding to the exposed edges of plywood or melamine to create a finished look. Finally, apply the desired finish to the drawer box.
Drawer Slide Installation
Installing the drawer slides correctly is crucial for smooth and reliable drawer operation. Begin by marking the location of the drawer slides on the inside of the cabinet and on the drawer box.
The exact location of the drawer slides depends on the type of slide being used and the desired drawer height. Consult the manufacturer's instructions for precise measurements. Typically, the slides are installed parallel to the top of the cabinet opening and the top edge of the drawer box.
For side-mount slides, attach the cabinet member of the slide to the inside of the cabinet using screws. Ensure the slides are level and properly aligned. Then, attach the drawer member of the slide to the drawer box using screws. Again, ensure proper alignment and levelness.
For under-mount slides, the installation process is slightly different. The cabinet members are typically mounted to the bottom of the cabinet opening, and the drawer members are attached to the bottom of the drawer box. Under-mount slides often require specific hardware and adjustments to ensure proper operation.
Once the slides are installed, carefully slide the drawer box into the cabinet. Test the drawer to ensure it slides smoothly and easily. If the drawer binds or is difficult to open or close, check the alignment of the slides and make any necessary adjustments.
Drawer Front Attachment
Attaching the drawer front is the final step in the drawer installation process. The drawer front should be slightly larger than the drawer box opening to create a clean and finished look.
There are several methods for attaching the drawer front. One common method is to use screws. Position the drawer front on the drawer box and secure it from the inside of the drawer box using screws. Predrill pilot holes to prevent the wood from splitting.
Another method is to use adhesive. Apply construction adhesive to the back of the drawer front and press it firmly against the drawer box. Use clamps to hold the drawer front in place while the adhesive dries.
For a more sophisticated look, consider using European-style hinges or drawer front adjusters. These hardware options allow for precise alignment and adjustment of the drawer front.
After attaching the drawer front, install a drawer pull or knob. Choose a pull or knob that complements the style of the kitchen cabinets. Drill a hole in the drawer front and attach the pull or knob using screws.
Finally, inspect the completed drawer for any imperfections. Make any necessary adjustments to ensure the drawer operates smoothly and looks aesthetically pleasing. The installation of sliding drawers can significantly improve storage efficiency and accessibility in kitchen cabinets.

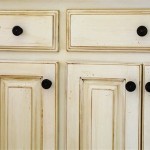
Diy Pull Out Cabinet Drawers Love Renovations

How To Make Simple Easy Sliding Shelves

How To Make Simple Easy Sliding Shelves

Diy Pull Out Cabinet Drawers Love Renovations

How To Build Kitchen Cabinets Install Drawer Slides

How To Make Pull Out Shelves For Kitchen Cabinets Ron Hazelton

Diy Pull Out Cabinet Drawers Love Renovations

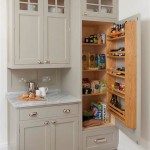
Kitchen Organization Pull Out Shelves In Pantry Remodelando La Casa

Kitchen Storage Pull Out Pantry Shelves Diy Family Handyman

How To Make Simple Easy Sliding Shelves
Related Posts