Restaining Kitchen Cabinets Without Sanding: A Comprehensive Guide
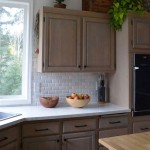
Kitchen cabinets are a focal point in any home, and their appearance significantly impacts the overall aesthetic of the kitchen. Over time, the finish on these cabinets can fade, become scratched, or simply look outdated. Restaining offers a cost-effective alternative to replacing the entire cabinet system, allowing homeowners to revitalize their kitchens without the expense and disruption of a full remodel. While traditional restaining methods often involve sanding, there are techniques that allow for restaining kitchen cabinets without sanding, preserving the original cabinet structure and simplifying the process.
This article provides a detailed guide on how to restain kitchen cabinets without sanding. It explores the necessary materials, preparation steps, the application process, and crucial factors to consider for achieving a professional-looking finish. This method is particularly suitable for cabinets with delicate veneers or intricate designs where sanding could cause damage. The key is proper cleaning and the use of bonding primers, which create the necessary surface adhesion for the new stain.
Understanding the Benefits of No-Sand Restaining
The primary advantage of restaining kitchen cabinets without sanding lies in its preservation of the existing finish and the cabinet's structural integrity. Sanding can remove the original veneer layer, especially on cabinets constructed with thin wood or MDF (Medium-Density Fiberboard) cores. It can also damage intricate detailing or raised panels. No-sand methods eliminate this risk, making them ideal for cabinets with delicate features or those made of lower-quality materials. Furthermore, the no-sand approach significantly reduces the amount of dust generated, simplifying cleanup and minimizing the mess associated with traditional refinishing projects. The process is faster and less labor-intensive, making it a worthwhile option for DIY enthusiasts seeking to refresh their kitchens efficiently.
Moreover, certain older cabinets might contain lead-based paint under the existing finish. Sanding these cabinets can release harmful lead dust into the air, posing a health hazard. By avoiding sanding, this risk is mitigated, allowing for a safer renovation process. The use of specialized cleaning agents and bonding primers ensures adequate adhesion for the new stain, even without the creation of a rough surface through abrasion.
Essential Materials and Tools
Restaining kitchen cabinets without sanding requires a specific set of materials and tools to ensure a successful outcome. The following list outlines the necessary items:
*Degreaser:
A strong degreaser is crucial for removing grease, oil, and grime buildup on the cabinets. Look for a product specifically designed for kitchen surfaces. *Cleaner:
A specialized cabinet cleaner or TSP (Trisodium Phosphate) substitute is necessary for removing residual dirt and preparing the surface for primer. *Scrubbing Pads:
Non-abrasive scrubbing pads will help remove stubborn stains and grime without damaging the existing finish. *Tack Cloths:
Tack cloths are used to remove any remaining dust or debris from the cleaned surfaces before applying primer. *Bonding Primer:
A high-quality bonding primer is the cornerstone of this method, providing a surface that the new stain can adhere to. Choose a primer specifically formulated for slick or glossy surfaces. *Stain:
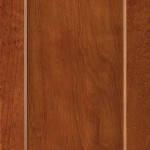
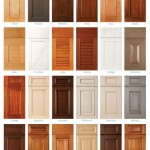
Select a stain that complements your kitchen's décor and suits the type of wood your cabinets are made of. Consider both the color and the type of stain (e.g., gel stain, oil-based stain, water-based stain). *Polyurethane or Topcoat:
A protective topcoat, such as polyurethane, is essential for sealing the stain and providing a durable, water-resistant finish. Choose a finish that matches your desired sheen (e.g., matte, satin, semi-gloss, gloss). *Paintbrushes and/or Foam Brushes:
High-quality paintbrushes or foam brushes are needed for applying the primer, stain, and topcoat. *Lint-Free Rags:
Lint-free rags are essential for wiping away excess stain and achieving a uniform finish. *Drop Cloths:
Drop cloths protect your countertops, floors, and appliances from spills and splatters. *Painter's Tape:
Painter's tape is used to mask off areas that you don't want to stain, such as walls, backsplashes, and cabinet interiors. *Screwdriver or Drill:
A screwdriver or drill is needed to remove doors and hardware from the cabinets. *Safety Glasses and Gloves:
Safety glasses and gloves protect your eyes and skin from chemicals and stains. *Containers:
Clean containers are needed for holding the degreaser, cleaner, primer, stain, and topcoat.Step-by-Step Guide to Restaining Without Sanding
The process of restaining kitchen cabinets without sanding involves careful preparation, application, and finishing. The following steps outline the recommended procedures:
1. Preparation: Removing Hardware and Doors
The first step is to remove all cabinet doors, drawers, and hardware, including knobs, pulls, hinges, and latches. This ensures thorough cleaning and allows for easier access to all surfaces. Label each door and drawer with a corresponding number or letter to ensure they are reinstalled in the correct locations. Store the hardware in labeled bags to prevent loss or confusion. Protect the surrounding work area with drop cloths to prevent spills and splatters.
2. Cleaning: Degreasing and Deep Cleaning
Kitchen cabinets accumulate grease, grime, and food splatters over time, which must be removed before applying primer or stain. Begin by applying a strong degreaser to all cabinet surfaces, inside and out. Allow the degreaser to sit for the recommended time, usually a few minutes, to loosen the grime. Use non-abrasive scrubbing pads to scrub away the grease and dirt. After degreasing, rinse the cabinets thoroughly with water to remove any residue. Next, use a specialized cabinet cleaner or a TSP substitute to deep clean the surfaces. Follow the manufacturer's instructions for the cleaning solution. Again, scrub the cabinets thoroughly and rinse with clean water. Allow the cabinets to dry completely before proceeding to the next step.
3. Surface Preparation: Ensuring Adhesion
Even without sanding, proper surface preparation is critical for ensuring adhesion of the primer and stain. After the cabinets are completely dry, use a tack cloth to remove any remaining dust or debris. Inspect the surfaces for any imperfections, such as scratches or chips. Fill any imperfections with wood filler or patching compound, allowing it to dry completely and then lightly smooth it with a fine-grit sanding sponge (being careful not to remove the existing finish). Clean the filled areas with a tack cloth to remove any dust. The goal is to create a clean, smooth, and dust-free surface for the primer to adhere to.
4. Priming: Applying a Bonding Primer
A high-quality bonding primer is essential for restaining kitchen cabinets without sanding. The primer creates a surface that the new stain can adhere to, even on glossy or slick surfaces. Choose a primer specifically formulated for this purpose. Apply a thin, even coat of primer to all cabinet surfaces using a high-quality paintbrush or foam brush. Pay attention to edges, corners, and intricate details. Avoid applying the primer too thickly, as this can lead to drips and uneven coverage. Allow the primer to dry completely according to the manufacturer's instructions, typically for at least 24 hours. Some primers may require a second coat for optimal adhesion. If so, apply a second thin coat and allow it to dry completely.
5. Staining: Applying the Stain
Once the primer is completely dry, you can begin applying the stain. Choose a stain that complements your kitchen's décor and suits the type of wood your cabinets are made of. Gel stains are often recommended for no-sand projects, as they tend to adhere well and provide even coverage. Apply the stain evenly using a brush, foam applicator, or lint-free cloth. Work in small sections, following the grain of the wood (if applicable). After applying the stain, allow it to sit for the recommended time, typically a few minutes, to allow the pigments to penetrate the primer. Then, use a clean, lint-free rag to wipe away any excess stain. The amount of time you leave the stain on will affect the final color intensity. Experiment on a test area to determine the desired color. Allow the stain to dry completely before proceeding to the next step, typically for at least 24 hours.
6. Finishing: Applying a Protective Topcoat
A protective topcoat, such as polyurethane, is essential for sealing the stain and providing a durable, water-resistant finish. Choose a finish that matches your desired sheen (e.g., matte, satin, semi-gloss, gloss). Apply a thin, even coat of polyurethane to all stained surfaces using a high-quality paintbrush or foam brush. Avoid applying the polyurethane too thickly, as this can lead to drips and uneven coverage. Allow the topcoat to dry completely according to the manufacturer's instructions, typically for at least 24 hours. Lightly sand between coats with a fine-grit sanding sponge (320 grit or higher) to create a smooth surface for the next coat. Clean the sanded surfaces with a tack cloth to remove any dust. Apply a second coat of polyurethane and allow it to dry completely. For added durability, you can apply a third coat, following the same procedure.
Key Considerations for Optimal Results
Several factors contribute to the success of restaining kitchen cabinets without sanding. Careful attention to these considerations will help ensure a professional-looking and long-lasting finish.
1. Thorough Cleaning is Paramount:
Adequate cleaning is the foundation of a successful no-sand restaining project. Ensure that all grease, grime, and dirt are completely removed from the cabinet surfaces before proceeding. Insufficient cleaning can compromise the adhesion of the primer and stain, leading to peeling, chipping, or an uneven finish.2. Choosing the Right Primer is Essential:
The choice of bonding primer is critical for ensuring adhesion on non-porous surfaces. Select a primer specifically formulated for slick or glossy surfaces. These primers contain additives that enhance their ability to grip the existing finish. Read the product labels carefully and follow the manufacturer's instructions for application and drying times.3. Thin Coats are Key:
When applying the primer, stain, and topcoat, apply thin, even coats. Thick coats can lead to drips, runs, and uneven coverage. Multiple thin coats are preferable to a single thick coat. Allow each coat to dry completely before applying the next one.4. Adequate Drying Time is Crucial:
Allow each coat of primer, stain, and topcoat to dry completely according to the manufacturer's instructions. Insufficient drying time can compromise the adhesion and durability of the finish. Resist the temptation to rush the process. Proper drying time ensures that the finish is properly cured and resistant to scratches, water damage, and other wear and tear.5. Proper Ventilation:
Adequate ventilation is essential when working with primers, stains, and topcoats. Open windows and doors to provide fresh air. Consider using a fan to circulate the air. Avoid working in enclosed spaces with poor ventilation, as this can lead to the accumulation of harmful fumes.By following these guidelines and dedicating time to diligent preparation and careful application, homeowners can successfully restain their kitchen cabinets without sanding, achieving a refreshed and revitalized kitchen space without the complexities of a full remodel.

Staining Your Wood Cabinets Darker Young House Love

Gel Stain Kitchen Cabinets Without Sanding Fast Easy Diy

How To Refinish Oak Cabinets Without Stripping Home Painters

How To Refinish Wood Cabinets The Easy Way Love Remodeled

How To Refinish Oak Cabinets Without Stripping Home Painters

How To Paint Kitchen Cabinets Without Sanding Sustain My Craft Habit

How To Refinish Kitchen Cabinets Without Stripping Ron Hazelton

How To Paint Kitchen Cabinets Without Sanding The Budget Decorator

Refinish Kitchen Cabinets Without Stripping

How To Refinish Wood Cabinets The Easy Way Love Remodeled
Related Posts