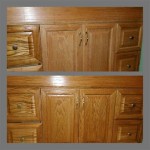
Essential Aspects of Restaining Oak Cabinets: A Step-by-Step Guide
Oak cabinets are a timeless addition to any home. However, over time, they may lose their luster or the finish may become damaged. Restoring the beauty of oak cabinets requires careful preparation and attention to detail. Here's a comprehensive step-by-step guide to help you master the art of restaining oak cabinets:
Step 1: Preparation
Begin by removing all hardware, handles, and knobs from the cabinets. Clean the surfaces thoroughly with a degreaser to remove dirt, grime, and any remaining wax or polish. Protect your work area with drop cloths and ensure proper ventilation.
Step 2: Sanding
Using a medium-grit sandpaper (120-150 grit), lightly sand the cabinets in the direction of the wood grain. This helps remove any existing finish and smooths out imperfections. If the finish is particularly thick or glossy, you may need to use a coarser grit (80-100 grit) initially.
Step 3: Refinishing
Apply a thin coat of wood conditioner to the cabinets. This helps prepare the wood for staining by promoting even absorption and preventing the stain from blotching. Allow the conditioner to dry according to the manufacturer's instructions.
Step 4: Staining
Select a stain that complements the existing wood tone or your desired look. Brush on the stain in thin, even strokes following the wood grain. Wipe off any excess stain with a clean cloth to avoid runs or unevenness. Allow the stain to dry completely.
Step 5: Second Coat (Optional)
If desired, you can apply a second coat of stain to enhance the color or depth. Repeat steps 3 and 4, ensuring to brush in the same direction as the first coat. Allow the second coat to dry thoroughly.
Step 6: Protecting
Once the stain is dry, apply a clear finish to protect the surface and enhance its durability. Polyurethane is a popular choice for its resistance to wear and tear. Brush on a thin coat in the direction of the wood grain, allowing each coat to dry before applying the next. Sand lightly between coats with fine-grit sandpaper (220-240 grit) for a smoother finish.
Step 7: Reassembly
When the finish is completely dry, reinstall the hardware, handles, and knobs. Clean up your work area and enjoy the renewed beauty of your restained oak cabinets.
Additional Tips:
* Test the stain on an inconspicuous area first to ensure the desired result. * Use a high-quality brush for even application of stain and finish. * Allow ample drying time between each step to prevent peeling or bubbling. * Wear appropriate safety gear, including a respirator and gloves, when working with chemicals. * If you encounter any difficulties or imperfections, do not hesitate to consult a professional refinisher for guidance.
Cabinet Refinishing Guide

How To Paint Kitchen Cabinets A Step By Guide Confessions Of Serial Do It Yourselfer

How To Refinish Oak Cabinets Without Stripping Home Painters
/102182203-4cf08265c33b4c4e88fb21315a8fe626.jpg?strip=all "Our Step By Guide To Beautiful Stained Wood Cabinets")
Our Step By Guide To Beautiful Stained Wood Cabinets

Exactly How To Paint Oak Cabinets Written By A Pro Painted Kayla Payne

How To Paint Kitchen Cabinets A Step By Guide Confessions Of Serial Do It Yourselfer

Diy Painted Oak Kitchen Cabinets Makeover

How To Paint Oak Cabinets And Hide The Grain Tutorial

How To Stain Unfinished Cabinets Painting By The Penny

9 Step Guide To Diy Kitchen Cabinet Refinishing
Related Posts