How To Install Wall Cabinets in Your Laundry Room: Ideas and Comprehensive Guide
Installing wall cabinets in a laundry room can dramatically improve storage capacity and organization. This improvement can transform a cluttered and inefficient space into a functional and aesthetically pleasing area. Thoughtful planning, precise execution, and attention to detail are crucial for a successful installation. This article outlines the process of installing wall cabinets in a laundry room, discussing essential tools, preparation steps, installation techniques, and design considerations to ensure optimal results.
Before commencing any installation project, it is paramount to assess the existing laundry room layout and identify specific storage needs. Consider the types of items that will be stored in the cabinets, such as laundry detergents, cleaning supplies, ironing boards, and extra linens. This assessment will dictate the required dimensions, number, and configuration of the wall cabinets. Accurately measuring the available wall space, including the distance between appliances and existing fixtures, will inform the maximum cabinet size and placement. A scale drawing of the laundry room, illustrating the location of appliances, plumbing, electrical outlets, and potential cabinet positions, provides a valuable visual aid throughout the planning process. This detailed plan helps to avoid obstructions and ensures that the installed cabinets integrate seamlessly with the existing room design.
Selecting the appropriate wall cabinets is another critical step. Several factors influence this decision, including the style of the laundry room, the budget allocation, and the desired level of functionality. Pre-assembled cabinets offer convenience and ease of installation, while flat-pack cabinets, requiring assembly, provide a cost-effective alternative. Custom-built cabinets offer the greatest degree of flexibility in terms of size, design, and materials, but typically entail a higher initial investment. Durable materials resistant to moisture and humidity, such as painted wood, laminate, or melamine, are ideal for laundry room environments. Consider features like adjustable shelves, soft-close hinges, and pull-out organizers to enhance the functionality and usability of the cabinets. The chosen cabinet style should complement the overall aesthetic of the laundry room, contributing to a cohesive and visually appealing space. Don’t forget to consider the weight capacity of the chosen cabinets and whether they are suitable for wall mounting. Some cabinets might require additional internal support.
Safety considerations should be prioritized throughout the installation process. Always wear safety glasses to protect the eyes from debris and dust. Use work gloves to prevent hand injuries. When working with power tools, follow the manufacturer's instructions carefully and exercise caution. Ensure that the electrical power to the area is turned off at the circuit breaker before working near electrical outlets or wiring. If there is any doubt about electrical safety, consulting a qualified electrician is highly recommended. When lifting heavy cabinets, enlist the assistance of another person to prevent back strain or other injuries. Clear the work area of any obstructions and maintain a clean and organized environment to minimize the risk of accidents. Always keep a first-aid kit readily available in case of minor injuries.
Essential Tools and Materials
Successful installation hinges on gathering the necessary tools and materials before starting. The following list comprises essential items:
- Stud finder: To locate wall studs for secure cabinet mounting.
- Level (2ft and 4ft): To ensure cabinets are installed straight and plumb.
- Drill/driver: For driving screws and making pilot holes.
- Screwdriver set (Phillips and flathead): For manual adjustments and tightening.
- Tape measure: For accurate measurements and marking.
- Pencil: For marking cabinet positions and screw locations.
- Safety glasses: To protect eyes from debris.
- Work gloves: To protect hands.
- Construction adhesive: For added stability and adhesion to the wall.
- Shims: For leveling cabinets on uneven walls.
- Cabinet screws (appropriate length and gauge): For securing cabinets to wall studs.
- Painter’s tape: To protect wall surfaces from scratches and marks.
- Utility knife: For cutting shims and other materials.
- Ladder or step stool: To reach high areas.
- Dust mask: To avoid inhaling dust particles.
- Optional: Laser level, cabinet jack, hole saw.
Having these items readily available will streamline the installation process and minimize downtime searching for tools.
Preparation of the Wall and Cabinet Placement
Preparatory steps are vital to ensuring a smooth and accurate cabinet installation. The first step involves locating the wall studs using a stud finder. Wall studs are vertical framing members that provide structural support for the wall. Cabinets must be securely attached to these studs to prevent them from falling. Mark the location of each stud using a pencil, extending the mark to the desired height of the cabinets. If the stud spacing is not standard (typically 16 or 24 inches on center), adjustments may be needed to the cabinet placement or additional support may be required.
Next, determine the desired height of the bottom of the wall cabinets. A common practice is to leave approximately 18 to 24 inches of space between the countertop and the bottom of the cabinets. This provides adequate workspace and prevents the cabinets from interfering with countertop appliances. Use a level to draw a horizontal line along the wall at the desired height, serving as a reference point for the bottom of the cabinets. This line will help to ensure that the cabinets are installed at a consistent height and are level.
Before installing the cabinets, inspect the wall surface for any imperfections, such as bumps, holes, or uneven areas. Use a scraper or sandpaper to smooth out any irregularities. Fill any holes with patching compound and allow it to dry completely before sanding it smooth. This will ensure that the cabinets sit flush against the wall and provide a stable mounting surface. Clean the wall surface with a damp cloth to remove any dust or dirt that may interfere with the adhesion of the construction adhesive. Applying painter's tape along the reference line and adjacent surfaces can protect the wall from scratches and marks during the installation process. It is also a good idea to account for any plumbing or electrical wiring that might be hidden in the wall, potentially interfering with the cabinet installation location.
Step-by-Step Cabinet Installation
With the preparation complete, the actual installation can proceed. Begin by lifting the first cabinet into position, aligning the bottom edge with the reference line marked on the wall. Enlist the help of another person to hold the cabinet in place while you proceed with the mounting process. Alternatively, a cabinet jack can be used to support the cabinet's weight.
Use a level to ensure that the cabinet is perfectly level both horizontally and vertically. If the wall is uneven, use shims to level the cabinet. Insert shims between the cabinet and the wall at the stud locations until the cabinet is level. Once the cabinet is level, pre-drill pilot holes through the cabinet's mounting rails into the wall studs. The pilot holes should be slightly smaller than the diameter of the cabinet screws. This will prevent the wood from splitting and make it easier to drive the screws.
Apply a bead of construction adhesive to the back of the cabinet where it contacts the wall. This will provide additional adhesion and stability. Drive the cabinet screws through the pilot holes and into the wall studs. Use a drill/driver to drive the screws until they are snug but not overtightened. Overtightening the screws can damage the cabinet or the wall. Check the level of the cabinet again to ensure that it has not shifted during the screwing process. Make any necessary adjustments using shims.
Repeat the process for the remaining cabinets, ensuring that each cabinet is level and aligned with the adjacent cabinets. Use clamps to hold the cabinets together while they are being screwed to the wall. This will ensure that the cabinets are flush and aligned properly. Once all the cabinets are installed, remove any excess construction adhesive with a damp cloth. Inspect the installation for any gaps or imperfections. Fill any gaps with caulk and smooth it out with a wet finger. Touch up any scratches or marks with paint or stain.
After the main installation, focus on the details that enhance functionality and aesthetics. Install shelves, drawers, or other internal organizers within the cabinets according to the manufacturer's instructions. Ensure that all hardware, such as knobs and pulls, is securely attached and complements the overall design. Consider adding under-cabinet lighting to illuminate the countertop and provide additional task lighting. This can significantly improve the functionality of the laundry room.
Finally, conduct a thorough inspection of the completed installation. Check that all cabinets are securely mounted, level, and properly aligned. Ensure that all doors and drawers open and close smoothly. Verify that all hardware is properly installed and functional. Clean the cabinets and the surrounding area to remove any dust or debris. With proper planning and execution, installing wall cabinets in a laundry room can create a more organized, functional, and visually appealing space.
Laundry Room Cabinet Ideas and Design Considerations
Beyond the technical aspects of installation, consider these design ideas to maximize the utility and visual appeal of your laundry room cabinets:
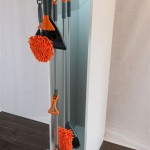
Vertical Storage: Tall, narrow cabinets are excellent for storing ironing boards, mops, brooms, or even hanging clothes. Consider installing a retractable ironing board within a taller cabinet for added convenience.
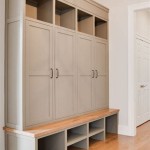
Open Shelving: Incorporate open shelving for frequently used items like detergents, fabric softeners, or decorative baskets. This provides easy access and a visual break from closed cabinets.
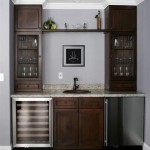
Countertop Integration: Design the cabinet layout to incorporate a countertop section, providing a convenient surface for folding clothes or sorting laundry. Position this section near the washer and dryer for efficiency.
Pull-Out Features: Consider pull-out shelves or baskets for easy access to items stored deep within the cabinets. These are especially useful for storing laundry supplies or small appliances.
Matching Design: Coordinate the cabinet style and finish with the overall aesthetic of your home. Consider using similar hardware and color palettes to create a cohesive look.
Hidden Hampers: Integrate a pull-out hamper into the cabinet design to conceal dirty laundry and keep the room looking tidy.
Good lighting is essential. Combine general ambient lighting with task lighting focused on the work areas. Undercabinet lighting is a practical addition.
By carefully considering these design aspects and integrating them into the cabinet installation process, your laundry room can become a more efficient and attractive space.

Adding Inexpensive Painted Cabinets In Our Laundry Room

6 Efficient Laundry Room Design Tips For Your Home

Laundry Room Makeover For Under 100

Adding Inexpensive Painted Cabinets In Our Laundry Room

Installing Wall Cabinets In Laundry

52 Best Laundry Room Ideas And Layouts To Maximize Space
:max_bytes(150000):strip_icc()/laundry-room-barn-door-58499db4da8d41b3a9d606b9d519f789.jpg?strip=all "24 Laundry Room Cabinet Ideas For A Pretty Clutter Free Space")
24 Laundry Room Cabinet Ideas For A Pretty Clutter Free Space

15 Laundry Room Cabinet Ideas For Maximum Function And Style

Laundry Room Cabinets Benefits And How To S

Small Laundry Room Makeover Taryn Whiteaker Designs
Related Posts