How to Make Your Own Cabinets
Creating custom cabinets offers a unique opportunity to personalize spaces and tailor storage solutions to specific needs. While the process demands precision and patience, the satisfaction of building cabinets from scratch, combined with potential cost savings, makes it an attractive project for many homeowners and DIY enthusiasts. This article outlines the key steps involved in designing, constructing, and installing custom cabinets.
### Planning and DesignThe foundation of any successful cabinet project lies in meticulous planning and design. This phase involves accurately measuring the space, determining the cabinet layout, and selecting materials. Careful consideration during the planning stage minimizes errors and ensures a functional and aesthetically pleasing finished product.
Begin by taking precise measurements of the area where the cabinets will be installed. Measure height, width, and depth at multiple points, accounting for any irregularities in the walls or floor. These measurements will dictate the overall dimensions of the cabinet frames and components.
Next, determine the desired cabinet layout. Consider the function of each cabinet, the type of items to be stored, and the accessibility requirements. Sketch out different layout options, paying attention to door and drawer placement. Software-based design tools, both free and paid, can be utilized to create detailed 3D models, enabling visualization of the final product before construction begins.
Material selection is a critical aspect of the design phase. Common cabinet materials include plywood, medium-density fiberboard (MDF), and solid wood. Plywood offers a balance of strength and affordability, making it a popular choice for cabinet boxes. MDF provides a smooth surface ideal for painting and intricate detailing. Solid wood offers a premium aesthetic and durability, but it can be more expensive and require specialized tools for working with it. Consider carefully the material attributes and budget constraints to determine the best fit for the project.
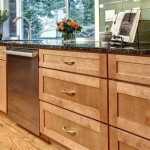
Finally, select the desired cabinet style. Options range from traditional face-frame cabinets to modern frameless (Euro-style) cabinets. Face-frame cabinets feature a solid wood frame attached to the front of the cabinet box, providing added strength and a classic look. Frameless cabinets, also known as Euro-style cabinets, offer a clean, minimalist aesthetic with doors and drawers directly attached to the cabinet box. The chosen style will influence the construction techniques and hardware requirements.
### ConstructionOnce the design is finalized and materials are procured, the construction phase begins. This involves cutting the cabinet components, assembling the boxes, and installing doors and drawers. Accuracy and attention to detail are paramount during this phase to ensure the cabinets are structurally sound and visually appealing.
Begin by cutting the cabinet components according to the dimensions specified in the design. Use a table saw or circular saw equipped with a sharp blade to achieve clean, accurate cuts. Prioritize safety by wearing appropriate protective gear, including safety glasses and hearing protection. For larger projects, a track saw can provide increased accuracy and control when cutting large sheets of material.
Assemble the cabinet boxes using screws, nails, or a combination of both. Apply wood glue to the joints before fastening to create a stronger, more durable bond. Ensure that the boxes are square and level during assembly. Clamps can be used to hold the pieces in place while the glue dries and the fasteners are secured. Consider using pocket-hole joinery, which offers a strong and concealed method for joining cabinet components.
Install the cabinet backs, which provide structural support and prevent racking. The back can be made from plywood, MDF, or a thinner material like hardboard. Attach the back to the cabinet box using screws or nails and glue. Ensure that the back is flush with the edges of the box. For larger cabinets, consider adding a center stile to the back for added support.
Construct the drawers using similar techniques as the cabinet boxes. Cut the drawer sides, front, back, and bottom according to the dimensions specified in the design. Assemble the drawer box using screws, nails, or dovetail joints. Dovetail joints offer a strong and aesthetically pleasing connection, but they require specialized tools and techniques. Attach the drawer bottom to the drawer box using glue and fasteners. Ensure that the drawer box is square and level.
Install drawer slides to the cabinet boxes. The type of drawer slides selected will determine the load capacity and the smoothness of the drawer operation. Ball-bearing slides are a popular choice for their smooth operation and durability. Mount the drawer slides to the cabinet box and the drawer sides, following the manufacturer's instructions. Test the drawer operation to ensure that it opens and closes smoothly.
Install the cabinet doors. The type of door hinges selected will determine the door overlay and the ease of adjustment. Concealed hinges are a popular choice for their clean look and adjustability. Mount the hinges to the cabinet doors and the cabinet frames, following the manufacturer's instructions. Adjust the hinges to ensure that the doors are aligned properly and close smoothly. Consider using soft-close hinges, which prevent the doors from slamming shut.
### Finishing and InstallationThe final stage involves finishing the cabinets and installing them in the designated space. Proper finishing enhances the appearance of the cabinets and protects them from damage. Careful installation ensures that the cabinets are level, secure, and functional.
Prepare the cabinet surfaces for finishing by sanding them smooth. Use progressively finer grits of sandpaper to remove any imperfections and create a smooth, even surface. Clean the surfaces thoroughly to remove any dust or debris. Apply a primer to the surfaces to provide a better base for the finish coat. Allow the primer to dry completely before proceeding.
Apply the desired finish to the cabinets. Common finishes include paint, stain, and varnish. Paint provides a durable and customizable finish that can be matched to any color. Stain enhances the natural grain of the wood and provides a warm, rich look. Varnish provides a protective layer that resists scratches and moisture. Apply the finish in thin, even coats, allowing each coat to dry completely before applying the next. Lightly sand between coats to create a smooth, even finish.
Install the cabinets in the designated space. Begin by locating the wall studs using a stud finder. Mark the locations of the studs on the wall. Lift the cabinets into place and align them with the wall studs. Use shims to level the cabinets as needed. Secure the cabinets to the wall studs using screws. Ensure that the cabinets are securely fastened to the wall before proceeding.
Install the countertops. Countertops can be made from a variety of materials, including laminate, solid surface, granite, and quartz. Follow the manufacturer's instructions for installing the countertop material selected. Ensure that the countertop is level and securely fastened to the cabinets. Seal the edges of the countertop to prevent moisture damage.
Install the hardware, including knobs, pulls, and handles. Select hardware that complements the style of the cabinets and provides a comfortable grip. Mark the locations for the hardware and drill pilot holes as needed. Attach the hardware to the cabinet doors and drawers using screws. Test the operation of the doors and drawers to ensure that the hardware is properly installed.
Finally, add any finishing touches, such as trim molding or light fixtures. Trim molding can be used to conceal gaps and create a more polished look. Light fixtures can be installed under the cabinets to provide task lighting. Clean the cabinets thoroughly to remove any dust or debris. The newly constructed cabinets are now ready for use.

Diy Kitchen Cabinets Made From Only Plywood

Build Your Own Cabinets Without Expensive Tools Houseful Of Handmade

Build Your Own Cabinets Without Expensive Tools Houseful Of Handmade

Homemade Modern Ep86 Kitchen Cabinets

How To Build Cabinets

How To Build Cabinets In Under 30mins The Easy Way

How To Build Cabinets The Complete Guide Houseful Of Handmade

How To Diy Build Your Own White Country Kitchen Cabinets

How To Build Cabinets

21 Diy Affordable Ways To Redo Kitchen Cabinets Extra Space Storage
Related Posts