How to Stain Honey Oak Cabinets Darker
Honey oak cabinets, once a popular choice for kitchens and bathrooms, can sometimes feel dated and lack the desired depth and richness. Fortunately, staining honey oak cabinets darker can revitalize their appearance and bring them into a more modern aesthetic. This process involves stripping the existing finish, applying a darker stain, and sealing the new finish to protect it. While it requires some time and effort, the transformation is well worth it.
Preparing the Cabinets
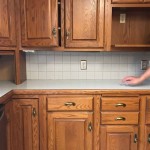
Before embarking on the staining process, it is crucial to thoroughly prepare the cabinets. This involves removing all hardware, such as knobs, handles, and hinges, and cleaning the surfaces. To remove any existing finish, a chemical stripper is typically used. Apply the stripper according to the manufacturer's instructions, ensuring it is evenly spread across the surface. Allow the stripper to sit for the recommended time, then scrape it off with a putty knife. After removing the stripper, clean the surfaces thoroughly with mineral spirits to remove any residue. Once the surfaces are clean and dry, they are ready for sanding.
Sanding the cabinets is essential for creating a smooth surface that will allow the stain to adhere properly. Start with a coarse-grit sandpaper (80-100 grit) to remove any remaining imperfections or unevenness. Gradually progress to finer grits, such as 120 and 180 grit, for a smoother finish. Pay attention to edges and corners, ensuring they are sanded evenly. After sanding, use a tack cloth to remove any dust particles, leaving the surface clean and ready for staining.
Applying the Stain
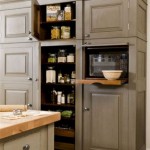
Choosing the right stain color is crucial for achieving the desired look. Consider the overall style of your kitchen or bathroom and select a shade that complements it. Darker shades, such as walnut, espresso, or mahogany, will provide a dramatic transformation. Lighter shades, such as cherry or ebony, can create a subtler, more contemporary feel.
Once the stain color is chosen, apply it evenly to the cabinet surfaces using a brush, rag, or foam applicator. Follow the stain manufacturer's instructions for drying time and application methods. Be sure to work in small sections for best results and to avoid streaks or unevenness. If you are using a water-based stain, be mindful of the drying time, as it may dry more quickly than oil-based stains.
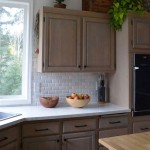
After the stain dries, inspect the cabinets closely. If the color is not dark enough, apply a second coat of stain. Allow each coat to dry thoroughly before proceeding to the next. Once you are satisfied with the color, you can move on to sealing the stain.
Sealing the Stain
Sealing the stain protects the new finish from water, scratches, and other damage. Polyurethane is a popular choice for sealing stained cabinets. It offers durability, protection, and a clear finish that enhances the beauty of the stain. It is available in both oil-based and water-based formulas. Oil-based polyurethane provides a more durable finish but has a longer drying time. Water-based polyurethane is faster drying but may not be as durable.
Apply the polyurethane using a brush, roller, or spray gun. Follow the manufacturer's instructions for drying time and application methods. Ensure that the polyurethane is applied evenly and that there are no drips or runs. Once the polyurethane is dry, apply a second coat for extra protection. After the final coat of polyurethane dries, you can reinstall the hardware and enjoy your newly stained cabinets.

Staining Your Wood Cabinets Darker Young House Love

Before After A Honey Oak Cabinet Refinished Ehow

5 Ideas How To Update Oak Or Wood Kitchen Cabinets Part 1 Staining

Staining Oak Cabinets An Espresso Finish Faq S Monica Benavidez

Just Stained The Honey Oak Cabinets Darker And Added Trim To Top Bottom Thanks My Awesome Hub Painting

How To Upgrade Dated Honey Oak Cabinets Hometalk

How I Updated My Oak Cabinets Without Paint By Using Briwax Easy Budget Kitchen Makeover Only 24

How To Update Oak Cabinets With Briwax

From To Great A Tale Of Painting Oak Cabinets

How To Glaze Cabinets With Gel Stain Adventures Of A Diy Mom
Related Posts